# PIR v4 Manual

# Introduction

The Introduction provides an overview of the Camtraptions PIR Sensor v4 — explaining how passive infrared detection works, what’s new in this version, and how the sensor integrates into a camera-trap setup. It offers essential background for understanding the purpose and advantages of the PIR v4 system.

# What is a PIR Motion Sensor?

All objects emit invisible infrared radiation. A **Passive Infrared (PIR)** sensor detects changes in infrared energy within its field of view—such as when a warm-bodied animal passes in front.

The term <span class="s1">**“passive”**</span> refers to the fact that the sensor does not emit any radiation itself—it simply monitors the infrared radiation naturally emitted by objects in its surroundings. This makes PIR sensors extremely energy-efficient and reliable for long-term use in the field.

In a camera-trap setup, the PIR sensor’s role is to <span class="s1">**detect an animal’s presence and automatically trigger the connected photographic equipment**</span>, such as a DSLR or mirrorless camera. This enables the capture of high-quality photographs and video footage of wildlife with minimal human disturbance.

# What is New in Version 4?

Version 4 of the <span class="s1">**Camtraptions Passive Infrared (PIR) Motion Sensor**</span> represents a significant upgrade over previous models, introducing enhanced flexibility, usability, and performance. The following are the key new features and improvements:

#### **Dual-Sensor System**

Version 4 features **dual PIR sensors**—two independent detectors offering maximum flexibility.:

- <span class="s1">**Long-range sensor**</span> – Equipped with a narrow, high-focal-length lens for detecting animals at greater distances within a precise, narrow field of view. This allows extremely fine control over the trigger zone, ideal for carefully framed shots.
- <span class="s1">**Wide-angle sensor**</span> – Designed with a broader field of view for detecting animals earlier as they approach the sensor. While its range is shorter and its trigger zone less precise, this sensor is ideal for video and for open environments where animal positioning in the frame is less critical.

Each sensor can be <span class="s1">**controlled independently**</span>. Users can adjust their relative sensitivities, enable or disable either sensor, or assign different functions—such as using the wide sensor to <span class="s1">**wake connected camera equipment**</span> and the far sensor to <span class="s1">**trigger it**</span>.

![pirv4.png](https://docs.camtraptions.com/uploads/images/gallery/2025-10/scaled-1680-/pirv4.png)

#### **New User Interface**

A built-in <span class="s1">**display screen and button pad**</span> provide an intuitive, menu-driven setup process. Users can easily configure parameters such as:

- Number of photos per detection and frame rate
- Length of video recordings
- Wireless channel
- Sensitivity levels
- Operating hours and many other settings

This marks a major step forward in ease of use compared with previous generations.

![lcd_screen.png](https://docs.camtraptions.com/uploads/images/gallery/2025-10/scaled-1680-/lcd-screen.png)

#### **Clock Integration**

The new <span class="s1">**clock**</span> allows precise scheduling of the sensor’s active hours. Users can define a specific time window—down to the minute—when the sensor should operate, offering greater control and efficiency in the field.

#### **Improved Battery System**

Version 4 introduces support for <span class="s1">**NP-F lithium-ion batteries**</span>, which are widely used in photographic equipment and easy to source. With the largest NPF batteries, the standby of the sensor time equals or exceeds the previous model.

A <span class="s1">**6xAA to NP-F battery adapter**</span> (purchased separately) allows the sensor to be powered by six AA batteries as an alternative. Batteries are easily and quickly swapped by opening the rear compartment and sliding them in or out.

The battery voltage can be checked quickly from the [home screen](https://docs.camtraptions.com/books/pir-v4-manual/page/the-home-screen "Home screen").

#### **Firmware Upgradability**

Version 4 now supports <span class="s1">**firmware updates via microSD card**</span>, enabling users to easily install future software improvements and feature enhancements without returning the unit for servicing.

#### **Enhanced Connectivity and Durability**

Version 4 remains compatible with both <span class="s2">**wired and wireless triggering methods**</span>, giving users the flexibility to connect their cameras and flashes using cables or <span class="s2">**Camtraptions Wireless Receivers**</span>. The sensor works seamlessly with existing <span class="s2">**wireless channels and accessories**</span>, ensuring full backward compatibility with previous systems.

Several other refinements further improve robustness and versatility:

- Improved **weather sealing** and an integrated **silica gel** cavity provide enhanced protection against moisture and humidity in challenging environments.
- Optional <span class="s1">**external power input**</span> for long-term installations
- New <span class="s1">**signal output and power input connectors**</span> compatible with existing cables, while also supporting an upgraded <span class="s1">**screw-lock waterproof cable system**</span> for a more secure connection
- Dual <span class="s1">**tripod mounting points**</span> on the base for added stability, especially when used with <span class="s1">**Camtraptions Jungle Mounts**</span>, allowing two screws to lock the sensor’s orientation securely

# Overview of the Sensor

The Camtraptions PIR Sensor v4 features a thoughtfully designed layout that balances functionality, durability, and ease of use. On the <span class="s1">**front**</span>, there are <span class="s1">**two motion sensors**</span>—one equipped with a <span class="s1">**built-in indicator light**</span> that is enabled during setup to show when motion is detected.

On the <span class="s1">**back**</span>, you’ll find the <span class="s1">**display screen and keypad**</span>, which includes the <span class="s1">**power (on/off) button**</span>. The <span class="s1">**rear side**</span> is also the <span class="s1">**battery door**</span>, which can be opened using the <span class="s1">**catch on the top**</span> to access the internal battery compartment.

<span class="s2">The </span>**underside**<span class="s2"> of the unit includes </span>**dual tripod mounting sockets**<span class="s2"> for secure installation, as well as the </span>**wired output socket**<span class="s2"> and </span>**DC power input**<span class="s2">, both protected by </span>**weather-sealed rubber cable bungs**<span class="s2">.</span>

On the <span class="s1">**sides**</span> of the sensor are <span class="s1">**adjustable flaps**</span> that can be used to limit or refine the field of view of the sensors for more precise control. Beneath the <span class="s1">**right-hand flap**</span> is a small <span class="s1">**bung**</span> that covers the <span class="s1">**microSD card slot**</span>, which is used for firmware updates.

![pir_front_label.png](https://docs.camtraptions.com/uploads/images/gallery/2025-10/scaled-1680-/pir-front-label.png)

![pir_back_label.png](https://docs.camtraptions.com/uploads/images/gallery/2025-10/scaled-1680-/pir-back-label.png)

The information in this manual corresponds to firmware version {{@0tag:Firmware Version}}. You can check the firmware version, and update it if necessary, by following the procedures on the [firmware update](https://docs.camtraptions.com/books/pir-v4-manual/page/firmware-update "Firmware Update") page.

# Getting Started

This section covers the fundamental steps for preparing your PIR Sensor for use — including powering, connecting, mounting, and aiming the unit. It guides you through initial setup so you can quickly get the sensor operational and ready for deployment in the field.

# Powering Your Sensor

The Camtraptions PIR Sensor v4 can be powered in several different ways, offering flexibility for a wide range of field conditions and setup durations.

![pir_battery.png](https://docs.camtraptions.com/uploads/images/gallery/2025-10/scaled-1680-/pir-battery.png)

#### **1. NPF-Type Rechargeable Battery**

The primary power option is a <span class="s2">**Sony-type NP-F lithium-ion battery**</span>, a widely available and reliable standard used across the photographic industry. The PIR v4 is compatible with NP-F batteries up to the size of an NP-F970 and with a maximum height of 60mm. Note that some third-party manufacturers produce NP-F batteries with built-in USB-charging ports that exceed this height and will not fit inside the sensor.

NP-F batteries are <span class="s2">**sold separately**</span>, as they are easy to source locally from most camera or video equipment suppliers. Place the battery into the battery tray, about 1cm away from its fully engaged position. Apply slight downward force to ensure that the central locking tab in the battery tray is fully depressed and, at the same time, push the battery forward until it clicks into place.

To remove the battery, simply pull it backwards.

#### **2. AA Battery Adapter**

As an alternative, the sensor can be powered using <span class="s2">**six AA batteries**</span> installed in a <span class="s2">**6xAA to NP-F battery adapter**</span> (sold separately). The adapter fits into the same mounting slot as the NP-F battery. This option provides flexibility in situations where rechargeable lithium batteries are not available or convenient to use.

To install, insert the adapter in the same way as an NP-F battery, ensuring it is seated securely before closing the rear door. The individual AA cells may be removed/inserted while keeping the adapter in-situ inside the PIR v4, or alternatively the entire adapter can be removed in the same way as an NP-F battery.

#### **3. External DC Power Input**

For extended deployments or fixed installations, the sensor can also be powered via the <span class="s2">**DC input jack**</span> located on the underside of the unit. The sensor accepts <span class="s2">**DC input voltages from 4V to 12V**</span>.

For added reliability in the field, the sensor is compatible with <span class="s2">**Camtraptions Waterproof Screw-lock DC connectors**</span>, which provide a more secure and weather-resistant connection.

<p class="callout warning">Ensure that any **internal battery** is **removed** from within the PIR v4 before an **external battery** or power source is connected to the sensor. Internal batteries cannot be connected and used at the same time as an external power supply. The only exception to this is if you are connecting a small external solar panel to trickle charge 6x Ni-MH AA batteries inside the PIR v4.</p>

# Connecting Your Camera

The Camtraptions PIR Sensor v4 can trigger your camera in two ways: <span class="s1">**wirelessly**</span> or via a <span class="s1">**wired connection**</span>. Both methods are compatible with DSLR and mirrorless cameras that feature an external shutter-release socket.

#### **1. Wireless Connection (Default)**

The sensor includes a built-in <span class="s1">**wireless transmitter**</span> that communicates with <span class="s1">**Camtraptions Wireless Receivers**</span>. This is the simplest and most flexible way to set up your camera trap.

- The wireless transmitter is <span class="s1">**enabled by default**</span> and set to <span class="s1">**Channel 1**</span>.
- You can change the channel via the [<span class="s1">**Wireless Channel**</span>](https://docs.camtraptions.com/books/pir-v4-manual/page/wireless-channel "Wireless channel") screen in the sensor’s menu.
- Up to <span class="s1">**15 channels**</span> are available, corresponding directly with the 15 channels available on Camtraptions Wireless Receivers.

To establish a connection:

1. Ensure the <span class="s1">**wireless channel**</span> on the sensor matches the <span class="s1">**channel setting**</span> on your wireless receiver.
2. <span class="s1">Plug the </span>**wireless receiver**<span class="s1"> into your camera’s </span>**shutter-release socket**<span class="s1"> using the appropriate </span>**Camtraptions camera connecting cable**<span class="s1">.</span>

The wireless transmitter can be <span class="s1">**disabled**</span> in the menu if you prefer to operate the sensor via a wired connection.

#### **2. Wired Connection**

Alternatively, the sensor can be connected directly to the camera using a <span class="s1">**wired cable**</span>.

- The camera output socket is located on the <span class="s1">**underside**</span> of the sensor and protected by a <span class="s1">**weather-sealing rubber bung**</span>.
- <span class="s1">Use the **Camtraptions Screw-lock Waterproof Cable for PIR Sensor v4** to connect the sensor to your camera’s shutter-release socket. Ensure that the black silicone sealing band on the waterproof cable's connector jack is seated evenly around the connector barrel. Plug in the cable and screw on the locking nut to fasten. **Do not over-tighten the cable's locking nut** - excessive force is not required to make a good seal.</span>

A robust and highly reliable direct connection is now created between the sensor and the camera.
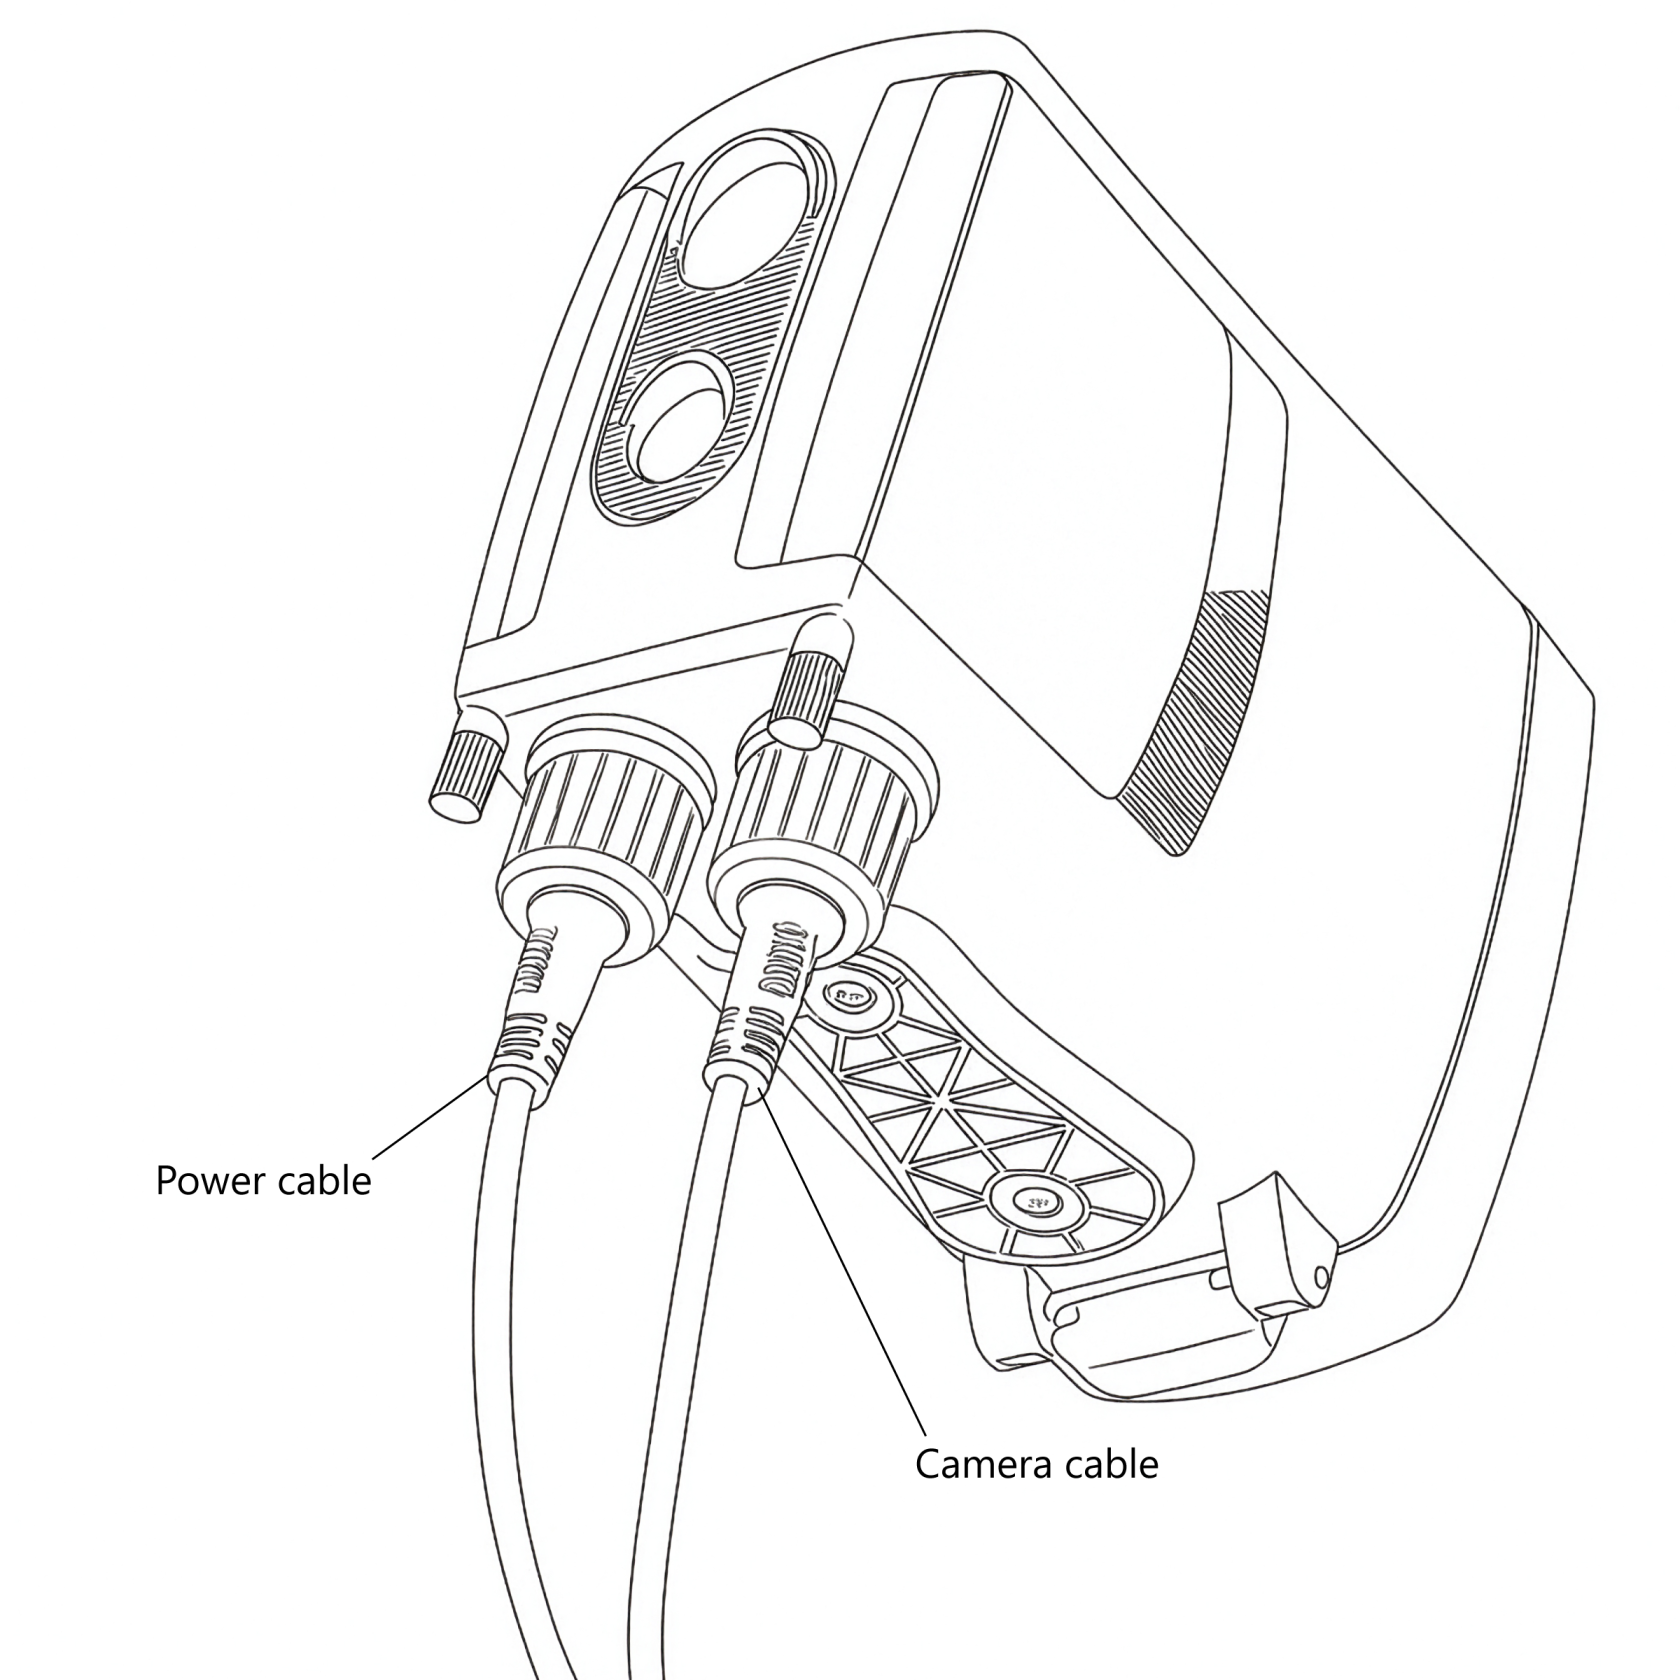
![PIRcables.png](https://docs.camtraptions.com/uploads/images/gallery/2025-10/scaled-1680-/pircables.png)

<span class="s1">A standard </span>**Camtraptions camera connecting cable** or **sensor extension cable** can also be plugged into the sensor, but using these basic cables instead of the dedicated waterproof cable system will void the warranty of the PIR Sensor v4, as its weather-sealing will not be maintained.

##### **Waterproof Cable Connection Tips**

- Even if only one of the waterproof connection types is being utilised, e.g. camera trigger signal output and not the external power input - it is recommended to securely fit **both ends** of the Screw-lock Waterproof Cable to the PIR v4. This ensures both of the sensor's ports and the cable's connectors are sealed against moisture and dirt, maintaining complete weather protection for the sensor and cable.
- If access is restricted, removing the side flap and thumbscrew can make it easier to tighten or loosen the cable nut securely.
- <span class="s1">Additional Camtraptions Waterproof Cables and adapters will be necessary to complete the connection to the camera.</span>

#### **3. Choosing Between Wireless and Wired**

Both connection types have advantages, depending on your setup requirements:

<table id="bkmrk-connection-type-adva" style="width: 100%;"><thead><tr><th style="width: 16.9249%;">**Connection Type**</th><th style="width: 41.5973%;">**Advantages**</th><th style="width: 41.4778%;">**Considerations**</th></tr></thead><tbody><tr><td style="width: 16.9249%;">**Wireless**</td><td style="width: 41.5973%;">Fast and simple setup. No long cables between camera and sensor, allowing greater flexibility in positioning. Reduces risk of cables being pulled, damaged, or chewed by animals.</td><td style="width: 41.4778%;">Wireless receiver consumes additional power, impacting total standby time of the setup.</td></tr><tr><td style="width: 16.9249%;">**Wired**</td><td style="width: 41.5973%;">Very power-efficient. Does not require a powered receiver. Immune to wireless interference and blocked or weak wireless signals.</td><td style="width: 41.4778%;">Requires a physical cable connection, limiting placement flexibility and adding potential for cable damage or disturbance.</td></tr></tbody></table>

In most cases, the <span class="s1">**wireless setup**</span> is preferred for its simplicity and flexibility, particularly when the sensor needs to be positioned several metres away from the camera. However, a <span class="s1">**wired setup**</span> is ideal when power efficiency is the priority or when the sensor and camera are mounted close together.

Camtraptions Wireless Receivers are designed for <span class="s1">**exceptional energy efficiency**</span>, making long-term wireless setups (lasting weeks or even months) possible when paired with larger batteries or solar power systems.

# Mounting Your Sensor

The Camtraptions PIR Sensor v4 features <span class="s1">**two tripod sockets**</span> on the underside, providing flexible and secure mounting options for a wide range of setups.

![pir_bottom_label.png](https://docs.camtraptions.com/uploads/images/gallery/2025-10/scaled-1680-/pir-bottom-label.png)

#### **Single-Screw Mounting**

For simple installations—such as when using a <span class="s1">**MightyPod**</span> or a <span class="s1">**third-party tripod**</span>—the sensor can be mounted using just <span class="s1">**one tripod socket**</span>.

#### **Dual-Screw Mounting**

For the most secure and stable mounting, particularly in outdoor or long-term deployments, a <span class="s1">**dual-screw setup**</span> can be used.

This prevents the sensor from twisting or shifting during installation or use. The <span class="s1">**socket spacing**</span> matches the standard used by the <span class="s1">**Camtraptions Jungle Mount System**</span>, enabling the sensor to be mounted on:

- The ground
- Posts or poles
- Tree limbs or trunks

This system provides a robust, flexible solution for positioning the sensor in almost any environment.

<p class="callout warning">When selecting a mounting method, ensure that the chosen mount <span class="s1">**does not obstruct the rear door**</span> of the sensor when it is opened. If the mount prevents the door from opening fully, forcing it may damage the hinge. Always allow sufficient clearance for the door to open freely for battery changes.</p>

# Controlling the Field of View

The <span class="s1">**field of view (FOV)**</span> of the Camtraptions PIR Sensor determines <span class="s1">**where an animal will be when the camera is triggered**</span>, making it a crucial part of composing your images—particularly for still photography. The field of view can be adjusted in several ways to precisely control the trigger zone.

![side_flaps.png](https://docs.camtraptions.com/uploads/images/gallery/2025-10/scaled-1680-/side-flaps.png)

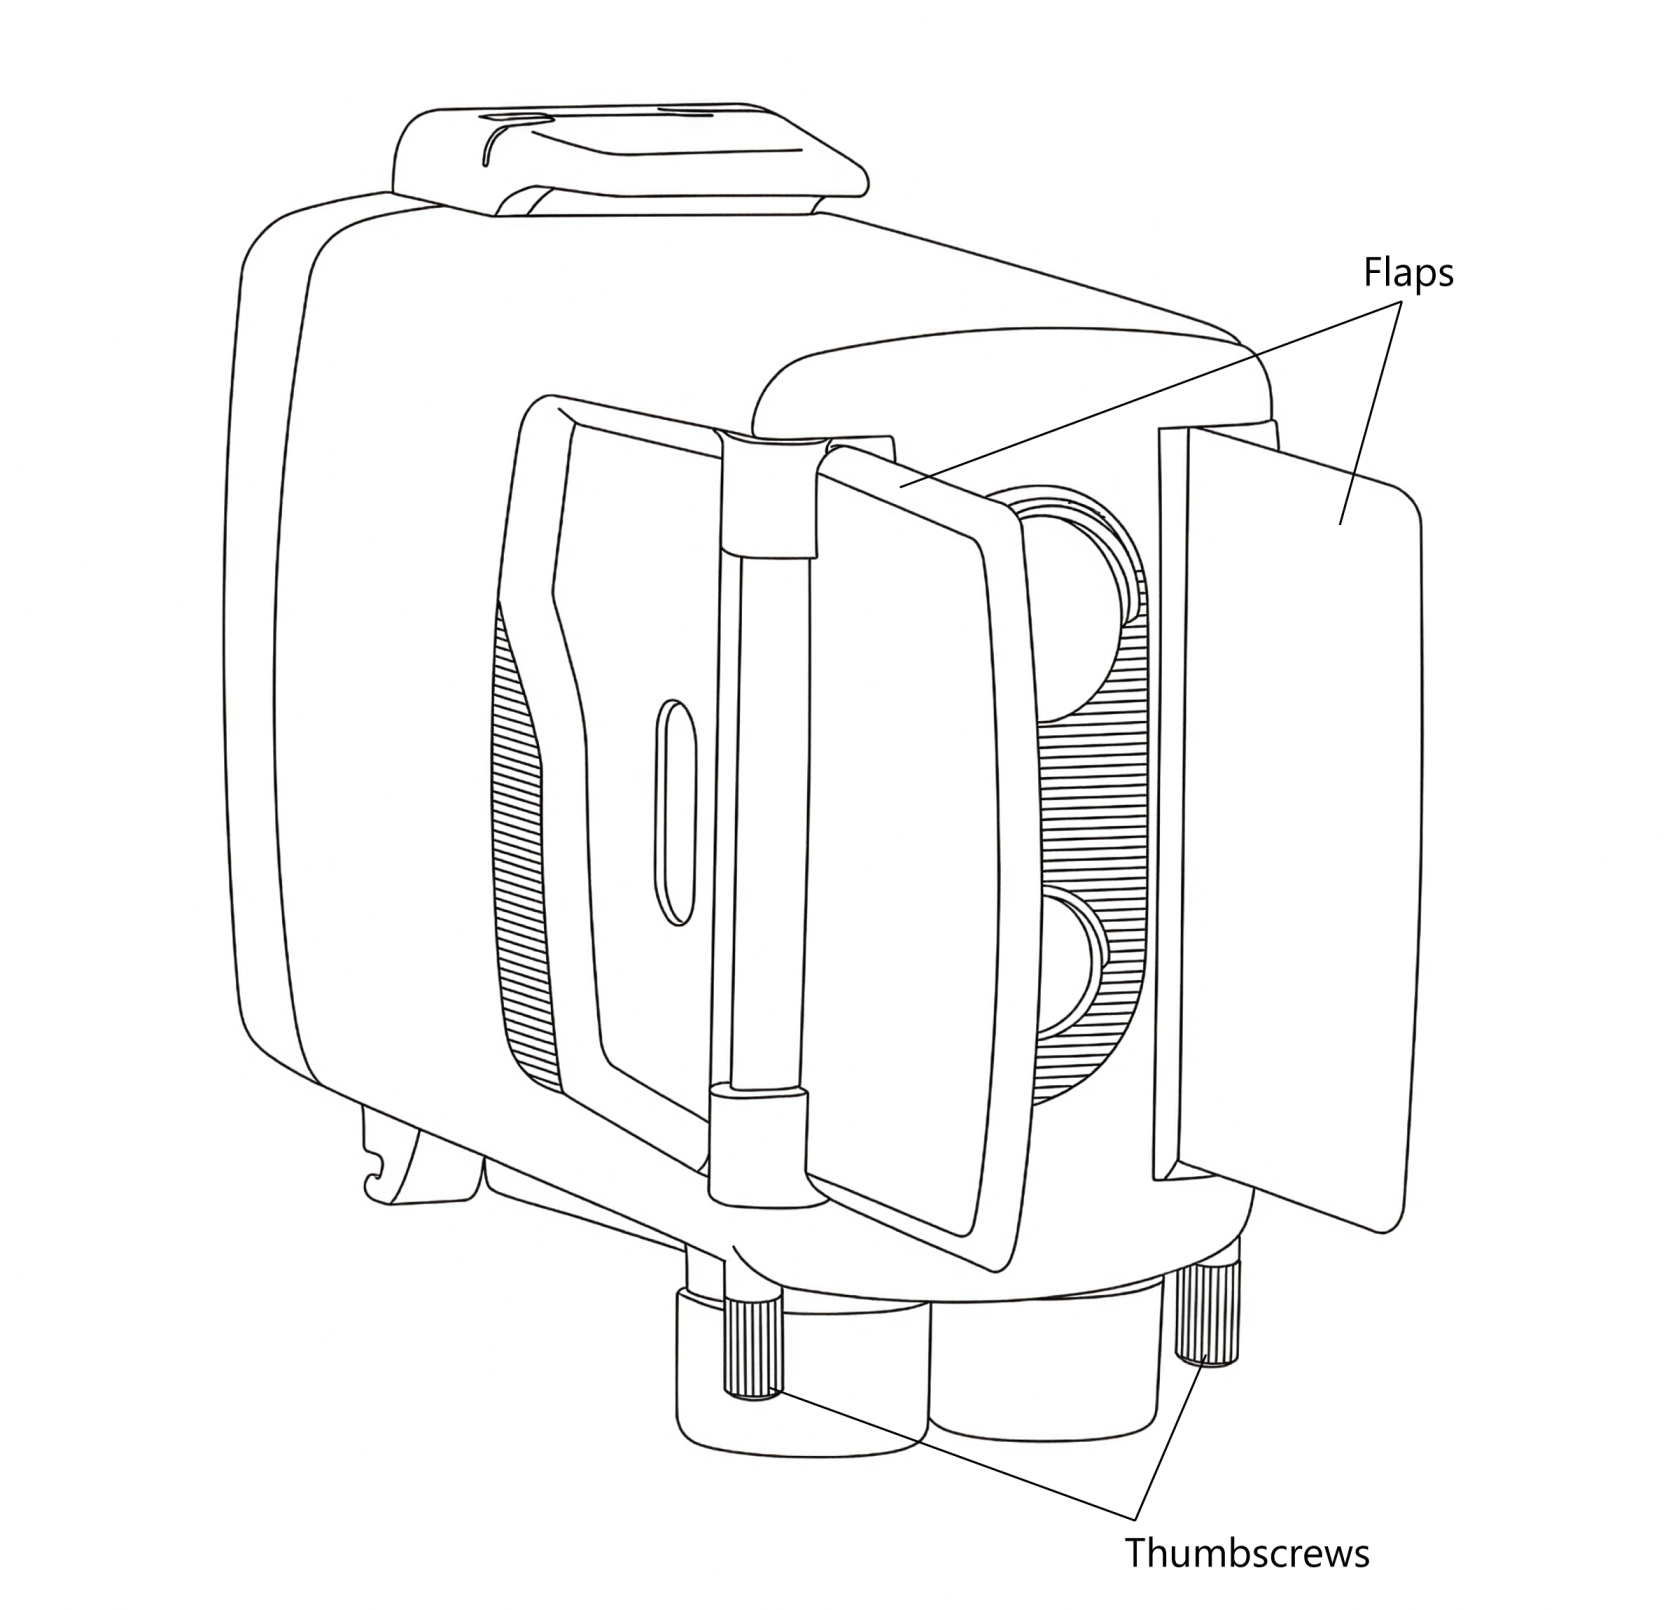
#### **1. Using the Adjustable Side Flaps**

Each side of the sensor is fitted with a<span class="s1"> **flap**</span> or **blinker** that can be used to <span class="s1">**limit the field of view**</span> of the PIR sensors.

By folding the flaps outward, you can block unwanted detection zones to either side, ensuring that the sensor only triggers when an animal is directly in front of it.

To adjust the flaps:

1. **Loosen the thumbscrew**<span class="s1"> on each flap.</span>
2. Rotate the flap into the desired position to restrict the field of view as needed.
3. <span class="s1">**Tighten the thumbscrew**</span> again to hold the flap firmly in place.

For best results, ensure that both flaps are positioned symmetrically, with the sensor aimed at the <span class="s1">**centre of the intended trigger zone**</span>. The PIR elements are most sensitive in the <span class="s1">**middle of their field of view**</span>, so symmetrical adjustment helps ensure that the sensor receives the strongest possible signal.

If you would like to **reduce the field of view** even further than the standard side flap positions allow, then you can undo the thumbscrews fully and **swap the left and right flaps** around. This makes it possible to achieve a very narrow angle resulting in an extremely precise trigger area.

Diagram showing flaps in reversed position:

![flaps-reversed.png](https://docs.camtraptions.com/uploads/images/gallery/2025-11/scaled-1680-/flaps-reversed.png)

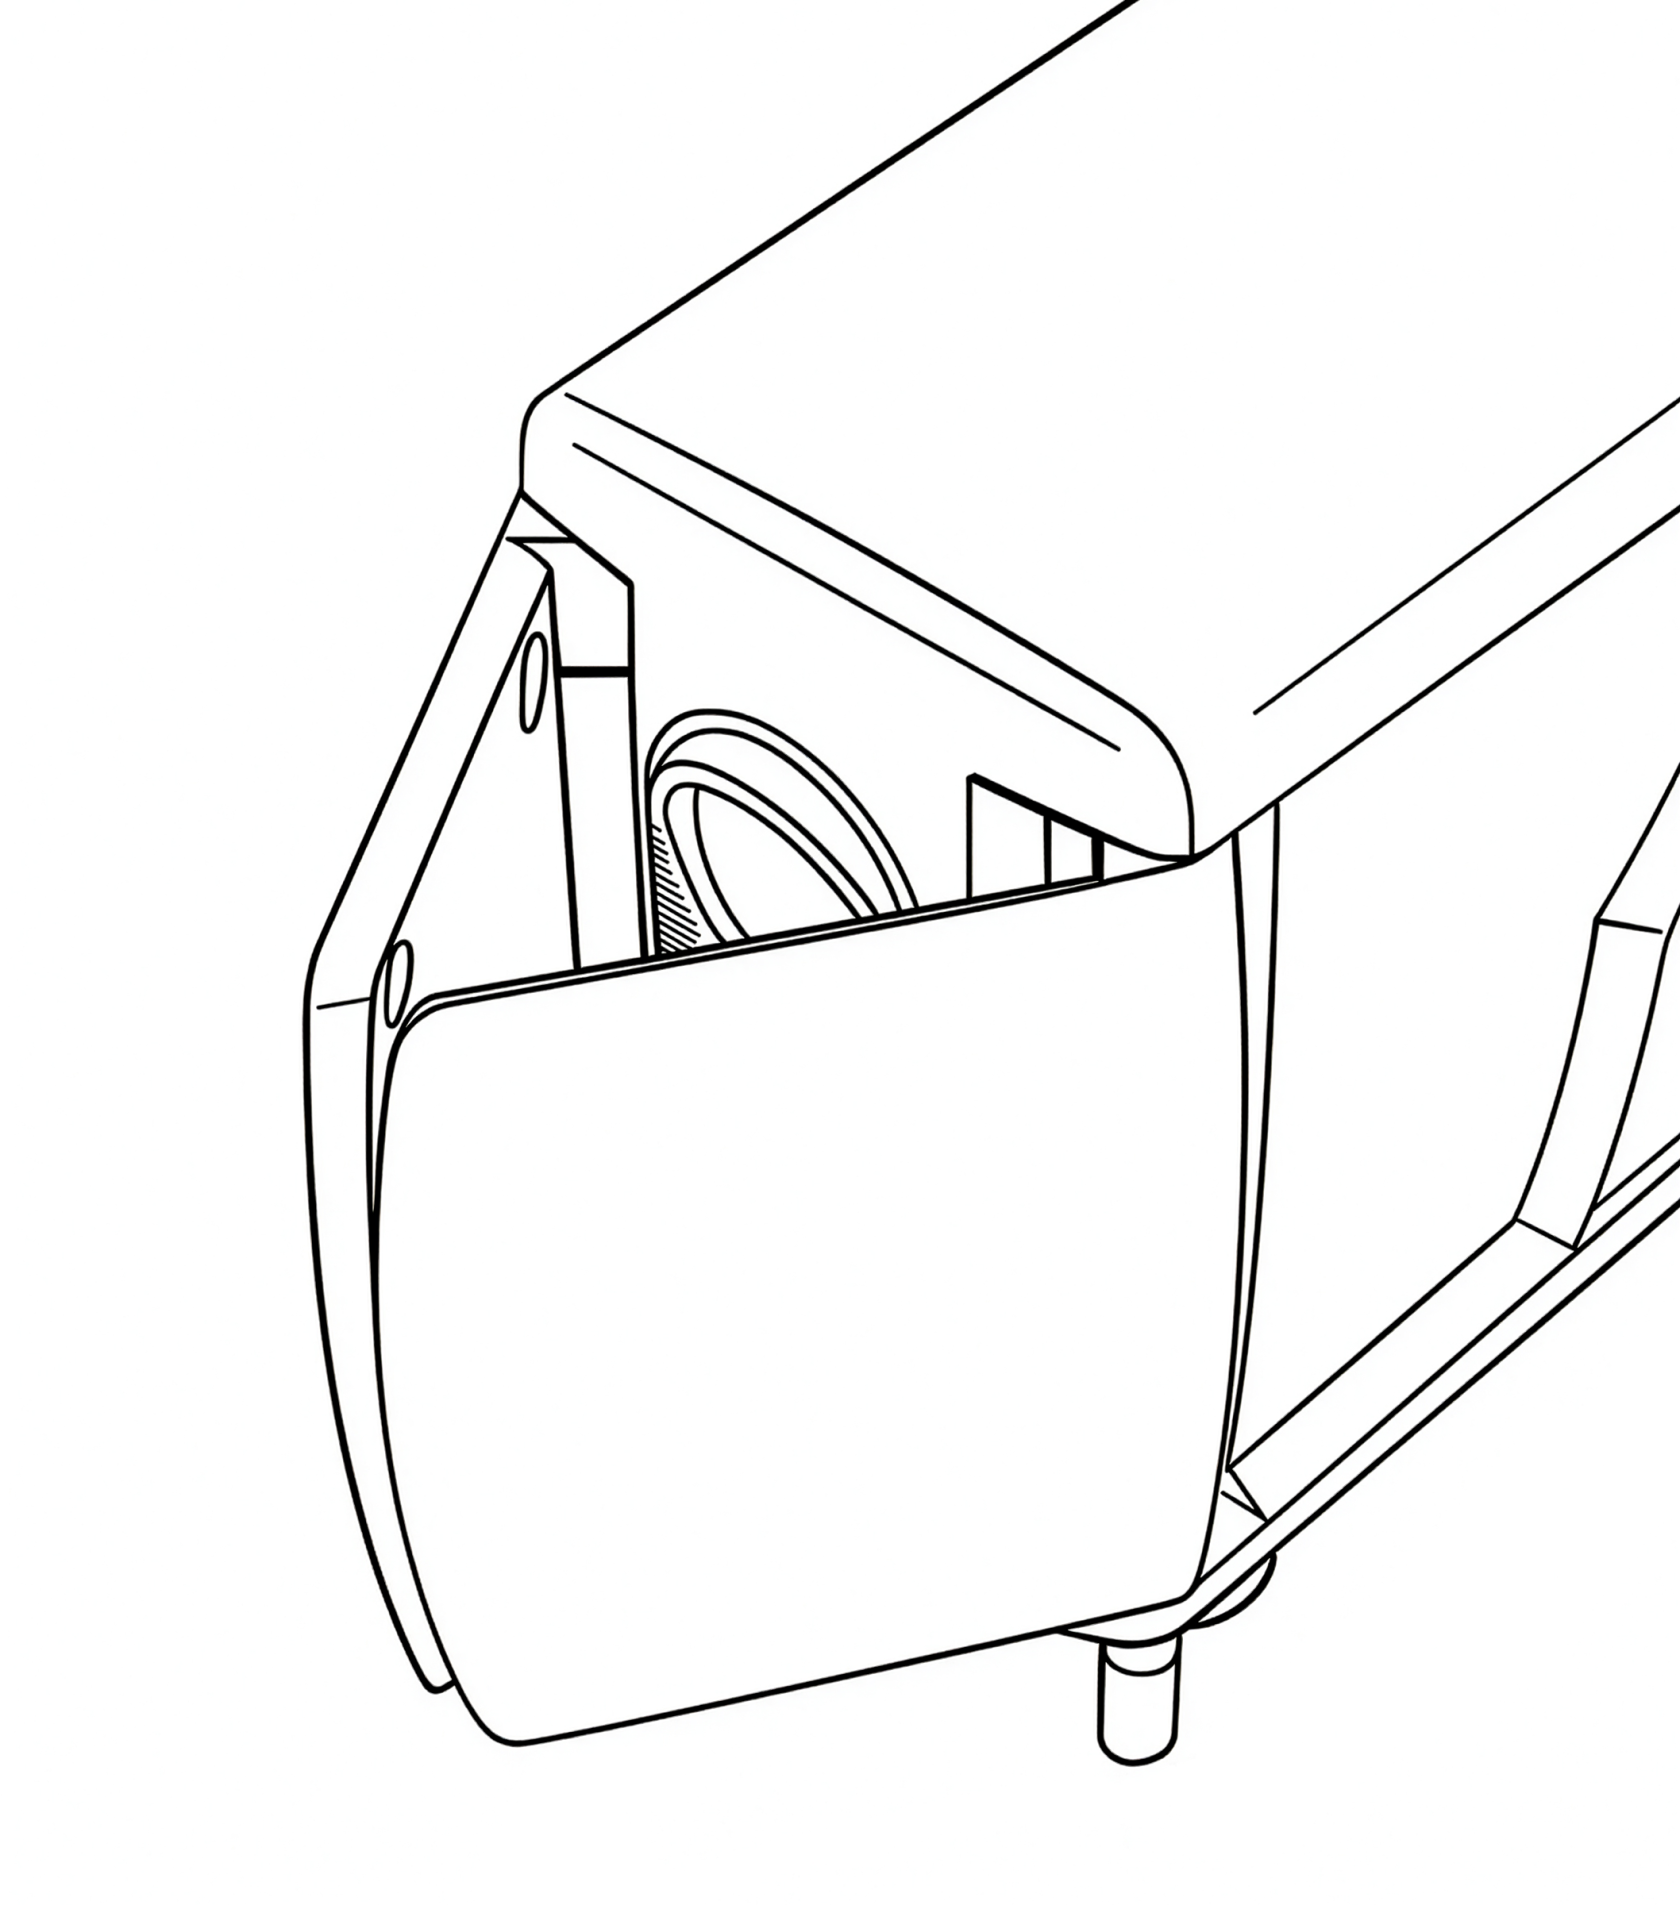
#### **2. Using the Dual-Sensor System**

Version 4 includes <span class="s1">**two separate sensors**</span>, each with a different field of view:

- <span class="s1">**Wide sensor:**</span> approximately <span class="s1">**60° horizontal field of view, 4.5° upward field of view, 13.5° downward field of view**</span> — shorter range but broader coverage.
- <span class="s1">**Far sensor:**</span> approximately <span class="s1">**10° field of view (horizontal &amp; vertical)**</span> — longer range but more precise detection area.

By adjusting the <span class="s1">**relative sensitivity**</span> of these two sensors, or disabling one entirely, you can fine-tune the spread and range of the trigger zone.

It should also be noted that the Wide and Far sensors are both **most sensitive to motion along the horizontal axis** (sideways motion). They are less sensitive to upward/downward motion along the vertical axis.

#### **3. Using the Indicator Light for Setup**

One of the two front sensors includes a <span class="s1">**built-in red indicator light**</span> that can assist with setup. When the light is active, it briefly illuminates whenever motion is detected - helping you see exactly where the trigger zone begins and ends.

To use the indicator light:

1. Turn on the sensor or press any button to <span class="s1">**activate setup mode**</span>.
2. Walk or wave a hand in front of the sensor to observe <span class="s1">**where motion is detected**</span>.
3. Adjust the sensor’s position or flap angles until the trigger zone aligns with your intended composition.

The indicator light remains active for <span class="s1">**five minutes**</span> after the last button press, after which it automatically disables to conserve power. For more details, see the [<span class="s1">**Indicator Light**</span>](https://docs.camtraptions.com/books/pir-v4-manual/page/front-motion-indicator-light "Front motion indicator light") section later in this manual.

# Turning Your Sensor On and Off

The Camtraptions PIR Sensor v4 has been designed for <span class="s1">**maximum reliability in long-term field deployments**</span>. Its power-management system ensures that the sensor automatically recovers from any momentary power interruptions.

#### **Automatic Power-On**

The sensor <span class="s1">**automatically turns on**</span> as soon as power is connected.

This behaviour is intentional and provides an important reliability safeguard. If power is ever <span class="s1">**momentarily interrupted**</span>—for example, by a brief loss of contact with the battery or vibration in the field—the sensor will automatically restart and resume operation without requiring user input. This ensures that your setup continues functioning even after jolts or disconnections.

#### **Manual Power Control**

Once power is connected, the sensor can be <span class="s1">**turned on or off manually**</span> using the <span class="s1">**power button**</span> on the rear keypad:

- To <span class="s1">**turn on**</span>: Tap the power button and the screen will switch on.
- To <span class="s1">**turn off**</span>: Hold the power button again for approximately <span class="s1">**two seconds** </span>until the screen shuts down.

#### **Notes on Power Behaviour**

- Because the sensor automatically powers on when a battery is inserted, it may <span class="s1">**turn itself on during transport**</span> if jostled or vibrated. This is normal and expected behaviour.
- When used in setups powered from a <span class="s1">**central battery**</span> (e.g. a shared DC power supply feeding multiple devices), the sensor will automatically <span class="s1">**power back on**</span> when the central power source is reconnected or replaced.
- In <span class="s1">**solar-powered systems**</span>, this feature ensures the sensor automatically resumes operation once solar charging restores power after an overnight or cloudy-day power loss.

This design guarantees the <span class="s1">**highest possible reliability**</span> in unattended camera-trap installations, ensuring the sensor always returns to active operation when power is restored.

# The Home Screen

When the Camtraptions PIR Sensor v4 is powered on, it will display the <span class="s1">**Home Screen**</span>. This is the default screen shown when the sensor is idle and ready to detect motion. The Home Screen provides key information about the sensor’s current operating state at a glance.

#### **Screen Indicators**

The following elements are displayed on the Home Screen:

- <span class="s1">**S / V Symbol**</span> – Indicates the current <span class="s1">**shooting mode**</span>. 
    - <span class="s1">**S**</span> = Still photo mode
    - <span class="s1">**V**</span> = Video mode
    
    This icon is always visible and lets you confirm at a glance how the sensor will trigger the camera.

<table border="1" id="bkmrk-" style="border-collapse: collapse; width: 100%; border-width: 0px;"><colgroup><col style="width: 50%;"></col><col style="width: 50%;"></col></colgroup><tbody><tr><td style="border-width: 0px;">![screen-s.png](https://docs.camtraptions.com/uploads/images/gallery/2025-10/scaled-1680-/screen-s.png)</td><td style="border-width: 0px;">![screen-v.png](https://docs.camtraptions.com/uploads/images/gallery/2025-10/scaled-1680-/screen-v.png)</td></tr></tbody></table>

- <span class="s1">**Clock Symbol**</span> – Indicates that <span class="s1">**time windows**</span> are enabled.   
    The clock icon only appears when the sensor has been configured to operate during specific times of day. 
    - When the icon is <span class="s1">**visible**</span>, it means the sensor will operate during a specified time window and will be inactive outside those hours. The clock symbol will be accompanied by either **ON** or **OFF**. This provides a convenient indication of whether the sensor is currently inside an active time window (**ON**) and is therefore **working**, or outside an active time window (**OFF**) and is therefore is **disabled**.
    - When the icon is <span class="s1">**not visible**</span>, no time window is set and the sensor will operate continuously.

<table border="1" id="bkmrk--1" style="border-collapse: collapse; width: 100%; border-width: 0px;"><colgroup><col style="width: 50%;"></col><col style="width: 50%;"></col></colgroup><tbody><tr><td style="border-width: 0px;">![screen-hometimeon.png](https://docs.camtraptions.com/uploads/images/gallery/2025-11/scaled-1680-/screen-hometimeon.png)</td><td style="border-width: 0px;">![screen-hometimeoff.png](https://docs.camtraptions.com/uploads/images/gallery/2025-11/scaled-1680-/screen-hometimeoff.png)</td></tr></tbody></table>

- **Camtraptions Logo (bottom-right corner)**<span class="s1"> – Acts as an </span>**activity indicator**<span class="s1">.  
    </span>The logo appears whenever the sensor has detected motion and is executing a sequence of commands, such as triggering a camera to take photos or run a video recording.  
    While the logo is displayed, the sensor is “busy” and will not respond to further detections until the sequence has completed.  
    Once the logo disappears, the sensor has finished the current sequence and is ready to trigger again.  
    *Note:*
    - *The sensor may appear unresponsive while the logo is displayed. This is normal behaviour — it simply means the sensor is running its programmed sequence.*
    - *If a button is pressed while a sequence is running, the sequence will be cancelled and not completed.*

*![screen-activity-logo.png](https://docs.camtraptions.com/uploads/images/gallery/2025-10/scaled-1680-/screen-activity-logo.png)*

#### **Button Shortcuts from the Home Screen**

While on the Home Screen, pressing and holding certain buttons provides quick access to key information:

<table id="bkmrk-button-hold-duration" style="width: 100%;"><thead><tr><th style="width: 10.7271%;">**Button**</th><th style="width: 18.3434%;">**Hold Duration**</th><th style="width: 70.9295%;">**Function**</th></tr></thead><tbody><tr><td style="width: 10.7271%;">**Left**</td><td style="width: 18.3434%;">2 seconds</td><td style="width: 70.9295%;">Displays the current <span class="s1">**time**</span> set on the sensor’s internal clock — useful for quickly confirming the time setting.</td></tr><tr><td style="width: 10.7271%;">**Up**</td><td style="width: 18.3434%;">2 seconds</td><td style="width: 70.9295%;">Displays the current <span class="s1">**battery voltage**</span>, allowing you to check the remaining charge.</td></tr><tr><td style="width: 10.7271%;">**Right**</td><td style="width: 18.3434%;">2 seconds</td><td style="width: 70.9295%;">Displays the <span class="s1">**firmware version**</span>, so you can confirm you’re using the correct manual or check if an update is available.</td></tr></tbody></table>

From the quick access screens, wait 20 seconds or press any arrow key to return to the home screen.

#### **Battery Voltage Reference**

When viewing the battery voltage, the displayed value provides an indication of the remaining battery charge. The relationship between voltage and capacity varies depending on the battery type and chemistry. For convenience, detailed [<span class="s2">**battery voltage reference tables**</span>](https://docs.camtraptions.com/books/pir-v4-manual/page/battery-voltage-tables "Battery Voltage Tables") are provided at the end of this manual, showing how measured voltage corresponds to approximate remaining charge for different compatible battery types.

# Front Motion Indicator Light

The <span class="s1">**Front Motion Indicator Light**</span> is a useful tool for <span class="s1">**testing the sensor’s field of view and detection range**</span> during setup. When active, the light flashes <span class="s1">**red**</span> through the white PIR lens whenever motion is detected, helping you visualise exactly when and where the sensor is responding.

The indicator light remains active for <span class="s1">**five minutes**</span> after the sensor is first powered on or after any button is pressed. It then automatically <span class="s1">**disables**</span> to conserve power and to prevent the light from drawing attention to the sensor while it is deployed in the field.

The light is <span class="s1">**bright and visible**</span> in a wide range of lighting conditions, making it effective for setup in both indoor and outdoor environments.

![frontlight.png](https://docs.camtraptions.com/uploads/images/gallery/2025-10/scaled-1680-/frontlight.png)

For practical guidance on using the indicator light to refine the trigger area, see the [<span class="s1">**Controlling the Field of View**</span>](https://docs.camtraptions.com/books/pir-v4-manual/page/controlling-the-field-of-view "Controlling the Field of View") section of this manual.

# Navigating the Menu

The Camtraptions PIR Sensor v4 features a simple and intuitive <span class="s1">**menu system**</span> that allows you to adjust all key settings directly from the built-in screen and keypad.

When the menu is inactive, the screen will revert to the <span class="s1">**Home Screen**</span>. To access the menu, press the <span class="s1">**Left**</span> or <span class="s1">**Right**</span> buttons to cycle through the available screens. The list of menu screens will differ depending on whether the sensor is set to <span class="s1">**Still Photo Mode**</span> or <span class="s1">**Video Mode**</span>.

#### **Adjusting a Setting**

1. Navigate to the desired menu screen using the <span class="s1">**Left**</span> or <span class="s1">**Right**</span> buttons.
2. Press the <span class="s1">**Up**</span> or <span class="s1">**Down**</span> button — the setting’s value will begin to <span class="s1">**flash**</span>.
3. Use the <span class="s1">**Up**</span> or <span class="s1">**Down**</span> buttons to adjust the value to your preference.
4. Press the <span class="s1">**Set**</span> (centre) button to <span class="s1">**save**</span> the change.

If you move to another screen while a value is still flashing (without pressing <span class="s1">**Set**</span>), the change will <span class="s1">**not**</span> be saved.

When you reach the end of the available screens, the menu will loop back to the <span class="s1">**Home Screen**</span> automatically.

#### **Additional (Hold) Functions**

Some menu screens have <span class="s1">**secondary functions**</span> that can be accessed by <span class="s1">**holding**</span> the <span class="s1">**Up**</span> or <span class="s1">**Down**</span> buttons. For example:

- **Sensor configuration screens (Far / Wide):**
    
    Holding the <span class="s1">**Up**</span> button cycles the sensor mode between <span class="s1">**Enabled**</span>, <span class="s1">**Disabled**</span>, and <span class="s1">**Wake-Only**</span>.
- **Wireless Channel screen:**
    
    Holding the <span class="s1">**Down**</span> button <span class="s1">**disables**</span> the wireless transmitter completely, switching the sensor to wired-only operation.

Refer to the individual <span class="s1">**Settings**</span> sections later in this manual for detailed descriptions of each menu screen and the available configuration options.

# Setting the Operating Mode (Stills or Video)

The <span class="s2">**Set Mode**</span> screen allows you to choose whether the sensor operates in <span class="s2">**Still Mode**</span> or <span class="s2">**Video Mode**</span>. This determines which set of menu screens and settings will be available.

<table border="1" id="bkmrk-" style="border-collapse: collapse; width: 100%; border-width: 0px;"><colgroup><col style="width: 50%;"></col><col style="width: 50%;"></col></colgroup><tbody><tr><td style="border-width: 0px;">![screen-set-mode.png](https://docs.camtraptions.com/uploads/images/gallery/2025-10/scaled-1680-/screen-set-mode.png)</td><td style="border-width: 0px;">![screen-set-mode-v.png](https://docs.camtraptions.com/uploads/images/gallery/2025-10/scaled-1680-/screen-set-mode-v.png)</td></tr></tbody></table>

#### **Changing the Operating Mode**

1. From the <span class="s1">**Home Screen**</span>, press the <span class="s1">**Left Arrow**</span> once to reach the <span class="s1">**Set Mode**</span> screen.
2. Use the <span class="s1">**Up**</span> or <span class="s1">**Down**</span> buttons to toggle between: 
    - <span class="s1">**S**</span> — *Still Mode*
    - <span class="s1">**V**</span> — *Video Mode*

#### **Notes**

- The <span class="s1">**current mode**</span> is always shown on the <span class="s1">**Home Screen**</span> as either <span class="s1">**S**</span> (Still) or <span class="s1">**V**</span> (Video).
- Changing mode will update the available menu screens to show the relevant settings for that mode.

# Stills Mode

This section describes all settings specific to still photography. It explains how the sensor controls the number of frames, frame rate, and timing sequences, as well as how to optimise your camera and flash setup for reliable results across lighting conditions.

# Still Mode Menu Overview

When the sensor is set to <span class="s2">**Still Mode**</span>, pressing the <span class="s2">**right arrow**</span> from the Home Screen will cycle through the following menu screens in order. Each screen allows adjustment of a key parameter controlling how the sensor detects motion and triggers the camera. After the final screen, the menu loops back to the Home Screen.

1. [<span class="s1">**Wireless Channel**</span>](https://docs.camtraptions.com/books/pir-v4-manual/page/wireless-channel "Wireless Channel") – Set or disable the wireless transmission channel used to communicate with Camtraptions receivers.
2. [<span class="s1">**Wide Sensor**</span>](https://docs.camtraptions.com/books/pir-v4-manual/page/wide-sensor "Wide Sensor") – Control the behaviour and relative sensitivity of the wide-angle PIR sensor.
3. [<span class="s1">**Far Sensor**</span>](https://docs.camtraptions.com/books/pir-v4-manual/page/far-sensor "Far Sensor") – Control the behaviour and relative sensitivity of the narrow-field, long-range PIR sensor.
4. [<span class="s1">**Num (Number)**</span>](https://docs.camtraptions.com/books/pir-v4-manual/page/still-mode-settings "Still Mode Settings") – Define how many photos the sensor will take per detection (1–6).
5. [<span class="s1">**FPS (Frames Per Second)**</span>](https://docs.camtraptions.com/books/pir-v4-manual/page/still-mode-settings "Still Mode Settings") – Set the shooting interval between frames (0.25–3 fps).
6. [<span class="s1">**Gap**</span>](https://docs.camtraptions.com/books/pir-v4-manual/page/gap-time "Gap Time") – Specify a retrigger delay between sequences to control how soon the sensor is able to reactivate.
7. [<span class="s1">**Wake**</span>](https://docs.camtraptions.com/books/pir-v4-manual/page/wake-time "Wake Time") – Set a wake-up period to give cameras or flashes time to power up before triggering.
8. [<span class="s1">**Set Time**</span>](https://docs.camtraptions.com/books/pir-v4-manual/page/set-clock-time "Set Clock Time") – Adjust the sensor’s internal clock for accurate time-based functions.
9. [<span class="s1">**Time Mode**</span>](https://docs.camtraptions.com/books/pir-v4-manual/page/enable-time-windows "Enable Time Windows") – Enable or disable time windows that limit when the sensor is active.
10. [<span class="s1">**Set On Time**</span>](https://docs.camtraptions.com/books/pir-v4-manual/page/set-on-time "Window On Time") – Define the time of day when the sensor becomes active.
11. [<span class="s1">**Set Off Time**</span>](https://docs.camtraptions.com/books/pir-v4-manual/page/set-off-time "Window Off Time") – Define the time of day when the sensor becomes inactive.
12. [<span class="s1">**External Wake**</span>](https://docs.camtraptions.com/books/pir-v4-manual/page/external-wake "External Wake") – Schedule periodic half-press pulses to prevent connected equipment from sleeping.
13. [<span class="s1">**Set Mode**</span>](https://docs.camtraptions.com/books/pir-v4-manual/page/setting-the-operating-mode-stills-or-video "Setting the Operating Mode (Stills or Video)") – Switch between <span class="s1">**Still**</span> and <span class="s1">**Video**</span> operating modes.

After the <span class="s2">**Set Mode**</span> screen, pressing the <span class="s2">**right arrow**</span> again returns to the <span class="s2">**Home Screen**</span>.

# Still Mode Settings

When the sensor is set to <span class="s2">**Still Mode**</span>, two additional menu screens become available: <span class="s2">**Number (NUM)**</span> and <span class="s2">**Frame Rate (FPS)**</span>. These control how many photos are taken and how quickly they are captured when motion is detected.

### **Number (NUM)**

The <span class="s2">**Number**</span> screen lets you choose how many photos the camera will take each time motion is detected.

#### **Adjusting the Number of Photos**

1. From the <span class="s1">**Home Screen**</span>, press the <span class="s1">**Right Arrow**</span> until you reach the <span class="s1">**NUM**</span> screen.
2. Use the <span class="s1">**Up**</span> or <span class="s1">**Down**</span> buttons to select a value between <span class="s1">**1**</span> and <span class="s1">**6**</span>.
3. Press the <span class="s1">**Set**</span> button to <span class="s1">**save**</span> your selection.

This value determines the total number of photos that will be captured per detection event.

For example, setting <span class="s2">**NUM = 5**</span> means the camera will take five photos each time the sensor detects motion.

![screen-num-3.png](https://docs.camtraptions.com/uploads/images/gallery/2025-10/scaled-1680-/screen-num-3.png)

### **Frame Rate (FPS)**

The <span class="s2">**Frame Rate (FPS)**</span> screen determines how quickly the photos in each sequence are taken — that is, how many frames are captured per second during a detection event.

#### **Adjusting the Frame Rate**

1. From the <span class="s1">**Home Screen**</span>, press the <span class="s1">**Right Arrow**</span> until you reach the <span class="s1">**FPS**</span> screen.
2. Use the <span class="s1">**Up**</span> or <span class="s1">**Down**</span> buttons to select the desired frame rate.
3. Press the <span class="s1">**Set**</span> button to <span class="s1">**save**</span> your selection.

The available frame rate range is <span class="s2">**0.25 to 3.0 FPS**</span>, where:

- <span class="s1">**3.0 FPS**</span> = Three photos per second (maximum speed).
- <span class="s1">**1.0 FPS**</span> = One photo per second.
- <span class="s1">**0.5 FPS**</span> = One photo every two seconds.
- <span class="s1">**0.25 FPS**</span> = One photo every four seconds (minimum speed).

For example, if <span class="s2">**NUM = 5**</span> and <span class="s2">**FPS = 1.0**</span>, the camera will take five photos over five seconds.

If <span class="s2">**FPS = 2.0**</span>, those same five photos will be captured over 2.5 seconds.

![screen-fps-2.png](https://docs.camtraptions.com/uploads/images/gallery/2025-10/scaled-1680-/screen-fps-2.png)

#### **Notes**

- Higher FPS settings capture faster sequences but may increase camera buffer use and flash cycle demands, and may also be more disturbing to animals when using flash.
- Lower FPS settings conserve battery and flash power and can be useful for monitoring slower-moving subjects.

# Suggested Camera Settings (Stills)

The following guide provides a <span class="s1">**recommended starting configuration**</span> for your camera when using the Camtraptions PIR Sensor v4. These settings are designed to produce reliable, well-exposed results in a wide range of conditions, both <span class="s1">**day and night**</span>.

This configuration is just one example — feel free to experiment with different settings to achieve specific creative effects or adapt to particular lighting conditions.

- <span class="s1">**Focus Mode:**</span> Set the camera to <span class="s1">**Manual Focus**</span> and pre-focus on the point where you expect the animal to trigger the sensor.
- **Drive Mode:** Set the camera to **Single Shot** mode rather than continuous drive. The sensor will automatically control the number of images and frame rate during each trigger sequence.
- <span class="s1">**ISO Setting:**</span> Use <span class="s1">**Auto ISO**</span> so the camera can automatically adjust to changing light levels. 
    - Optional: Limit the <span class="s1">**maximum ISO**</span> to around <span class="s1">**1600 or 3200**</span> to prevent excessive noise at night.
- **Exposure Mode:**<span class="s1"> Set the camera to </span>**Manual Exposure**<span class="s1"> mode.</span>
    - Use a <span class="s1">**shutter speed of 1/200 s**</span> to avoid motion blur or ghosting.
    - Choose an <span class="s1">**aperture of around f/8**</span> to provide sufficient depth of field and ensure the image is not overexposed in bright daylight at base ISO.
- <span class="s1">**Image Stabilisation:**</span> If your lens includes <span class="s1">**image stabilisation (IS)**</span> or <span class="s1">**vibration reduction (VR)**</span>, <span class="s1">**disable it**</span>. (These systems are unnecessary in a stationary setup.)
- <span class="s1">**Power Saving:**</span> Enable the camera’s <span class="s1">**auto power-off**</span> function so it powers down automatically after about <span class="s1">**30 seconds**</span> of inactivity.
- <span class="s1">**Image Review:**</span> Turn <span class="s1">**off automatic image review**</span> after each shot to conserve battery power.
- **Flash Power:**
    - Set each flash to <span class="s1">**manual power mode**</span> and adjust output to correctly expose the subject <span class="s1">**in complete darkness**</span>, based on your chosen manual exposure settings at the <span class="s1">**maximum ISO**</span> expected from Auto ISO.
    - As ambient light increases, the ISO will decrease, and the contribution from the flashes will naturally become less significant.
- <span class="s1">**Image Format:**</span> Shoot in <span class="s1">**RAW**</span> to retain maximum flexibility for adjusting exposure and brightness during post-processing.

This setup offers a dependable baseline that balances <span class="s1">**exposure, responsiveness, and image quality**</span>. Once you have verified that your sensor and flashes are triggering reliably, you can fine-tune exposure settings, flash ratios, or ISO limits to suit your specific environment and creative goals.

# Video Mode

The Video Mode section outlines how to configure the sensor for video recording. It details trigger signal behaviours, extend-on-motion options, and timing parameters. This mode enables reliable video capture of wildlife behaviour using either natural or artificial lighting.

# Video Mode Menu Overview

When the sensor is set to <span class="s1">**Video Mode**</span>, pressing the <span class="s1">**right arrow**</span> from the Home Screen will cycle through the following menu screens in order. Each screen allows configuration of a key parameter controlling how the sensor detects motion and manages video recording. After the final screen, the menu loops back to the Home Screen.

1. [<span class="s1">**Wireless Channel**</span>](https://docs.camtraptions.com/books/pir-v4-manual/page/wireless-channel "Wireless Channel") – Set or disable the wireless transmission channel used to communicate with Camtraptions receivers.
2. [<span class="s1">**Wide Sensor**</span>](https://docs.camtraptions.com/books/pir-v4-manual/page/wide-sensor "Wide Sensor") – Control the behaviour and relative sensitivity of the wide-angle PIR sensor.
3. [<span class="s1">**Far Sensor**</span>](https://docs.camtraptions.com/books/pir-v4-manual/page/far-sensor "Far Sensor") – Control the behaviour and relative sensitivity of the narrow-field, long-range PIR sensor.
4. [<span class="s1">**Time (Recording Length)**</span>](https://docs.camtraptions.com/books/pir-v4-manual/page/video-mode-settings "Video Mode Settings") – Define the duration of each video recording following a detection.
5. [<span class="s1">**Gap**</span>](https://docs.camtraptions.com/books/pir-v4-manual/page/gap-time "Gap Time") – Set a retrigger delay between recordings to manage how soon the sensor is able to reactivate.
6. [<span class="s1">**Extend Time (EXT)**</span> ](https://docs.camtraptions.com/books/pir-v4-manual/page/video-mode-settings "Video Mode Settings")– Enable or disable Extend Mode. When enabled, motion detected during recording resets the timer, extending the clip until motion stops or the maximum limit is reached.
7. [<span class="s1">**Video Mode (Signal Type)**</span>](https://docs.camtraptions.com/books/pir-v4-manual/page/video-mode-settings "Video Mode Settings") – Select the type of control signal used to start and stop video recording, depending on camera brand: *1 Press*, *2 Press*, or *Hold* mode.
8. [<span class="s1">**Wake Time**</span>](https://docs.camtraptions.com/books/pir-v4-manual/page/wake-time "Wake Time") – Configure a wake-up period to give cameras time to power up before recording begins.
9. [<span class="s1">**Set Time**</span>](https://docs.camtraptions.com/books/pir-v4-manual/page/set-clock-time "Set Clock Time") – Adjust the internal real-time clock to ensure accurate time-based operation.
10. [<span class="s1">**Time Mode**</span>](https://docs.camtraptions.com/books/pir-v4-manual/page/enable-time-windows "Enable Time Windows") – Enable or disable time windows that restrict when the sensor is active.
11. [<span class="s1">**Set On Time**</span>](https://docs.camtraptions.com/books/pir-v4-manual/page/set-on-time "Set On Time") – Define the time of day when the sensor becomes active.
12. [<span class="s1">**Set Off Time**</span>](https://docs.camtraptions.com/books/pir-v4-manual/page/set-off-time "Set Off Time") – Define the time of day when the sensor becomes inactive.
13. [**External Wake**](https://docs.camtraptions.com/books/pir-v4-manual/page/external-wake "External Wake") – Schedule periodic half-press pulses to prevent connected equipment from entering deep sleep.
14. [<span class="s1">**Set Mode**</span>](https://docs.camtraptions.com/books/pir-v4-manual/page/setting-the-operating-mode-stills-or-video "Setting the Operating Mode (Stills or Video)") – Switch between <span class="s1">**Video**</span> and <span class="s1">**Still**</span> operating modes.

After the <span class="s1">**Set Mode**</span> screen, pressing the <span class="s1">**right arrow**</span> again returns to the <span class="s1">**Home Screen**</span>.

# Video Mode Settings

When the sensor is set to <span class="s1">**Video Mode**</span>, three additional menu screens become available: <span class="s1">**Recording Time (TIME)**</span>, <span class="s1">**Extend Time (EXT TIME)**</span>, and <span class="s1">**Video Trigger Mode (MODE)**</span>. These settings control how long the camera records, whether recordings are extended when movement continues, and how the sensor communicates with your camera model.

### **Recording Time (TIME)**

The <span class="s1">**Recording Time**</span> screen sets how long the sensor will command the camera to record each time motion is detected.

#### **Adjusting the Recording Time**

1. From the <span class="s1">**Home Screen**</span>, press the <span class="s1">**Right Arrow**</span> until you reach the <span class="s1">**TIME**</span> screen.
2. Use the <span class="s1">**Up**</span> or <span class="s1">**Down**</span> buttons to adjust the recording duration in **seconds**.
3. Press the <span class="s1">**Set**</span> button and then use the <span class="s1">**Up**</span> or <span class="s1">**Down**</span> buttons to adjust the recording duration in **minutes**.
4. Press the <span class="s1">**Set**</span> button to confirm and save.

The duration can be set from <span class="s1">**10 seconds up to 15 minutes 59 seconds**</span> using the same adjustment method as other time-based settings.

This value represents the <span class="s1">**length of each video clip**</span> triggered by motion detection.

![screen-video-time.png](https://docs.camtraptions.com/uploads/images/gallery/2025-10/scaled-1680-/screen-video-time.png)

### **Extend Time (EXT TIME)**

The <span class="s1">**Extend Time**</span> option determines whether new motion detected during a recording will <span class="s1">**extend the recording duration**</span>. The Extend Time will be added to the remaining recording time from the moment that the last motion was detected.

This feature is useful for capturing continuous activity without cutting off prematurely when animals remain in view.

#### **Adjusting the Extend Time**

1. From the <span class="s1">**Home Screen**</span>, press the <span class="s1">**Right Arrow**</span> until you reach the <span class="s1">**EXT TIME**</span> screen.
2. Use the <span class="s1">**Up**</span> or <span class="s1">**Down**</span> buttons to adjust the number of seconds to extend the recording time by, from between 10s and 99s (10s by default).
3. Press the <span class="s1">**Set**</span> button to confirm and save.

#### **Enabling or Disabling Extend Time**

1. Navigate to the <span class="s1">**EXT TIME**</span> screen.
2. Press and **hold** the <span class="s1">**Up**</span> or <span class="s1">**Down**</span> button to toggle between <span class="s1">**ON**</span> and <span class="s1">**OFF**</span>.
3. Press <span class="s1">**Set**</span> to confirm.

![screen-video-ext-time.png](https://docs.camtraptions.com/uploads/images/gallery/2025-10/scaled-1680-/screen-video-ext-time.png)

**Example:**

If the Recording Time is <span class="s1">**1 minute**</span>, the Extend Time is **30 seconds** and new motion is detected **45**<span class="s1"> **seconds**</span> into the recording, then the clip length would be 45s + 30s for a total clip length of <span class="s1">**1 minute 15 seconds**</span>.

<p class="callout info">Note: C Var 6 (see the [<span class="s1">**Custom Variables**</span>](https://docs.camtraptions.com/books/pir-v4-manual/page/custom-variables "Custom Variables") section) can be used to limit the total recording length when Extend Time is enabled.
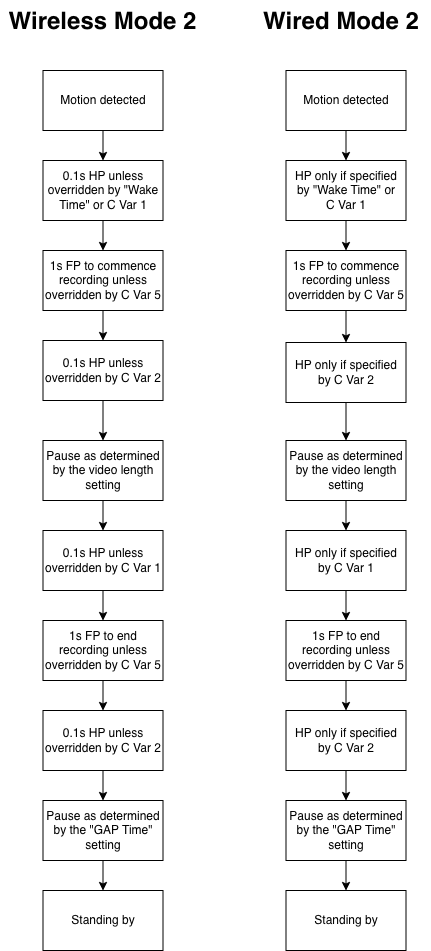
</p>

### **Video Trigger Mode (MODE)**

The <span class="s1">**Video Mode**</span> screen defines how the sensor sends <span class="s1">**start and stop signals**</span> to the camera. Different camera brands and models interpret these signals differently, so selecting the correct mode ensures reliable video triggering.

![screen-video-mode.png](https://docs.camtraptions.com/uploads/images/gallery/2025-10/scaled-1680-/screen-video-mode.png)

<table id="bkmrk-mode-description-com" style="width: 100%;"><thead><tr><th style="width: 16.329%;">**Mode**</th><th style="width: 58.5277%;">**Description**</th><th style="width: 25.1433%;">**Compatible Systems**</th></tr></thead><tbody><tr><td style="width: 16.329%;">**1**</td><td style="width: 58.5277%;">Sends a full-press signal to start recording, then repeats a full-press signal every <span class="s1">**10 seconds**</span> to maintain recording. If more than 10 seconds elapse without a signal, the camera automatically stops recording.</td><td style="width: 25.1433%;">Sony cameras connected to the Camtraptions Sony Video Cable v2.</td></tr><tr><td style="width: 16.329%;">**2**</td><td style="width: 58.5277%;">Sends a full-press signal to start recording and another full-press signal to stop recording.</td><td style="width: 25.1433%;">Most Canon and Nikon mirrorless cameras.
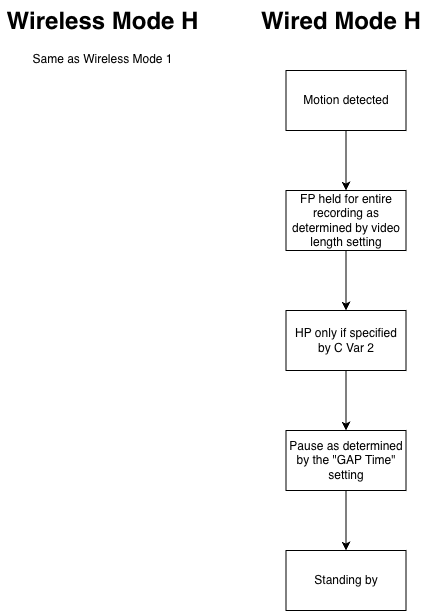
</td></tr><tr><td style="width: 16.329%;">**H**</td><td style="width: 58.5277%;">Sends a **wireless** full-press signal to start recording, then repeats a full-press signal every <span class="s1">**10 seconds**</span> to maintain recording. The sensor holds a **wired** full-press signal for the entire length of the video.</td><td style="width: 25.1433%;">Used to activate equipment requiring a constant full-press signal.</td></tr></tbody></table>

<p class="callout info"><span class="s1">**Mode 1**</span> is typically the most reliable, as it ensures that if any trigger signal is missed, the camera will automatically stop recording instead of continuing indefinitely or becoming out of sync with the sensor’s start/stop commands.</p>

<p class="callout info">**Mode 2** - Many cameras (including Canon and Panasonic models among others) that operate using Mode 2, also need an **intial half-press signal, followed by a pause**, so that they fully wake up first before starting a recording. This initial half-press signal + pause can be added using the global [**Wake Time**](https://docs.camtraptions.com/books/pir-v4-manual/page/wake-time "Wake Time") setting.</p>

<p class="callout warning"><span class="s1">**Mode 2**</span> - If a button on the sensor is pressed during a recording then the sequence will be cancelled and not completed. This means a camera may not receive the stop recording signal and will continue recording unless manually stopped.</p>

# Suggested Camera Settings (Video)

When using the Camtraptions PIR Sensor in <span class="s1">**Video Mode**</span>, camera setup will depend largely on <span class="s1">**creative goals**</span> and <span class="s1">**equipment preferences**</span>. This section focuses on the key settings that ensure <span class="s1">**reliable operation**</span> when the camera is controlled by the sensor, rather than prescribing specific exposure or quality settings.

- <span class="s1">**Focus Mode:**</span> Use <span class="s1">**Manual Focus**</span> and pre-focus on the area where you expect the subject to appear. This prevents focus hunting when the camera is triggered and ensures consistent, sharp results. Use a small aperture to give a larger depth of field where necessary.
- <span class="s1">**Exposure and Quality Settings:**</span> Choose your preferred <span class="s1">**resolution, frame rate, and picture profile**</span> according to creative requirements, memory capacity and power considerations. The sensor will not affect these choices.
- <span class="s1">**Power Saving:**</span> Enable <span class="s1">**Auto Power-Off**</span> after approximately 30 seconds of inactivity to conserve battery life. The <span class="s1">**Wake Time**</span> feature of the sensor can be used (and for some cameras **must** be used) to reawaken the camera before a recording commences.
- <span class="s1">**Stabilisation:**</span> Turn <span class="s1">**off image stabilisation (IS/VR)**</span> on both the camera and lens to avoid unnecessary power use and framing drift.
- **Lights**: For night-time recording, use **continuous lights** rather than flashes. The sensor can trigger **Camtraptions Power Switches** to turn lights on and off using the same wireless signals that control the camera.

<p class="callout info">For Nikon and Canon cameras, the camera’s menu settings must be configured to allow the shutter button to start and stop video recording. Enabling this option ensures the camera can respond correctly to trigger signals sent via the shutter release socket, allowing the sensor to start and stop video recording automatically.</p>

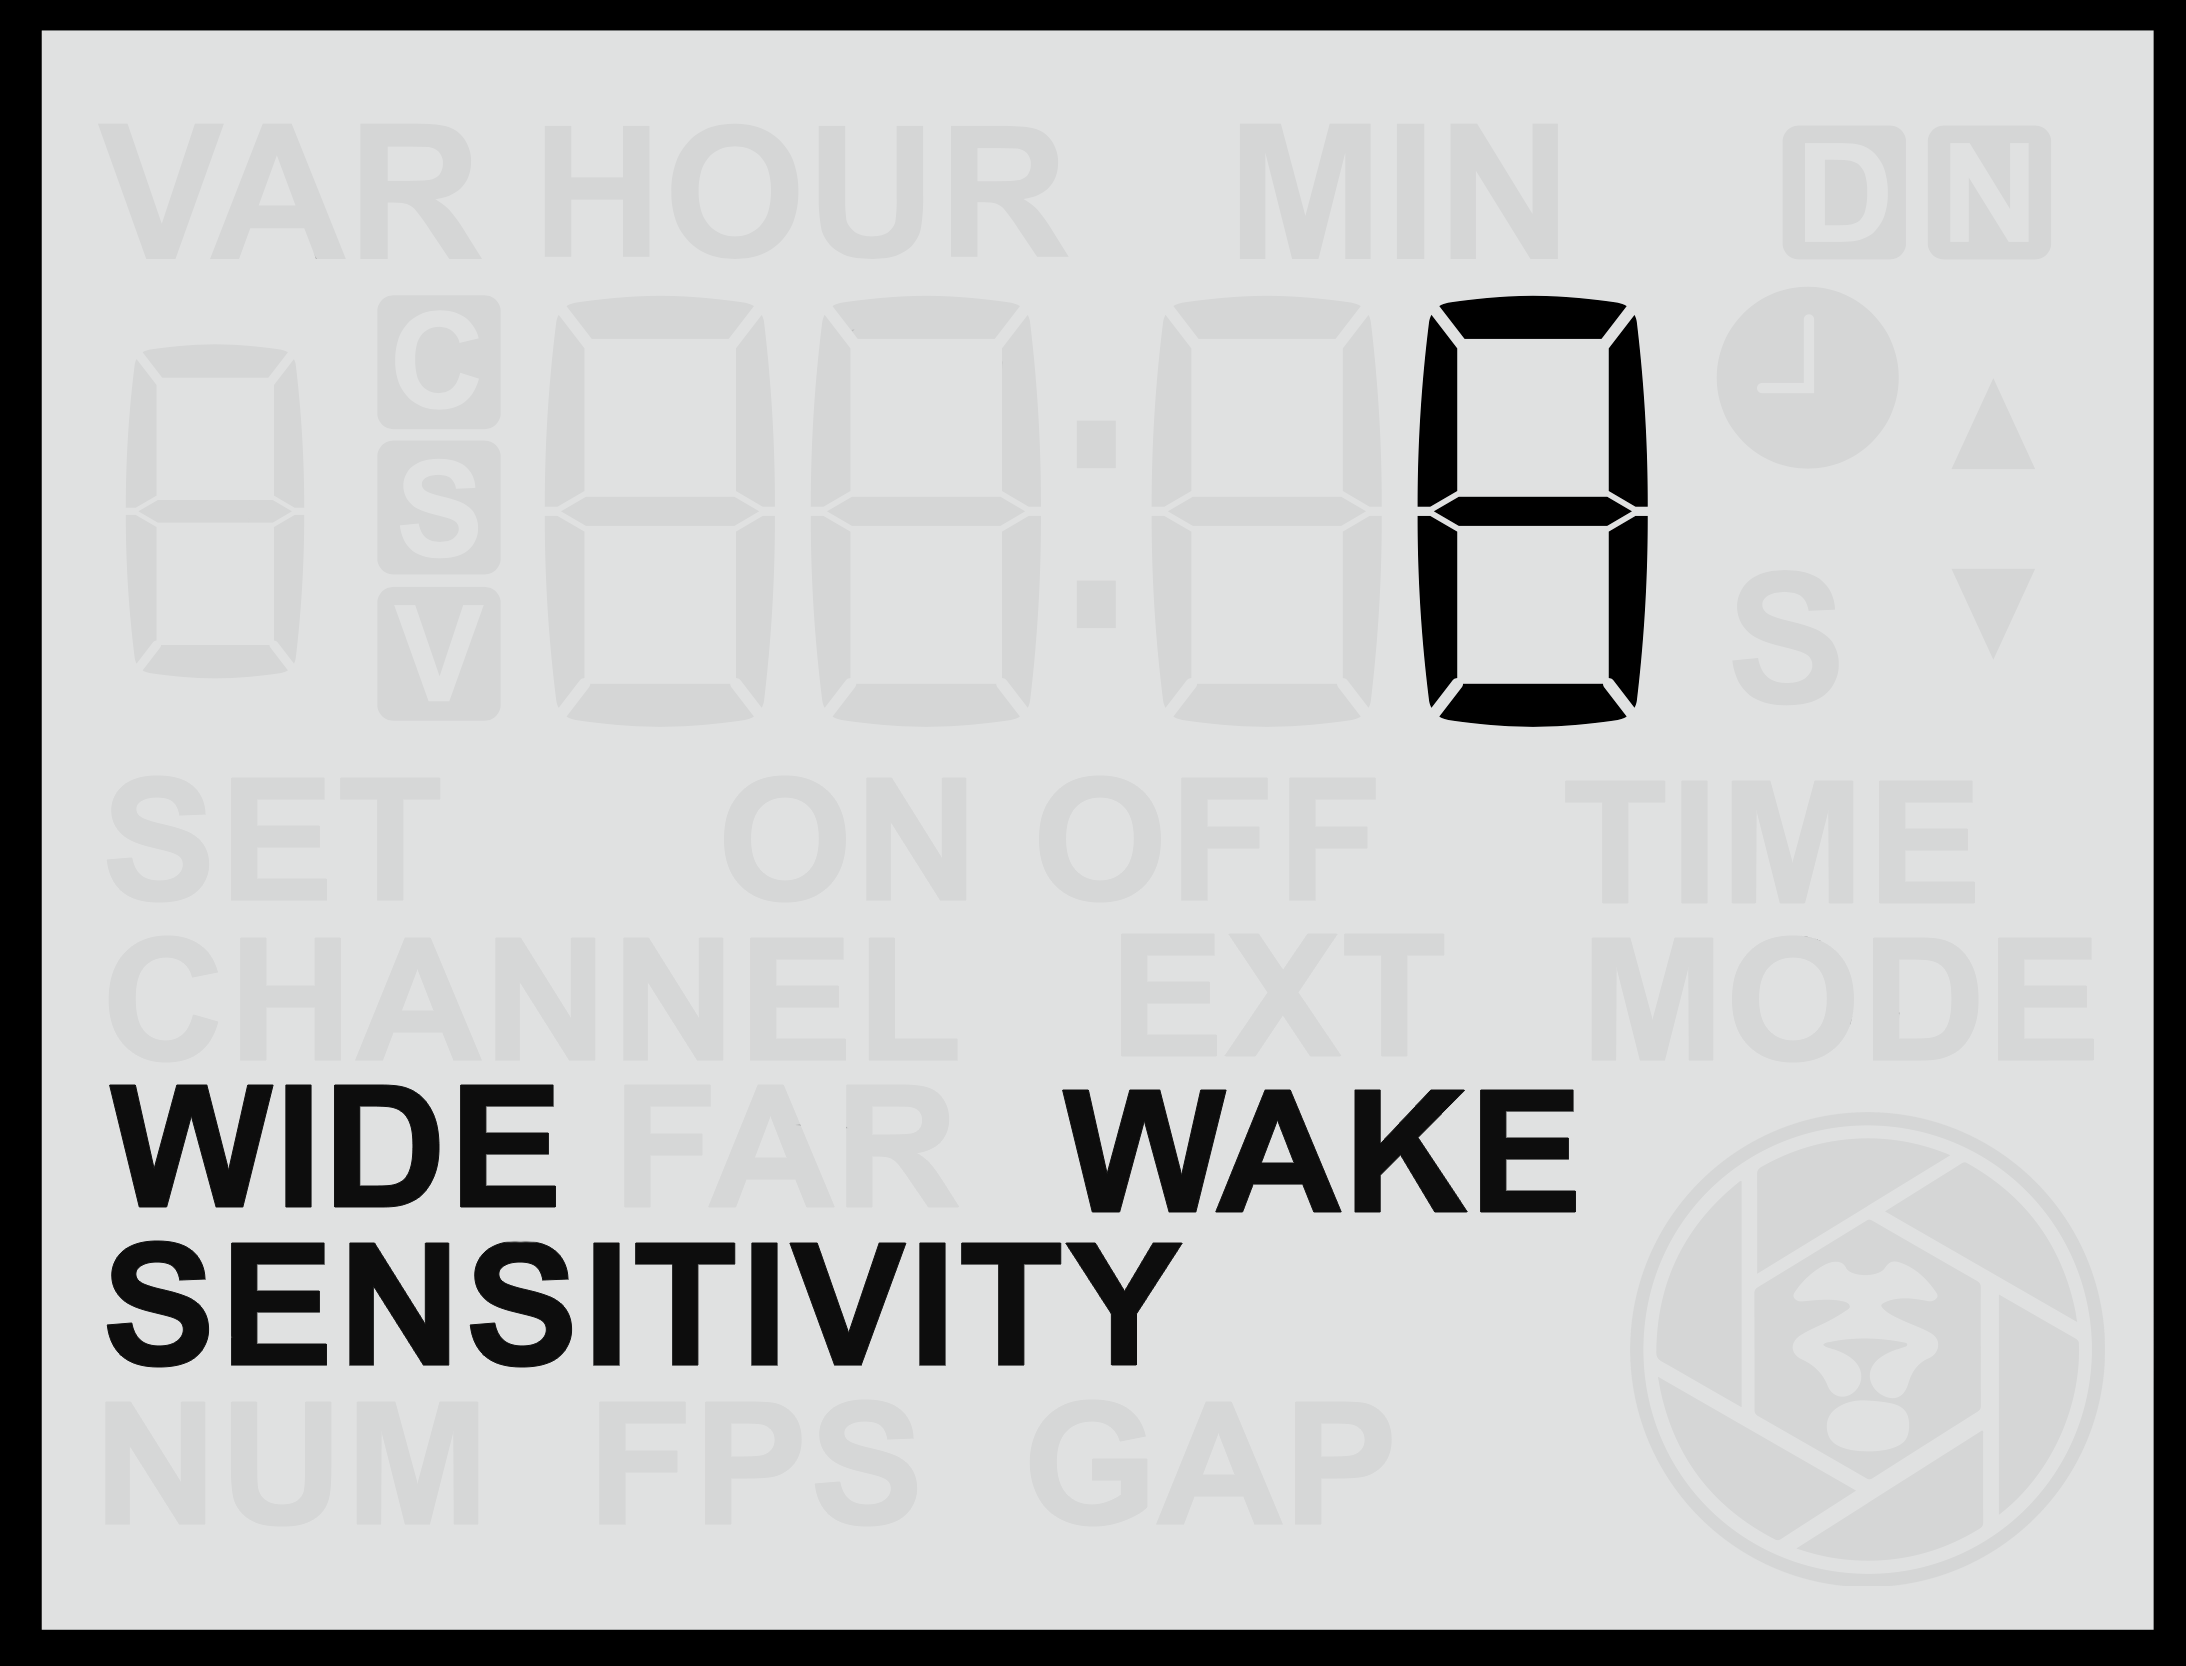
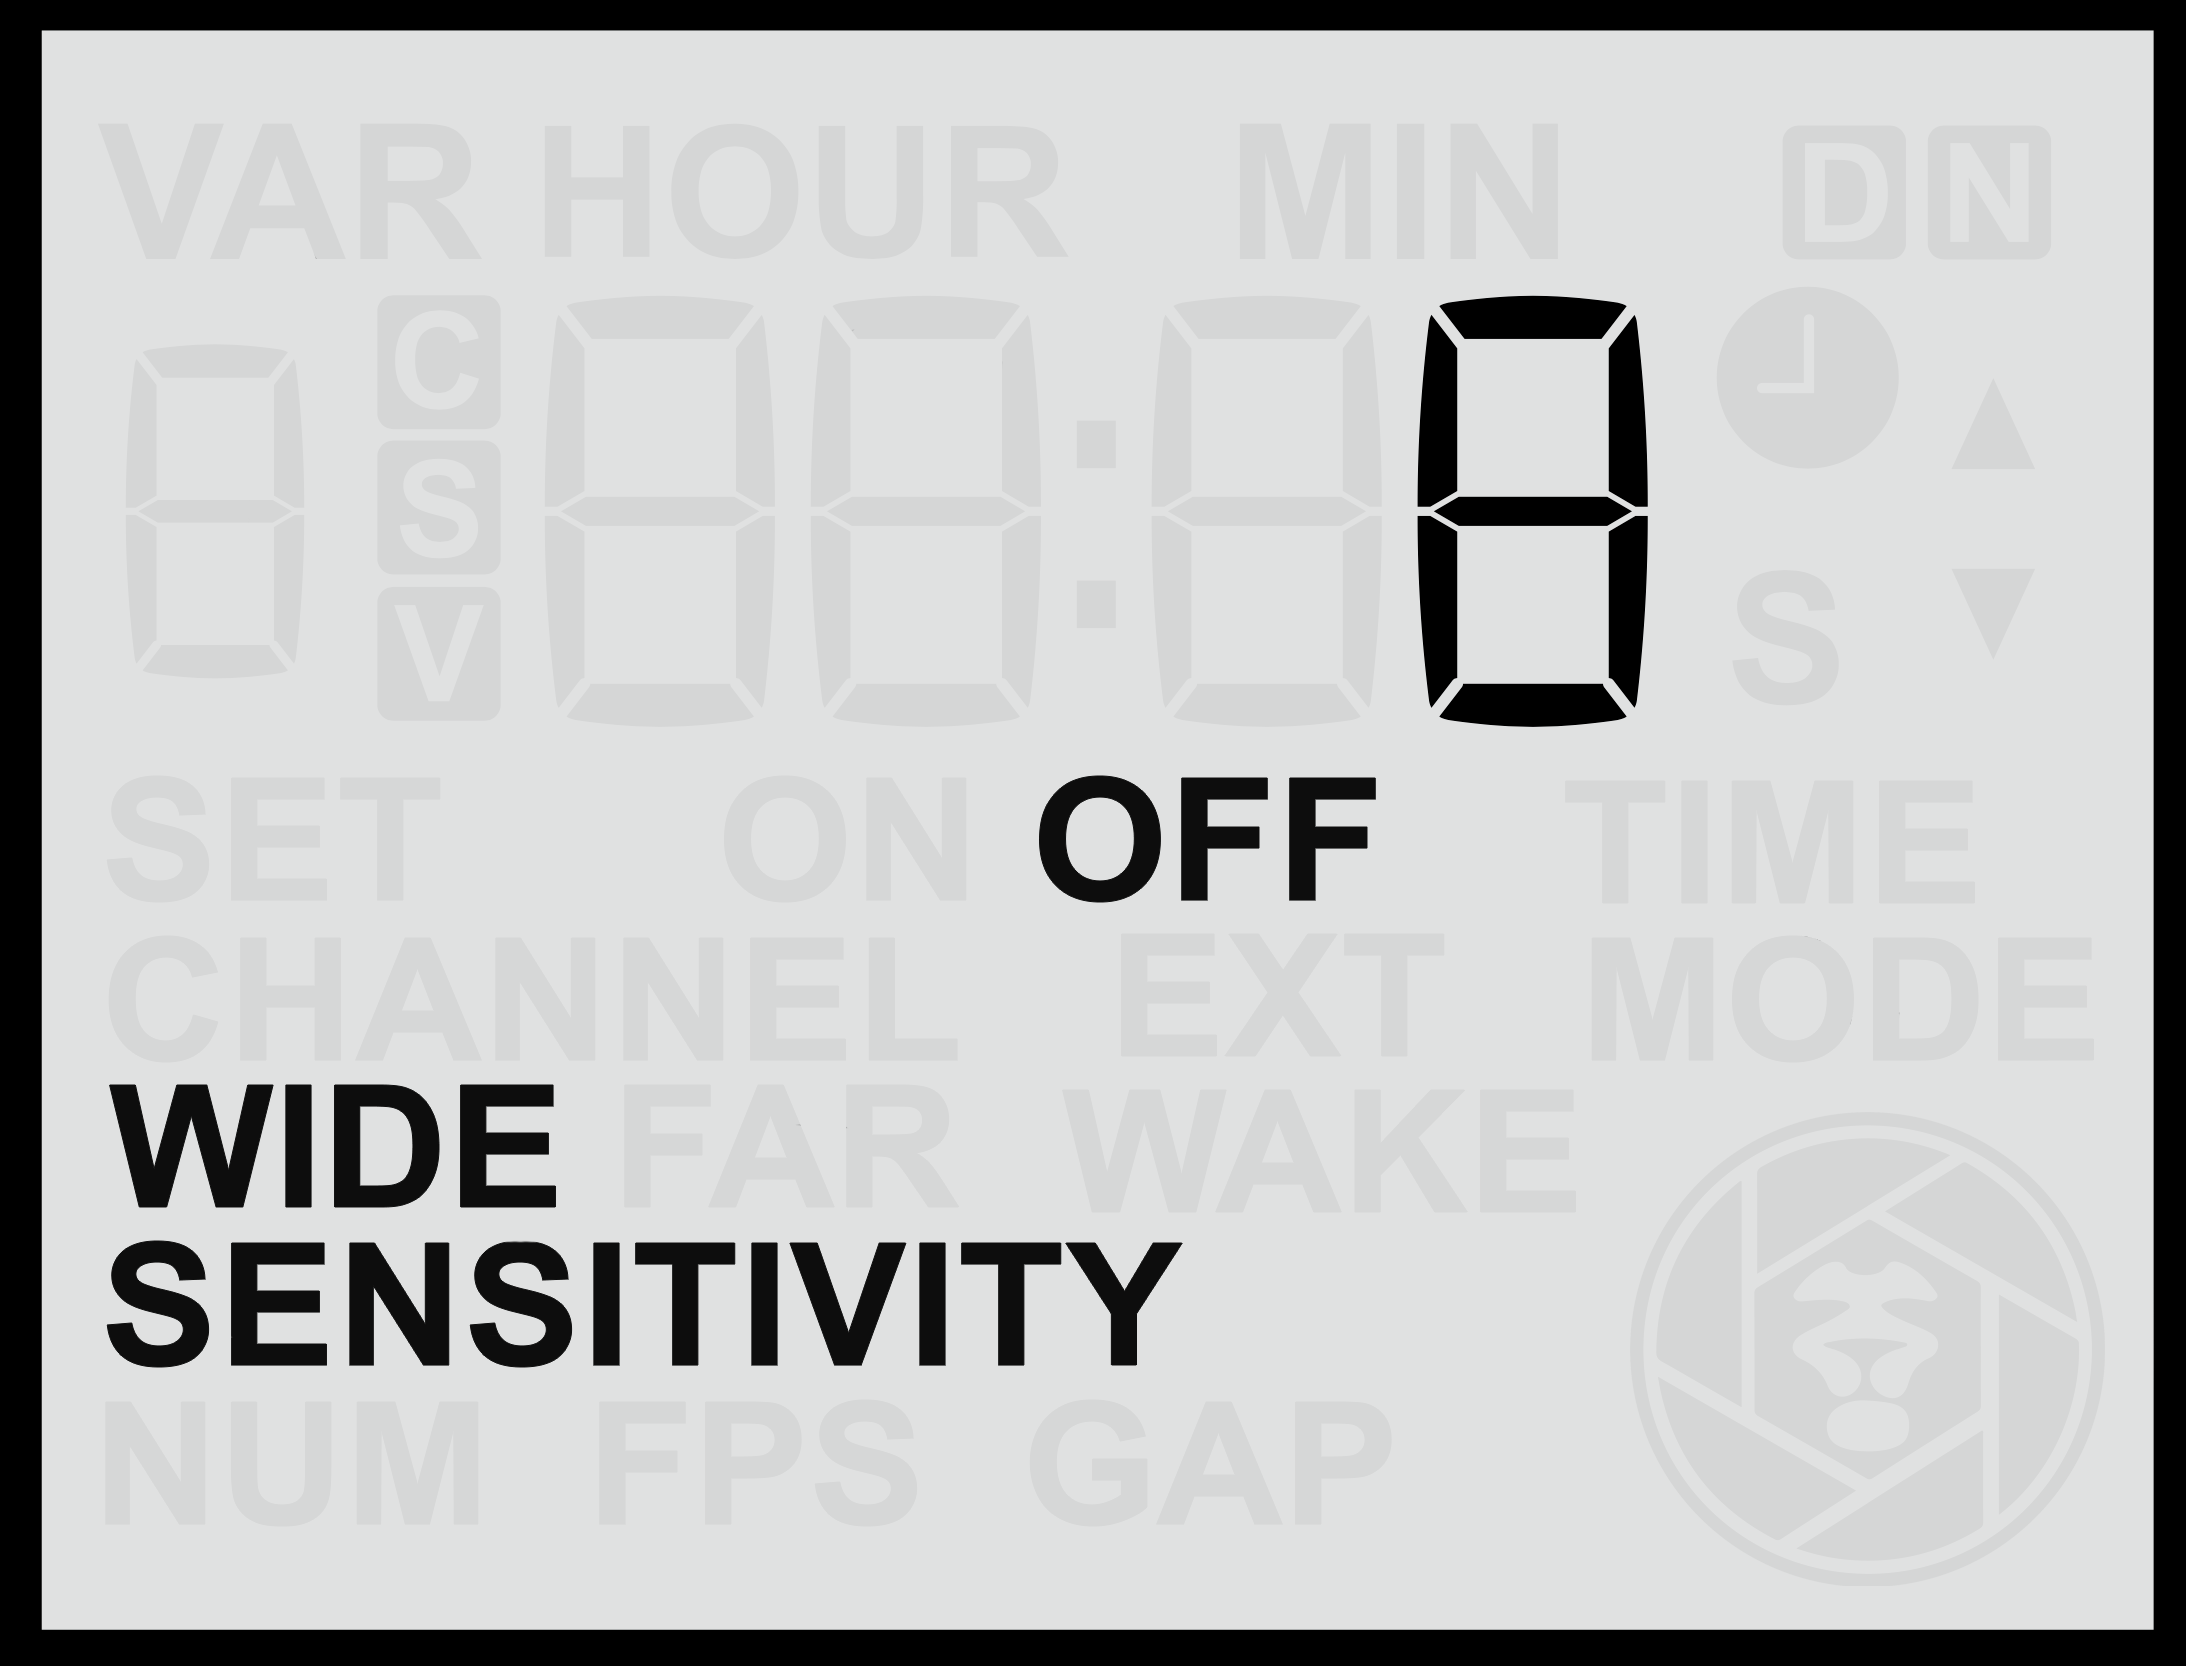
# Global Settings

The Global Settings apply to both Still and Video modes. These settings control the core behaviour of the sensor and remain active regardless of which shooting mode is selected. Global Settings include options such as Wireless Channel, Sensitivity, and the Far/Wide Sensor configuration. These settings define how the sensor detects motion and communicates with connected equipment.

# Wireless Channel

The <span class="s1">**Wireless Channel**</span> menu screen allows you to select which <span class="s1">**wireless channel**</span> the sensor’s built-in transmitter will use to communicate with your <span class="s1">**Camtraptions Wireless Receiver**</span>.

<span class="s3">![screen-channel.png](https://docs.camtraptions.com/uploads/images/gallery/2025-10/scaled-1680-/screen-channel.png)</span>

#### **Accessing the Wireless Channel Setting**

1. From the <span class="s1">**Home Screen**</span>, press the <span class="s1">**Right Arrow**</span> button until you reach the <span class="s1">**Wireless Channel**</span> screen.
2. Use the <span class="s1">**Up**</span> or <span class="s1">**Down**</span> buttons to change the wireless channel number.
3. Press the <span class="s1">**Set**</span> (centre) button to <span class="s1">**save**</span> your selection.

The selected channel must match the channel set on your <span class="s1">**Camtraptions Wireless Receiver**</span> for proper operation.

#### **Available Channels**

The sensor supports <span class="s1">**15 wireless channels**</span>, numbered 1–15. Each corresponds directly to the same numbered channel on the [Camtraptions Wireless Receiver](https://store.camtraptions.com/collections/flash-cables-accessories/products/wireless-trigger?variant=30110971212).
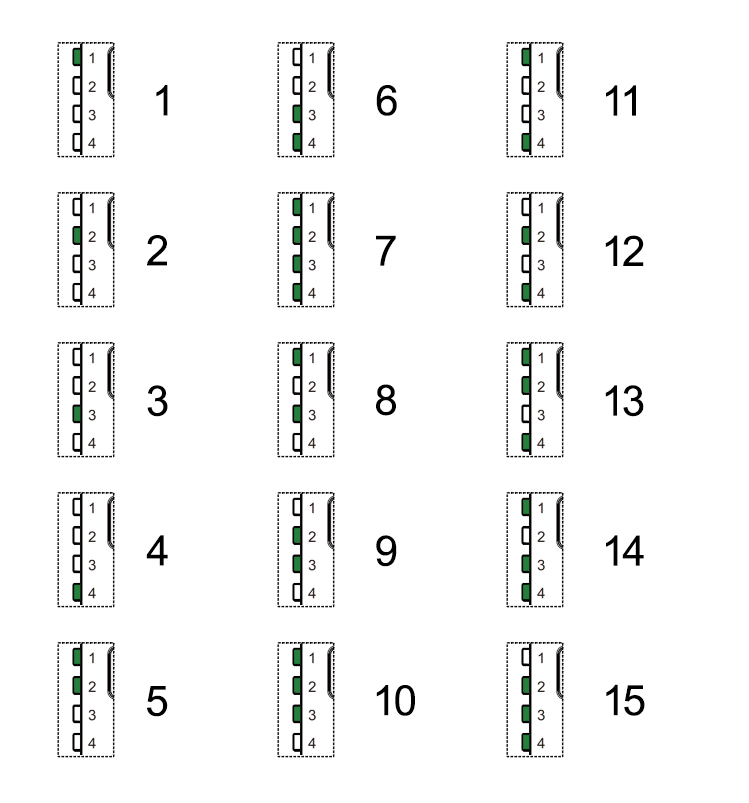
*![Wireless channels](https://docs.camtraptions.com/uploads/images/gallery/2025-10/scaled-1680-/wirelesschannels.png)*

#### **Disabling Wireless Transmission**

To <span class="s1">**disable the wireless transmitter**</span> completely (for wired-only operation):

- Press and <span class="s1">**hold**</span> either the <span class="s1">**Up**</span> or <span class="s1">**Down**</span> button for more than **2**<span class="s1"> **seconds**</span> while on the Wireless Channel screen.

The display will show <span class="s1">**“OFF”**</span>, indicating that wireless transmission is disabled.

<span class="s3">In this mode, the sensor will </span>**only trigger connected devices via the wired output socket**<span class="s3">. It will also conserve some power and allow the sensor to operate for even longer in the field.</span>

# Wide Sensor

The <span class="s2">**Wide Sensor**</span> menu screen allows you to adjust the behaviour and sensitivity of the <span class="s2">**wide-angle PIR lens**</span>. This sensor has a broader field of view (approximately <span class="s2">**60°**</span>) and is ideal for detecting animals earlier as they approach the camera.
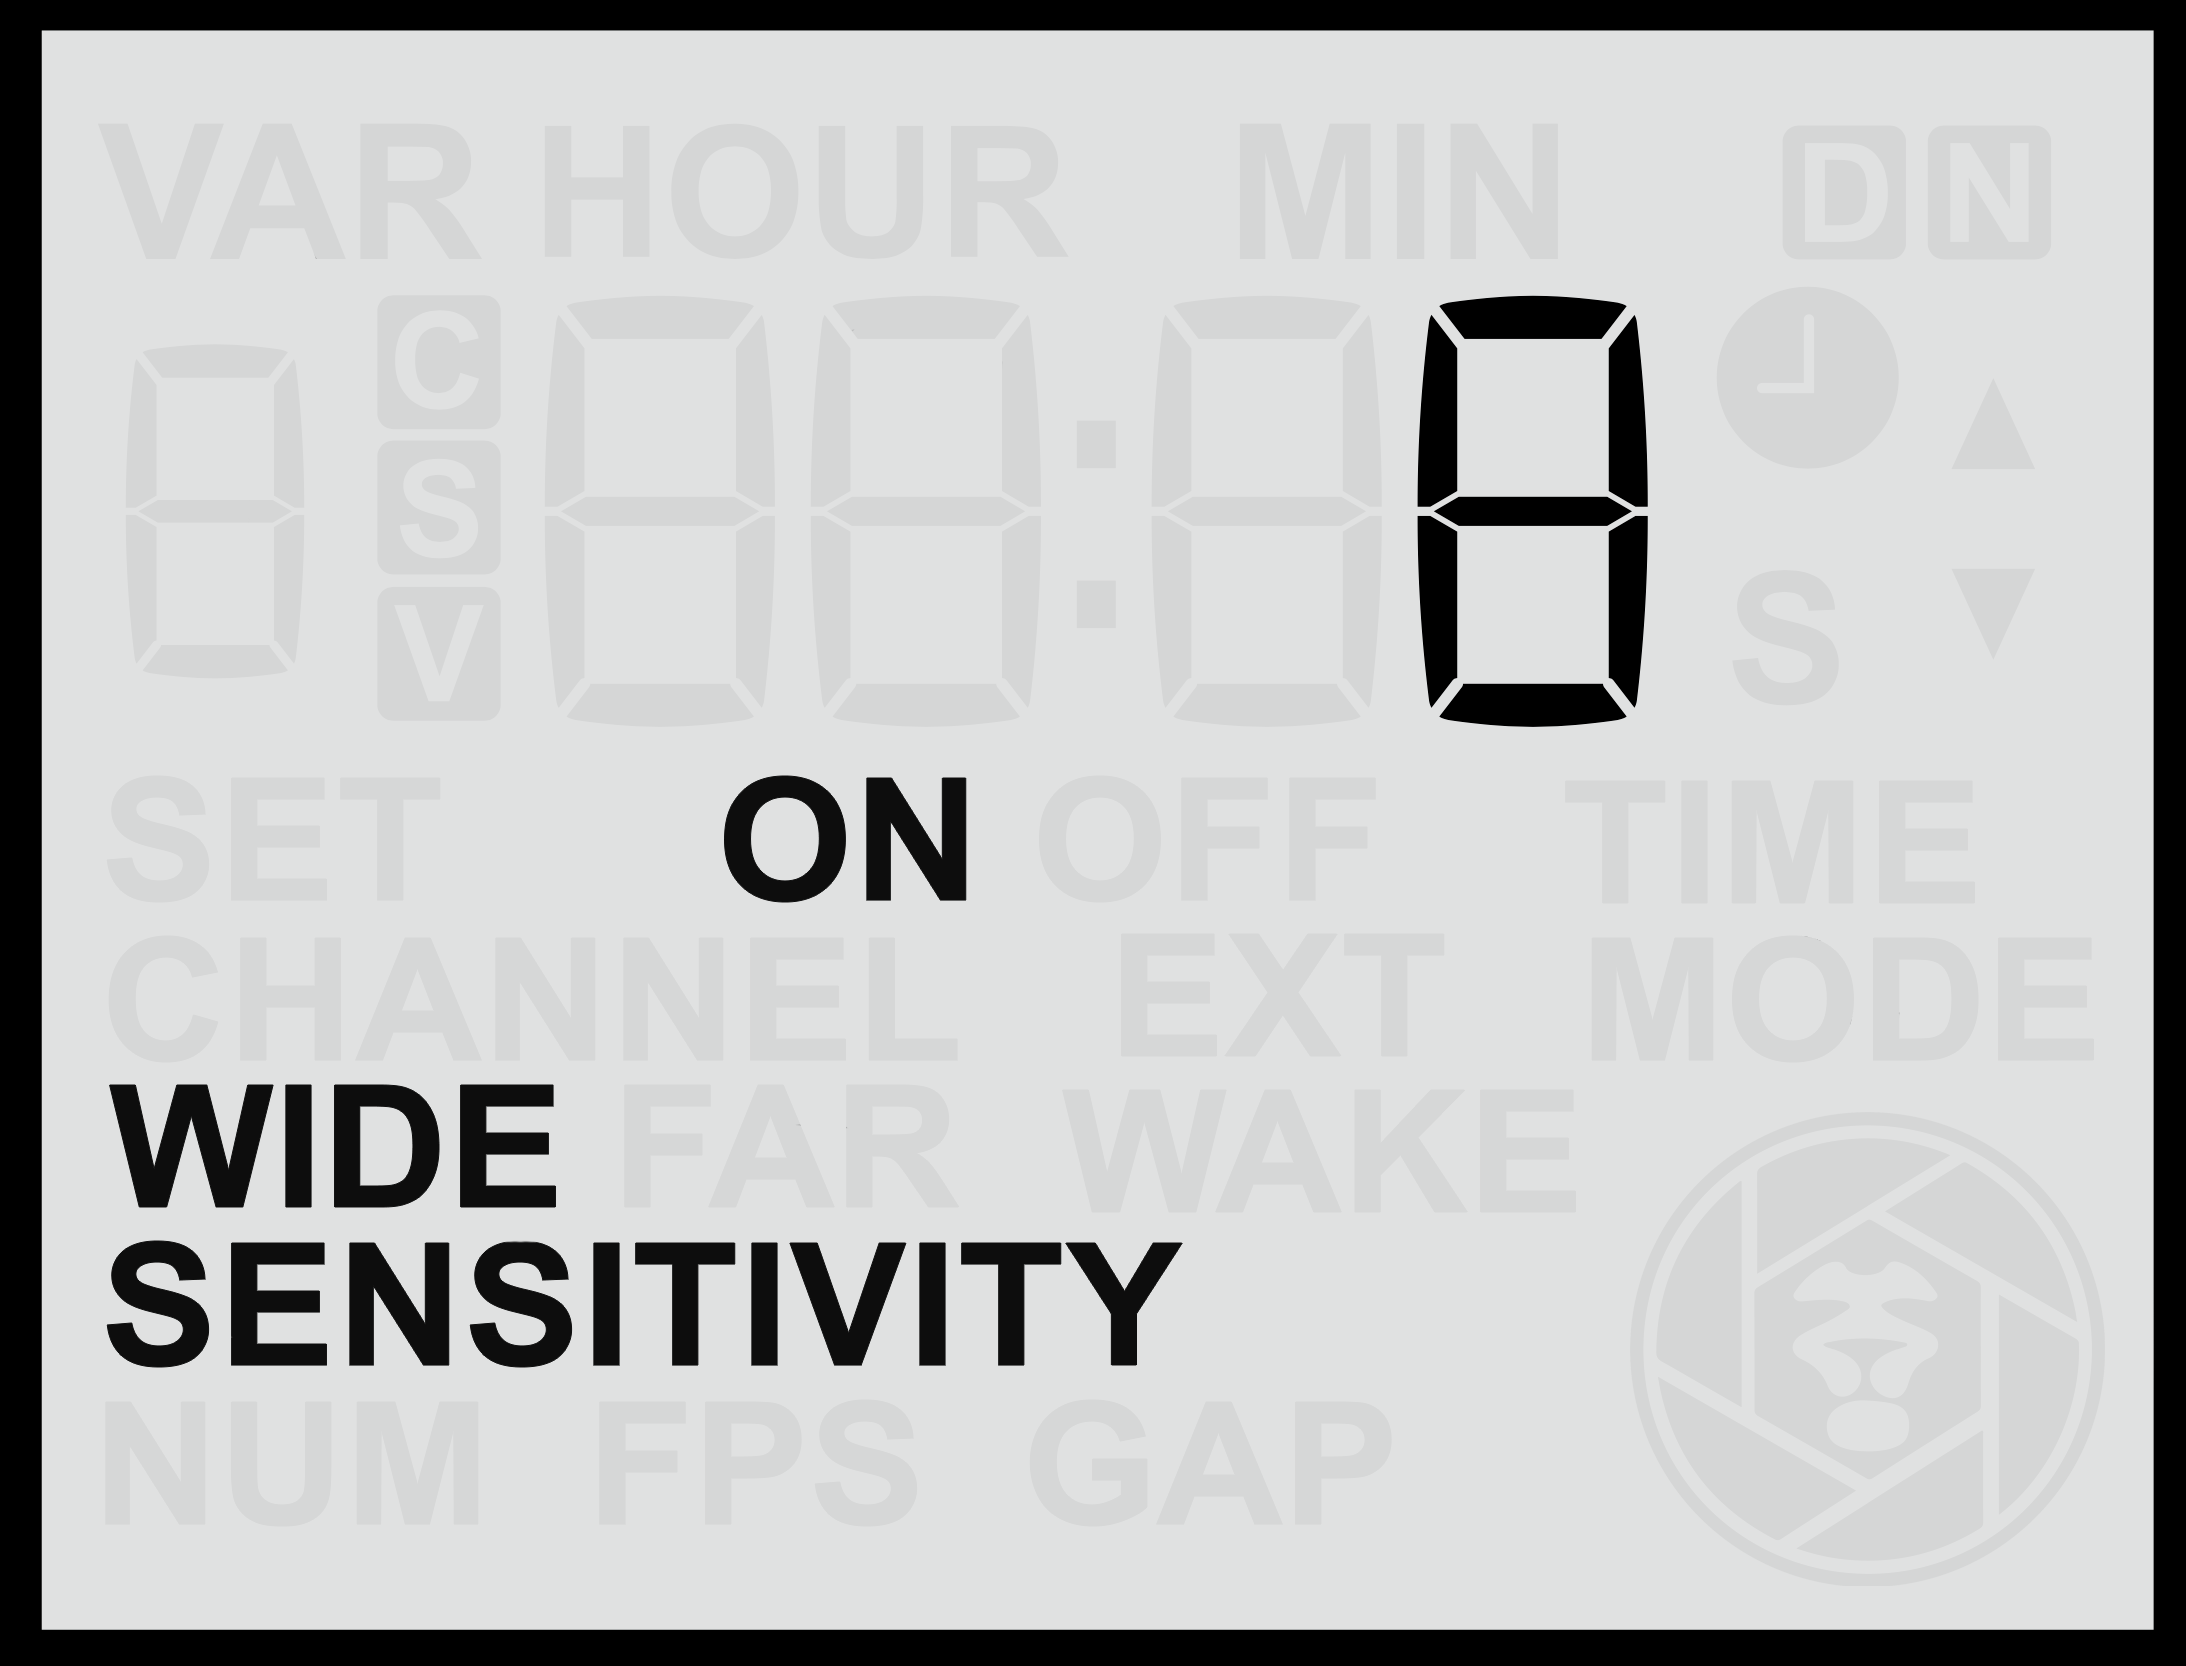
<table border="1" id="bkmrk-" style="border-collapse: collapse; width: 100%; border-width: 0px;"><colgroup><col style="width: 50%;"></col><col style="width: 50%;"></col></colgroup><tbody><tr><td class="align-center" colspan="2" style="border-width: 0px;">![screen-widesenson.png](https://docs.camtraptions.com/uploads/images/gallery/2025-11/screen-widesenson.png)</td></tr><tr><td class="align-center" style="border-width: 0px;">![screen-widesenswake.png](https://docs.camtraptions.com/uploads/images/gallery/2025-11/screen-widesenswake.png)</td><td class="align-center" style="border-width: 0px;">![screen-widesensoff.png](https://docs.camtraptions.com/uploads/images/gallery/2025-11/screen-widesensoff.png)</td></tr></tbody></table>

#### **Accessing the Wide Sensor Screen**

1. From the <span class="s1">**Home Screen**</span>, press the <span class="s1">**Right Arrow**</span> repeatedly until you reach the <span class="s1">**Wide**</span> screen.
2. Use the <span class="s1">**Up**</span> or <span class="s1">**Down**</span> buttons to adjust the sensitivity between <span class="s1">**1 and 16**</span>, where: 
    - <span class="s1">**16**</span> = Maximum sensitivity (detects smaller or more distant motion).
    - <span class="s1">**1**</span> = Minimum sensitivity (detects only close or pronounced motion).
3. Press the <span class="s1">**Set**</span> button to <span class="s1">**save**</span> your chosen setting.

#### **Testing the Wide Sensor**

To understand and fine-tune how the wide sensor behaves in your setup:

- Temporarily <span class="s1">**disable the Far Sensor**</span> to isolate the wide lens’s detection zone.
- Use the <span class="s1">**red motion indicator light**</span> on the front of the sensor to see when motion is detected.
- Once testing is complete, <span class="s1">**re-enable**</span> both sensors for normal operation.

Testing each sensor individually can help you visualise their detection ranges and ensure the trigger zone aligns precisely with your intended framing.

#### **Changing the Wide Sensor Function**

You can also change how the wide sensor behaves by pressing and <span class="s2">**holding**</span> either the <span class="s2">**Up**</span> or <span class="s2">**Down**</span> button for more than **2**<span class="s2"> **seconds**</span>. This cycles through three operating modes:

<table id="bkmrk-mode-description-nor" style="width: 100%;"><thead><tr><th style="width: 15.9613%;">**Mode**</th><th style="width: 84.0387%;">**Description**</th></tr></thead><tbody><tr><td style="width: 15.9613%;">**Normal**</td><td style="width: 84.0387%;">The sensor behaves normally, triggering the camera or flash when motion is detected.</td></tr><tr><td style="width: 15.9613%;">**Off**</td><td style="width: 84.0387%;">The wide sensor is disabled and will not detect motion or trigger the camera.</td></tr><tr><td style="width: 15.9613%;">**Wake**</td><td style="width: 84.0387%;">The wide sensor will only send a <span class="s1">**wake signal**</span> to connected camera equipment when motion is detected, but not a full trigger signal.</td></tr></tbody></table>

The <span class="s1">**Wake**</span> mode is particularly useful because the wide sensor often detects animals <span class="s1">**entering the frame**</span> before the far sensor does. Using it to send a <span class="s1">**wake signal**</span> ensures that by the time the far sensor sends the <span class="s1">**shoot signal**</span>, the camera (and any connected flashes) are already active and ready to respond.

This function is especially beneficial for:

- <span class="s1">**Cameras that take a long time to wake from standby**</span>, such as some older or budget mirrorless models.
- <span class="s1">**Third-party flashes**</span> that require a charging period before firing.

<p class="callout info">Note: Camtraptions Z Pro Flashes remain fully charged and ready to fire instantly, so this feature is not required when using Z Pro units.</p>

<p class="callout info">Note: If a sensor is set to **Wake** mode, then the signal will only be sent if the PIR v4 has not been active within the last 30 seconds. This ensures that no unnecessary wake signals (and potential trigger delays) are occuring during periods of continuous activity in front of the PIR.</p>

# Far Sensor

The <span class="s1">**Far Sensor**</span> menu screen allows you to adjust the behaviour and sensitivity of the <span class="s1">**long-range PIR lens**</span>. This sensor has a much <span class="s1">**narrower field of view**</span> (approximately <span class="s1">**10°**</span>) and is significantly more sensitive overall than the wide sensor. It is designed for precise control of the trigger zone, enabling the user to determine exactly <span class="s1">**where in the frame**</span> the animal will be when the camera is activated.

Because of its narrow detection zone, the far sensor can be used much like a<span class="s1"> **“beam break”**</span>, ideal for cutting across an animal trail or pathway to ensure triggering occurs only when the subject reaches a specific point.
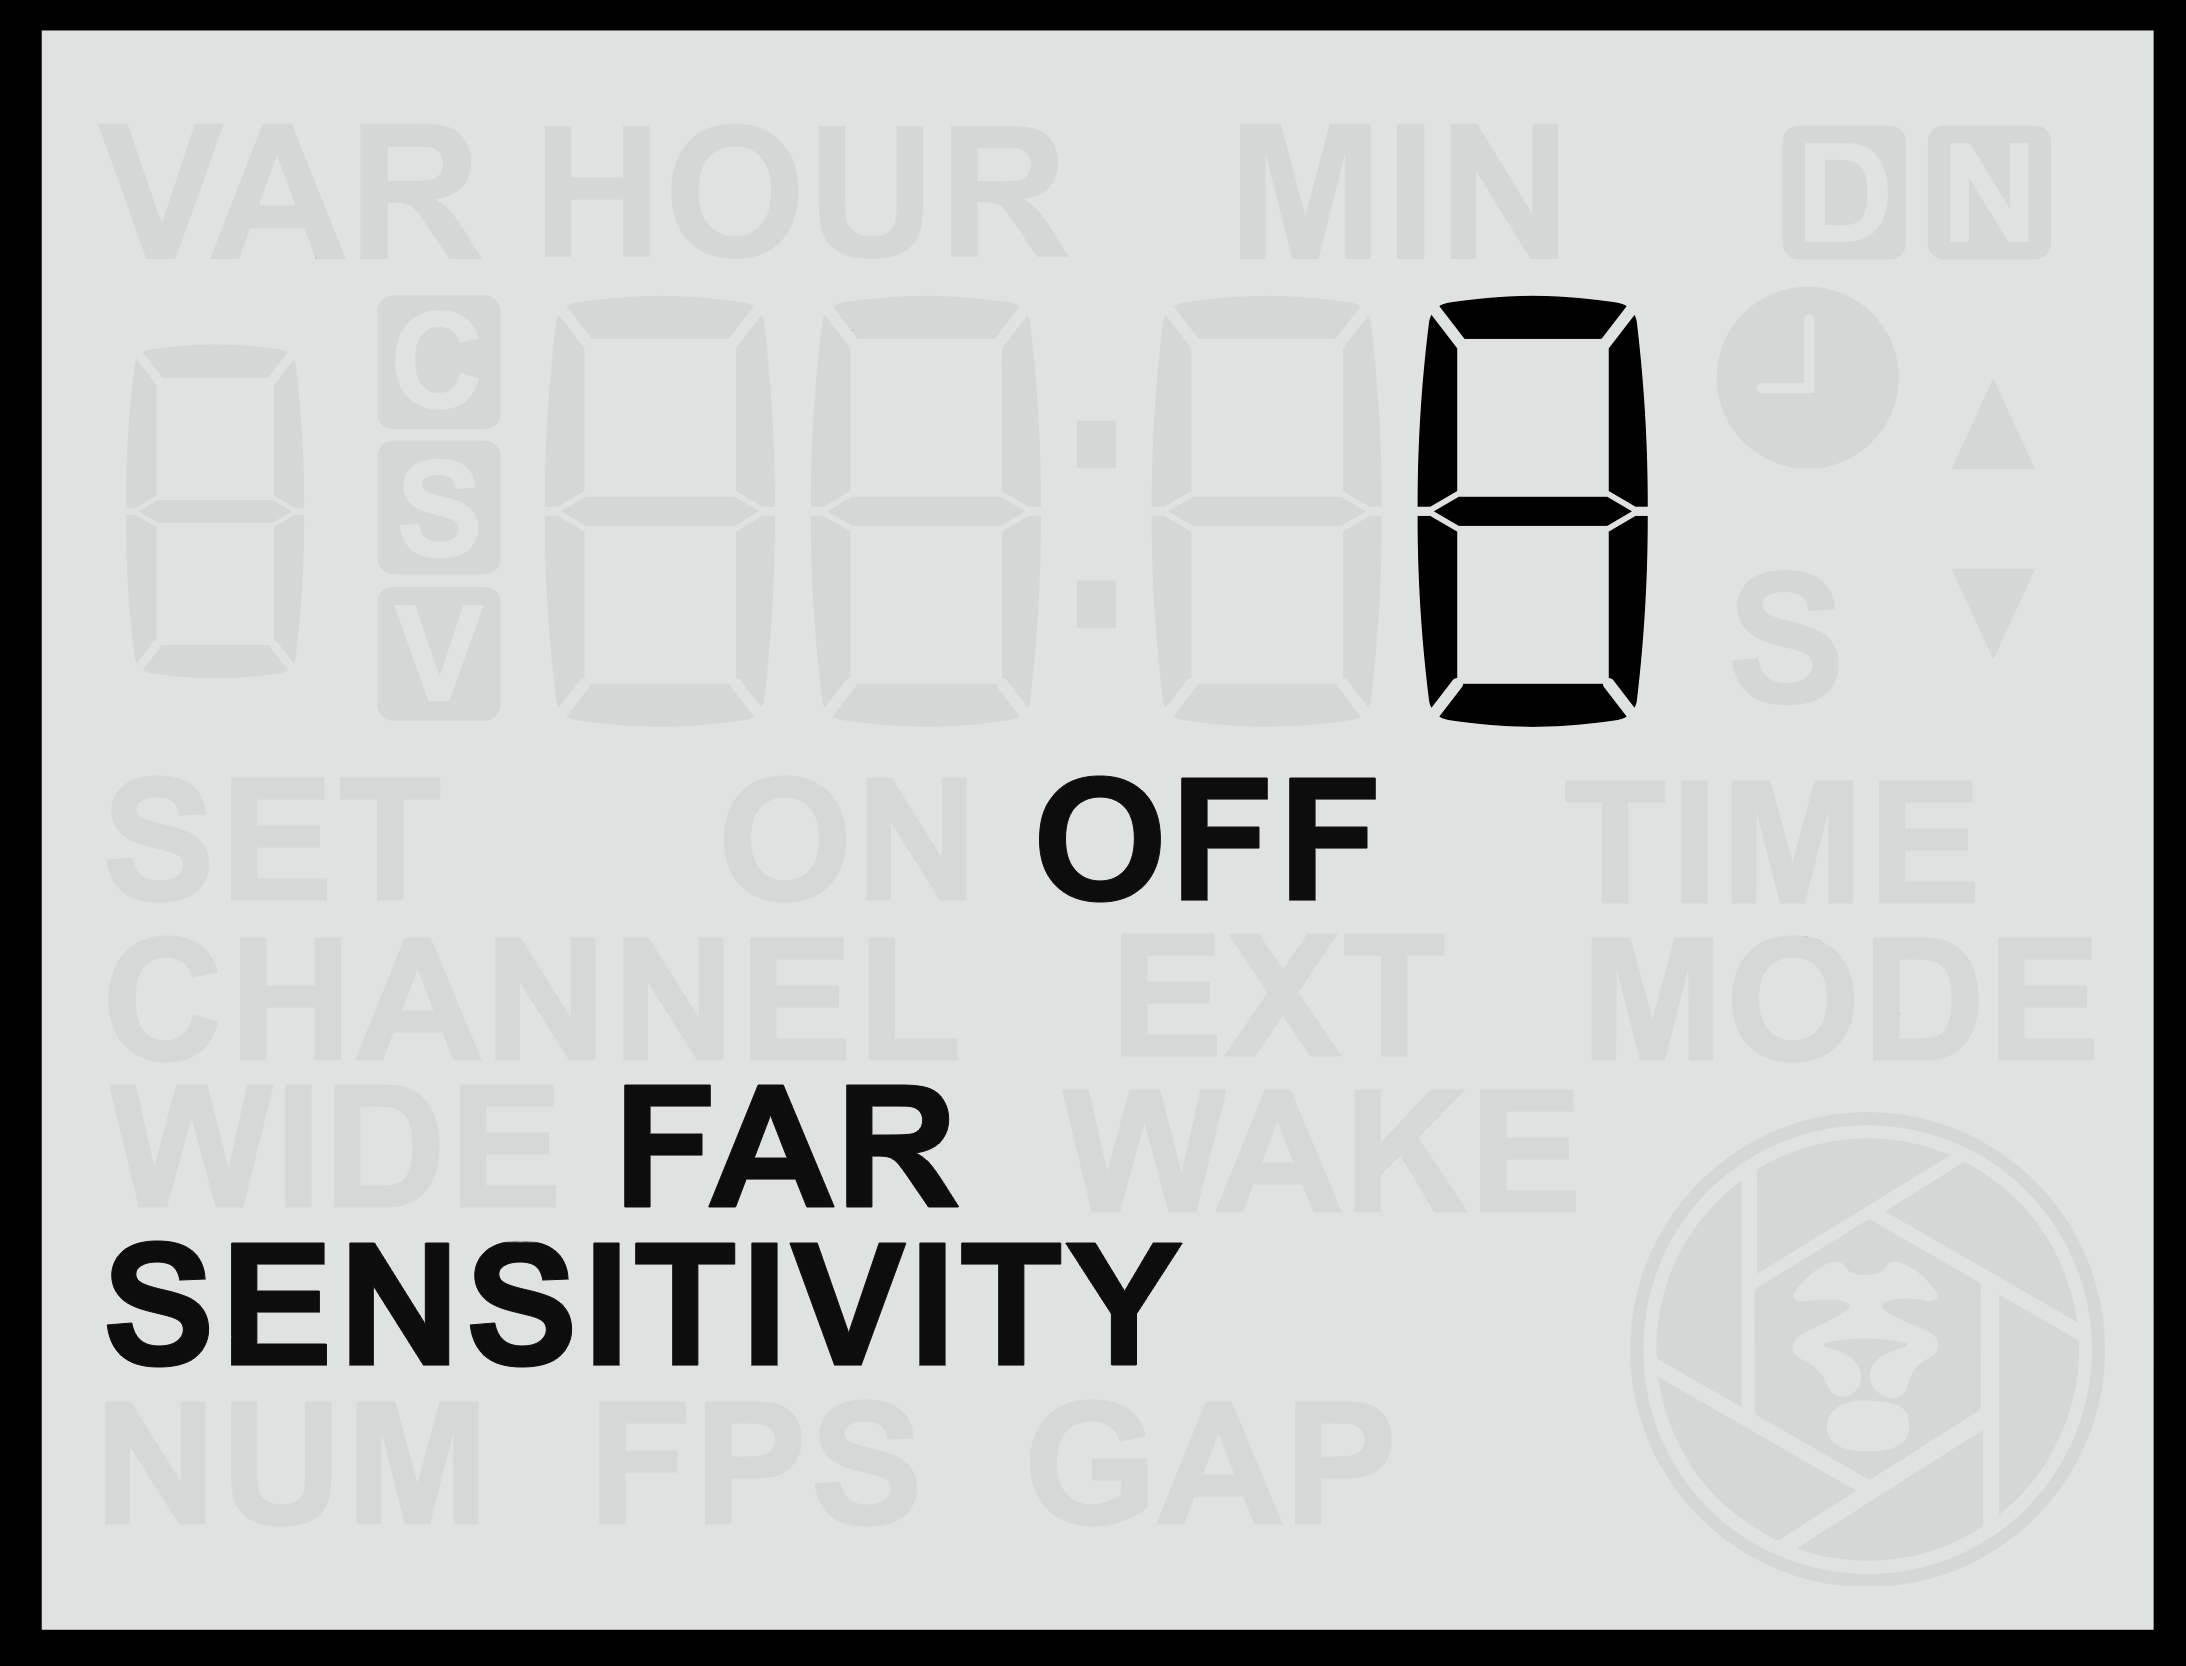
<table border="1" id="bkmrk-" style="border-collapse: collapse; width: 100%; border-width: 0px;"><colgroup><col style="width: 50%;"></col><col style="width: 50%;"></col></colgroup><tbody><tr><td class="align-center" style="border-width: 0px;">![screen-farsenson.png](https://docs.camtraptions.com/uploads/images/gallery/2025-11/screen-farsenson.png)</td><td class="align-center" style="border-width: 0px;">![screen-farsensoff.png](https://docs.camtraptions.com/uploads/images/gallery/2025-11/screen-farsensoff.png)</td></tr></tbody></table>

#### **Accessing the Far Sensor Screen**

1. From the <span class="s1">**Home Screen**</span>, press the <span class="s1">**Right Arrow**</span> repeatedly until you reach the <span class="s1">**Far**</span> screen.
2. Use the <span class="s1">**Up**</span> or <span class="s1">**Down**</span> buttons to adjust the sensitivity between <span class="s1">**1 and 16**</span>, where: 
    - <span class="s1">**16**</span> = Maximum sensitivity (detects very small or distant motion).
    - <span class="s1">**1**</span> = Minimum sensitivity (detects only close or pronounced motion).
3. Press the <span class="s1">**Set**</span> button to <span class="s1">**save**</span> your chosen setting.

#### **Testing and Positioning the Far Sensor**

To understand and fine-tune the detection range and behaviour of the far sensor:

- Temporarily <span class="s1">**disable the Wide Sensor**</span> so you can observe only the far lens’s performance.
- Use the <span class="s1">**red motion indicator light**</span> to see exactly when motion is detected.
- Adjust the sensor’s position and side flaps to align the detection beam precisely with your desired trigger zone.
- Once testing is complete, <span class="s1">**re-enable both sensors**</span> for full functionality.

Because its range is very long, the far sensor may sometimes detect motion <span class="s1">**beyond the intended trigger zone**</span> or <span class="s1">**outside the camera’s framing**</span>.

To prevent unwanted detections, it can be effective to <span class="s1">**mount the sensor slightly higher**</span> and <span class="s1">**angle the far sensor downward**</span> toward the desired trigger area. This positioning limits its view of distant background areas and ensures it primarily “sees” the ground where the subject will pass, triggering reliably and precisely when the animal enters the frame.

#### **Changing the Far Sensor Function**

As with the wide sensor, you can change the behaviour of the far sensor by pressing and <span class="s1">**holding**</span> either the <span class="s1">**Up**</span> or <span class="s1">**Down**</span> button for more than <span class="s1">**2 seconds**</span>. This cycles through three operating modes:

<table id="bkmrk-mode-description-nor"><thead><tr><th>**Mode**</th><th>**Description**</th></tr></thead><tbody><tr><td>**Normal**</td><td>The sensor behaves normally, triggering the camera or flash when motion is detected.</td></tr><tr><td>**Off**</td><td>The far sensor is disabled and will not detect motion or trigger the camera.</td></tr><tr><td>**Wake**</td><td>The far sensor sends only a <span class="s1">**wake signal**</span> to connected camera equipment but does not trigger a full shoot command.</td></tr></tbody></table>

The <span class="s1">**Normal**</span> mode is typically used for capturing the actual trigger moment. However, in some advanced setups, the <span class="s1">**Wake**</span> mode may be used strategically to coordinate multiple sensors or fine-tune camera wake-up behaviour.

# Gap Time

The <span class="s2">**Gap Time**</span> setting controls the <span class="s2">**delay between triggers**</span>, defining how long the sensor will wait before it can activate again after completing a sequence. This lets you control how often the sensor triggers, conserving battery power and storage while allowing flashes to recharge and reducing the chance of disturbing subjects.

![screen-gap.png](https://docs.camtraptions.com/uploads/images/gallery/2025-10/scaled-1680-/screen-gap.png)

#### **Adjusting the Gap Time**

1. From the <span class="s1">**Home Screen**</span>, press the <span class="s1">**Right Arrow**</span> until you reach the <span class="s1">**Gap Time**</span> screen.
2. Use the <span class="s1">**Up**</span> or <span class="s1">**Down**</span> buttons to set the desired delay between 0.5s and 1min (1s by default).
3. Press the <span class="s1">**Set**</span> button to <span class="s1">**save**</span> your selection.

The chosen value determines how long the sensor will remain inactive after completing a sequence before it can trigger again.

- A <span class="s1">**short gap time**</span> allows the sensor to retrigger quickly and capture multiple events close together.
- A <span class="s1">**longer gap time**</span> limits the number of triggers, reducing the total number of images or videos recorded over time.

#### **Practical Uses**

Adjusting the Gap Time can help you:

- <span class="s1">**Reduce excessive triggering**</span> in areas with frequent animal movement.
- <span class="s1">**Conserve battery power**</span> and <span class="s1">**memory card space**</span> for longer unattended deployments.
- <span class="s1">**Allow flashes time to recharge**</span> between triggers, especially when using multiple flashes or high power levels.
- <span class="s1">**Avoid disturbing animals**</span> with rapid, repeated flashes.

In most cases, a <span class="s2">**moderate delay**</span> provides the best balance between responsiveness and conservation of resources. For fast-moving subjects or short-term deployments, a shorter delay may be preferable, while for long-term camera traps, a longer delay could help extend system endurance.

# Wake Time

The <span class="s2">**Wake Time**</span> setting determines how long the sensor will wait after an initial <span class="s2">**half-press (wake)**</span> signal has been sent to the camera before beginning the main trigger sequence. This gives the camera (and any connected flashes) time to <span class="s2">**wake up or prepare**</span> before the full trigger (shoot) command is sent.

![screen-wake.png](https://docs.camtraptions.com/uploads/images/gallery/2025-10/scaled-1680-/screen-wake.png)

#### **Adjusting the Wake Time**

1. From the <span class="s1">**Home Screen**</span>, press the <span class="s1">**Right Arrow**</span> until you reach the <span class="s1">**Wake Time**</span> screen.
2. Use the <span class="s1">**Up**</span> or <span class="s1">**Down**</span> buttons to select the desired delay in seconds between 1s and 15s.
3. Press the <span class="s1">**Set**</span> button to <span class="s1">**save**</span> your selection.

The delay can be configured in <span class="s2">**seconds**</span>, depending on how much wake-up time your camera or flashes require. By default, this setting is <span class="s2">**off**</span> (no wake-up signal and delay).

#### **Enable or Disable the Wake Function**

- <span class="s1">**Hold**</span> either the <span class="s1">**Up**</span> or <span class="s1">**Down**</span> button for more than <span class="s1">**2 seconds**</span> while on the **Wake** screen.
- When active, the display will show the <span class="s1">**ON**</span> indicator.

#### **Purpose of Wake Time**

Some cameras require a short period to power up or establish communication before they will respond to a full trigger signal. If a <span class="s2">**shoot signal**</span> arrives too soon after the system has been idle, the camera may miss it entirely. This can lead to missed shots in still mode and, more critically, problems in video mode.

For example:

- Certain <span class="s1">**Canon cameras**</span> require a <span class="s1">**full-press signal**</span> to start and stop video recording. If the start signal is missed due to wake-up lag, the camera may only respond to the <span class="s1">**stop**</span> command later, resulting in continuous, indefinite recording.
- Cameras with <span class="s1">**longer wake-up delays**</span>, or flashes that require a moment to recharge, benefit from a wake period that ensures all equipment is ready before the main trigger occurs.

#### **Recommended Use**

It is recommended to use a <span class="s2">**Wake Time**</span> delay for:

- Cameras that take noticeable time to wake from standby (especially some older mirrorless cameras).
- **Canon and Panasonic cameras**<span class="s1"> used in </span>**video mode**<span class="s1">.</span>
- Setups involving third-party flashes that require a short recharge time before firing. (Note: Camtraptions flashes do not require a wake delay, as they remain ready to fire instantly.)

Adjusting this delay ensures reliable operation by waking connected equipment first, then triggering the shutter or video start signal once everything is ready.

# Set Clock Time

The <span class="s1">**Set Clock Time**</span> screen allows you to configure the sensor’s <span class="s1">**internal clock**</span>, which is required for <span class="s1">**Time Windows**</span> (scheduled active hours). Setting the correct time ensures the sensor operates accurately within any defined time periods.

<table border="1" id="bkmrk-" style="border-collapse: collapse; width: 100%; border-width: 0px;"><colgroup><col style="width: 50%;"></col><col style="width: 50%;"></col></colgroup><tbody><tr><td style="border-width: 0px;">![screen-set-time.png](https://docs.camtraptions.com/uploads/images/gallery/2025-10/scaled-1680-/screen-set-time.png)</td><td style="border-width: 0px;">![screen-set-time-min.png](https://docs.camtraptions.com/uploads/images/gallery/2025-10/scaled-1680-/screen-set-time-min.png)</td></tr></tbody></table>

#### **Setting the Clock**

1. From the <span class="s1">**Home Screen**</span>, press the <span class="s1">**Right Arrow**</span> until you reach the <span class="s1">**Set Clock Time**</span> screen.
2. Press the <span class="s1">**Up**</span> or <span class="s1">**Down**</span> buttons to adjust the <span class="s1">**hour**</span> value.
3. Press the <span class="s1">**Set**</span> button to confirm the hour.
4. The <span class="s1">**minute**</span> value will then begin flashing — use the <span class="s1">**Up**</span> or <span class="s1">**Down**</span> buttons to adjust it.
5. Press <span class="s1">**Set**</span> again to save the time.

The clock uses a <span class="s1">**24-hour format**</span> (00:00 to 23:59).

<p class="callout info">
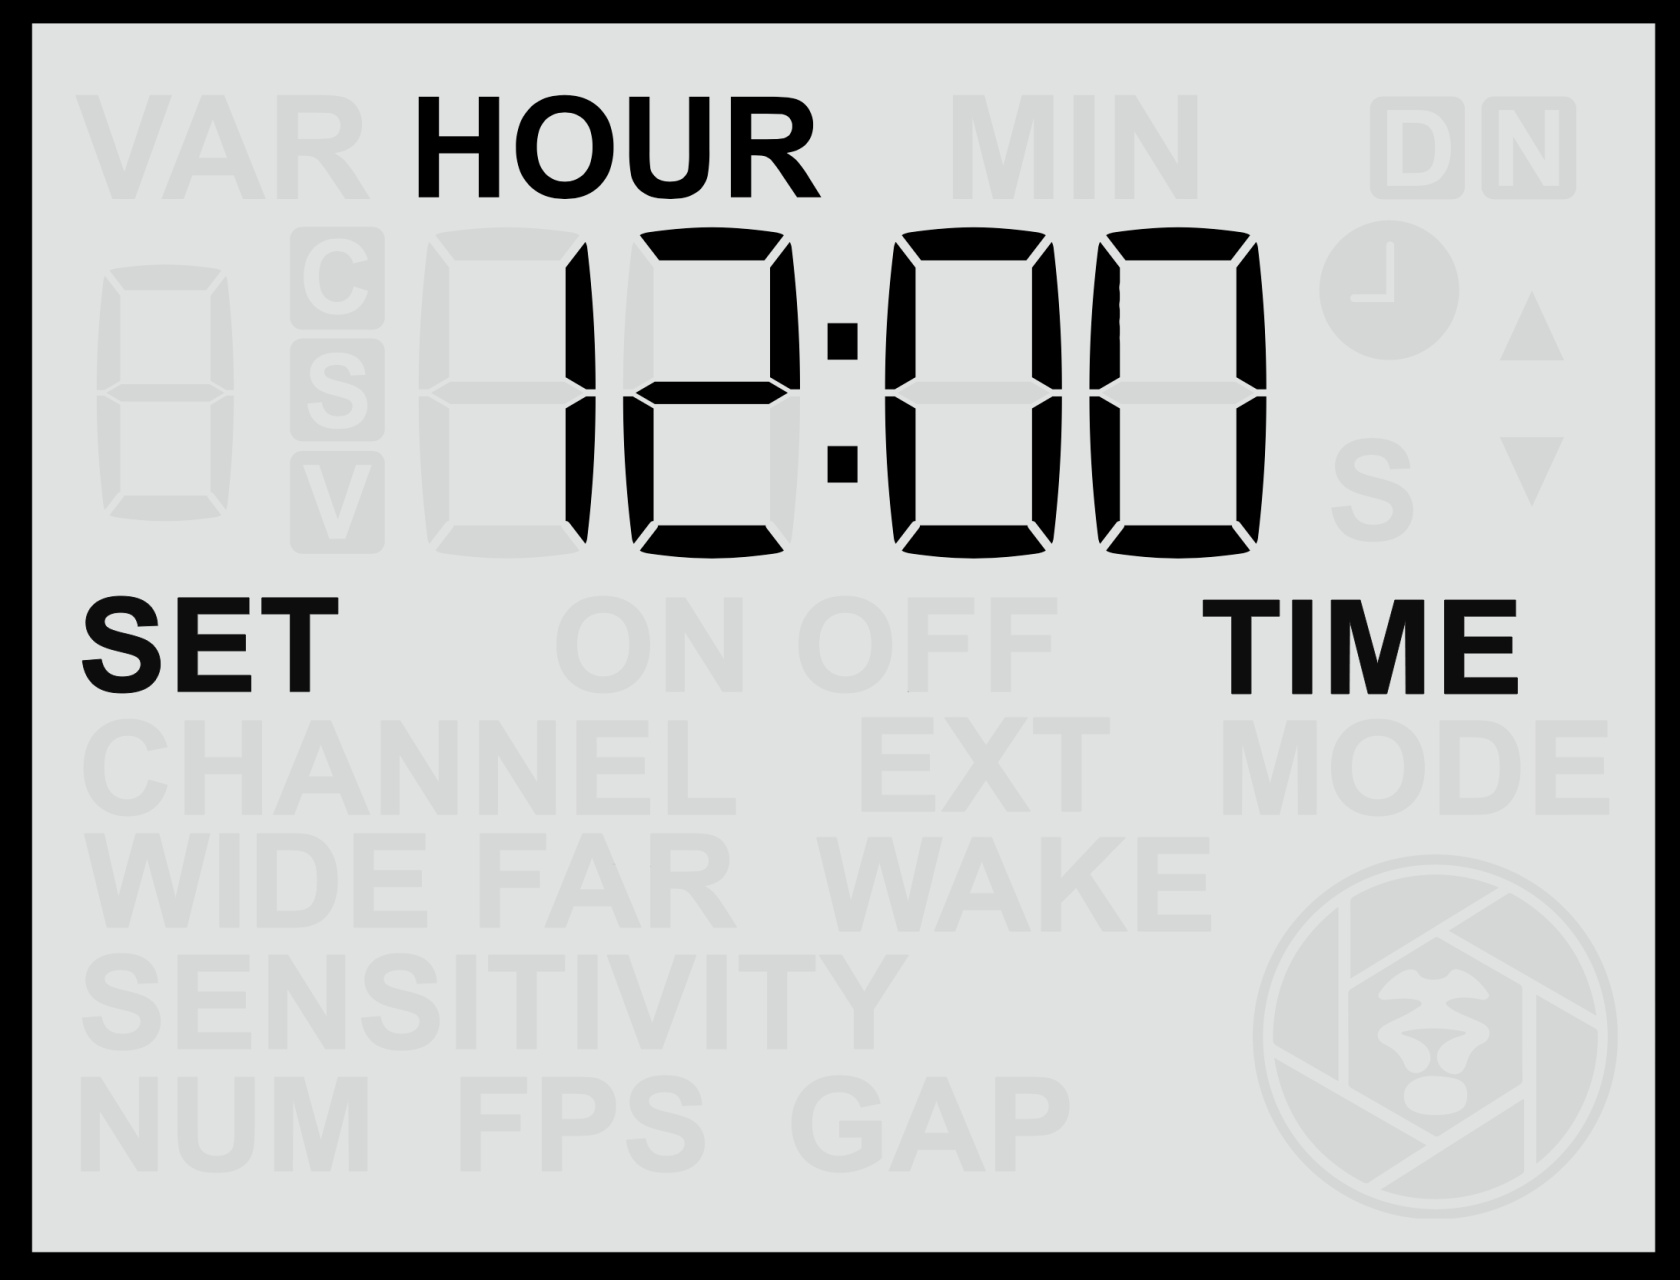
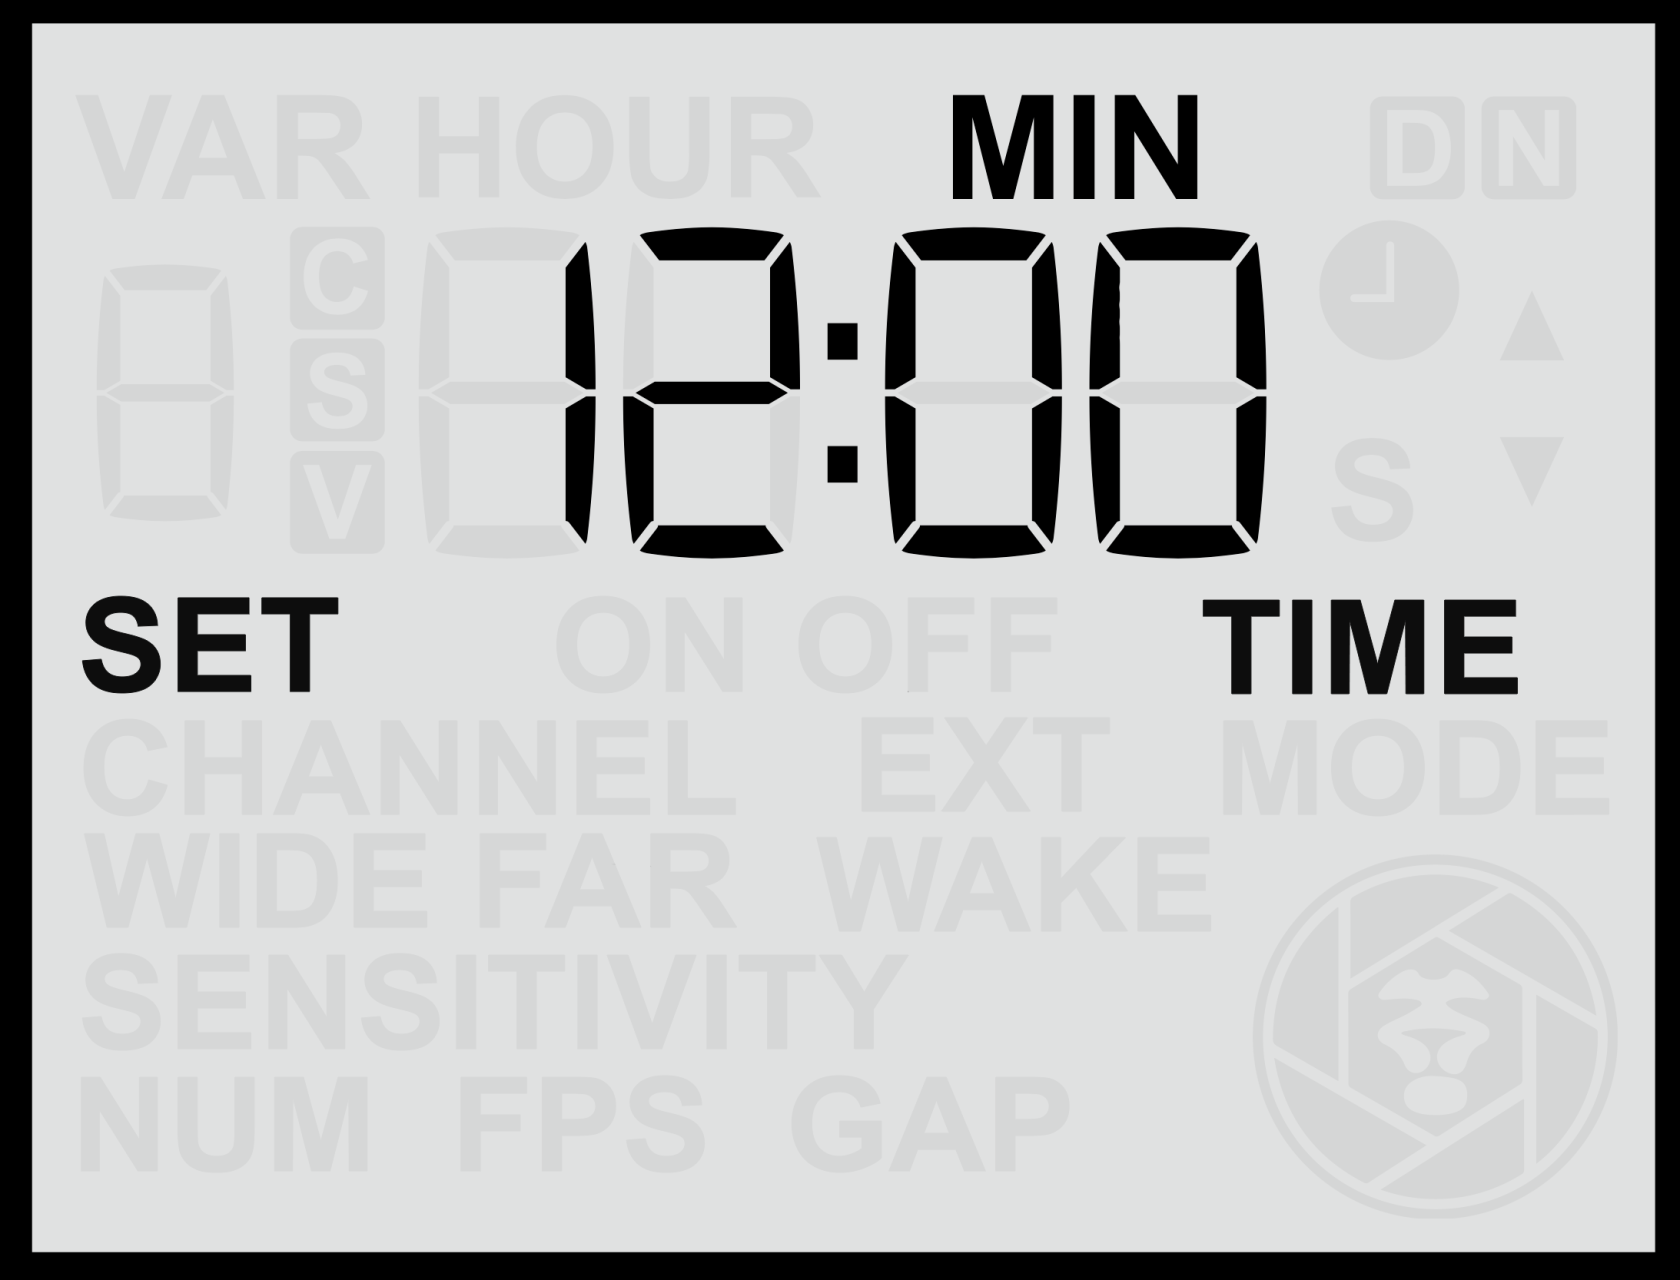
Note: The clock setting is retained internally, even when the sensor is powered off or the battery is removed.</p>

<p class="callout info">Note: For accurate operation of <span class="s1">**Time Windows**</span>, ensure the clock is set to <span class="s1">**local time**</span> in the location where the sensor is being deployed.
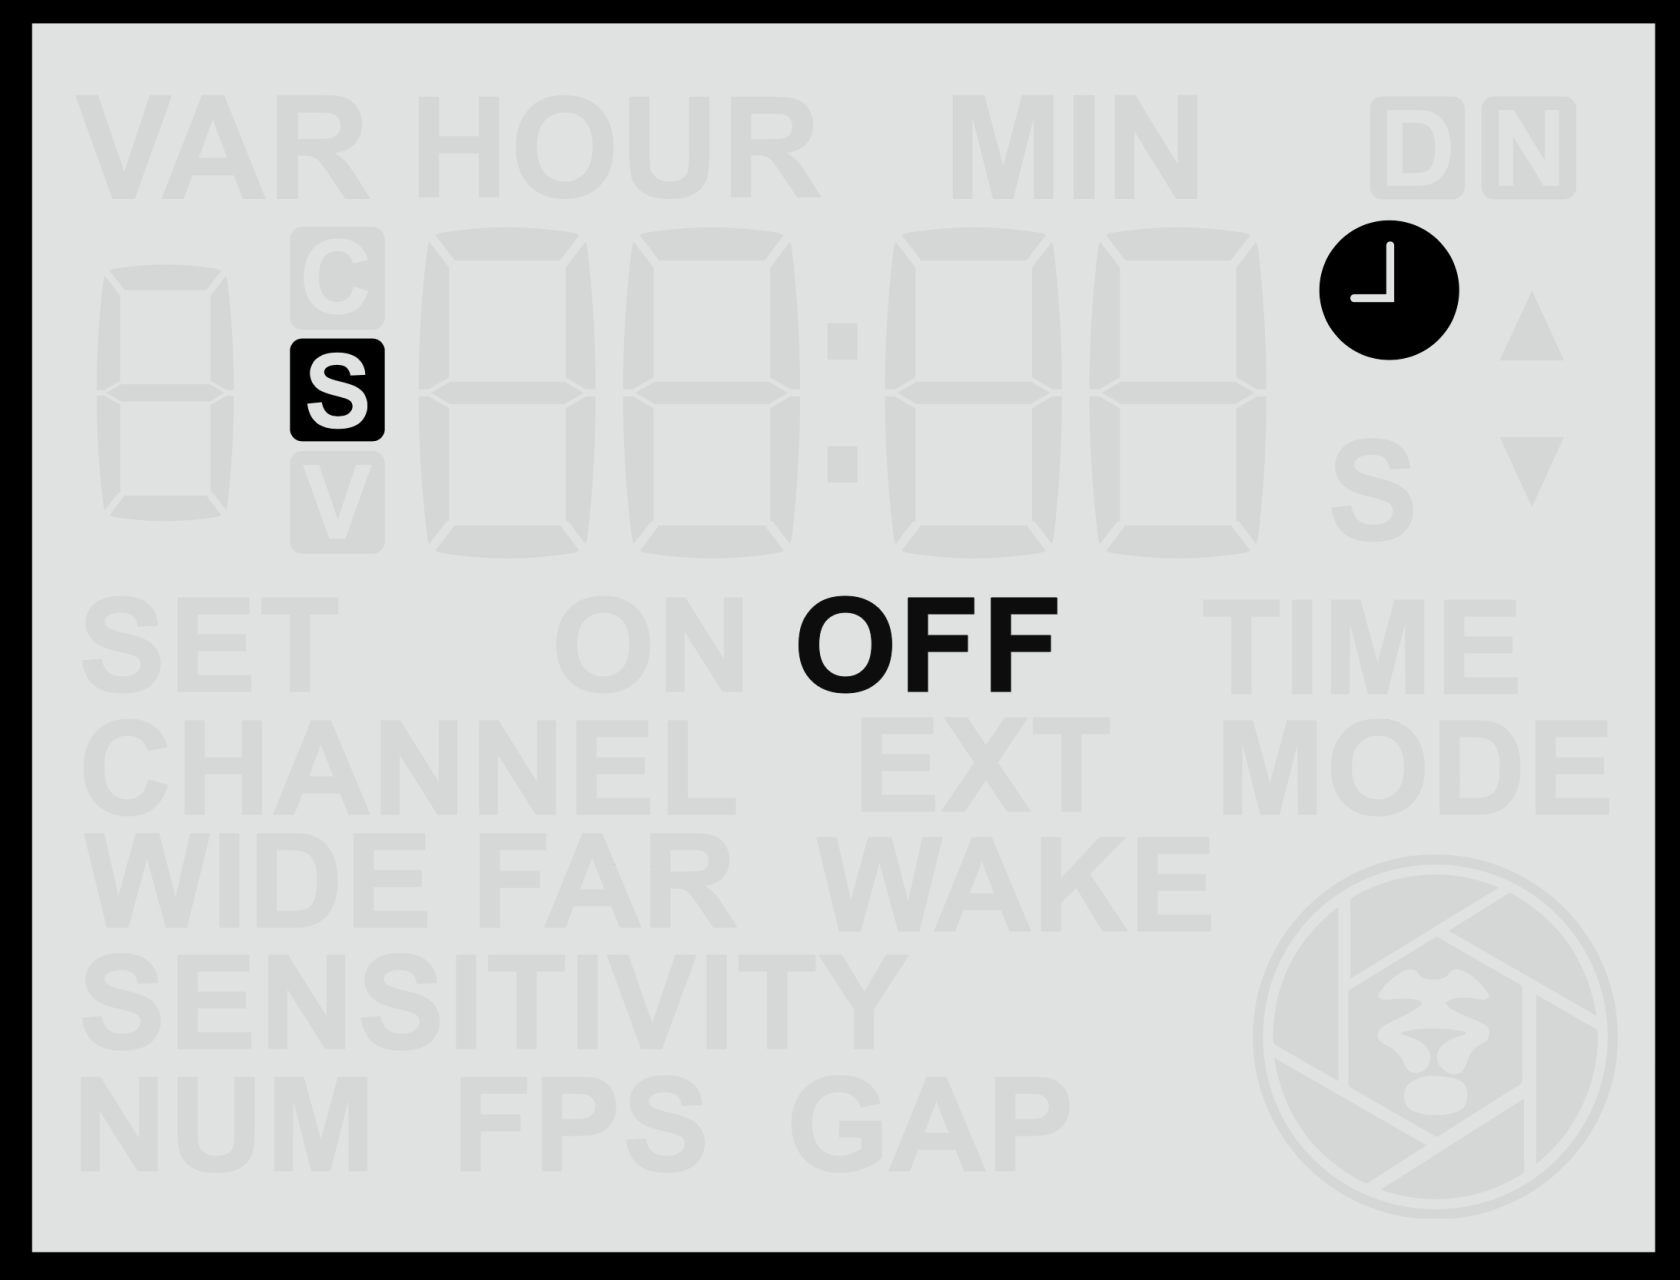
</p>

# Enable Time Windows

The <span class="s1">**Time Windows**</span> setting allows you to control when the sensor is active during a 24-hour period. When enabled, the sensor will automatically disable itself outside the defined time window, allowing it to operate only during selected hours (for example, <span class="s1">**nighttime only**</span> or <span class="s1">**daytime only**</span> operation).

![screen-time-mode.png](https://docs.camtraptions.com/uploads/images/gallery/2025-10/scaled-1680-/screen-time-mode.png)

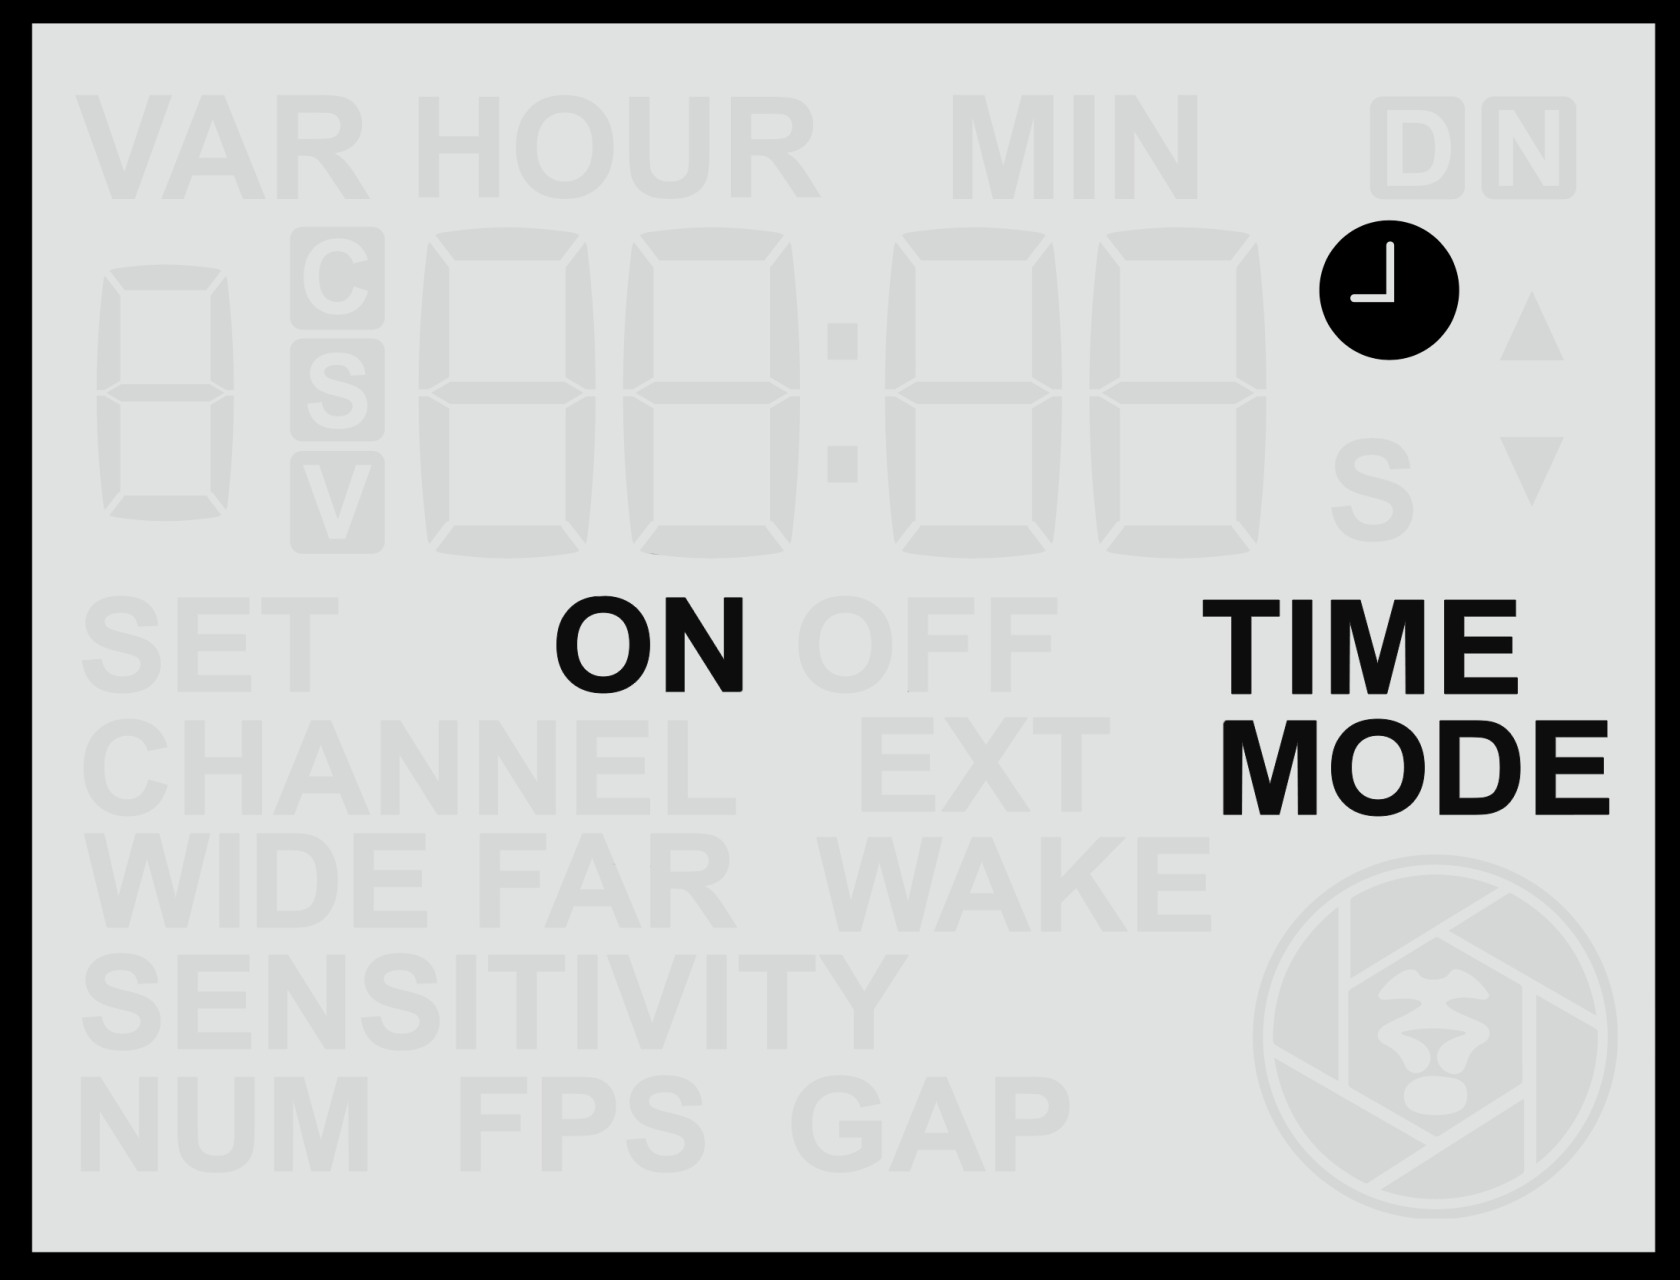
#### **Enabling or Disabling Time Windows**

1. From the <span class="s1">**Home Screen**</span>, press the <span class="s1">**Right Arrow**</span> until you reach the <span class="s1">**Time Windows**</span> screen.
2. Press the <span class="s1">**Up**</span> or <span class="s1">**Down**</span> button to toggle between <span class="s1">**ON**</span> and <span class="s1">**OFF**</span>.

When <span class="s1">**Time Windows**</span> are enabled, a <span class="s1">**clock icon**</span> will appear on the <span class="s1">**Home Screen**</span>, indicating that scheduled operating hours are active. The clock icon on the **Home Screen** will be accompanied by either **ON** or **OFF**. This provides a convenient indication of whether the sensor is currently inside an active time window (**ON**) and is therefore **working**, or outside an active time window (**OFF**) and is therefore is **disabled**.

#### **Notes on Operation**

- When Time Windows are <span class="s1">**ON**</span>, the sensor will remain <span class="s1">**inactive**</span> outside the specified time range.
- Currently, <span class="s1">**only one time window**</span> can be defined per 24-hour cycle (for example, limiting operation to daylight or night hours).
- Ensure the <span class="s1">**internal clock**</span> is correctly set before enabling Time Windows (see *Set Clock Time* section).

<p class="callout info">Future firmware updates may introduce the ability to configure multiple time windows. If multiple time windows would be a valuable feature for your application, please contact <span class="s1">**Camtraptions**</span> for updates or to provide feedback.</p>

<p class="callout warning">An active Time Window may cause the sensor to appear unresponsive. If the sensor does not seem to react to motion, first check whether the clock icon is visible on the Home Screen and if the activity indicator is displaying **OFF**. If it is, verify that the internal clock and time window settings are correct.</p>

# Set On Time

The <span class="s1">**Window On Time**</span> setting defines the time of day when the sensor becomes <span class="s1">**active**</span> — in other words, the start of the period during which motion detection and triggering are enabled.

This feature works in conjunction with the <span class="s1">**Time Windows**</span> setting. For example, if you wish the sensor to operate <span class="s1">**only at night**</span>, you might set the *Window On Time* to <span class="s1">**18:00 (6:00 p.m.)**</span> and the *Window Off Time* to <span class="s1">**06:00 (6:00 a.m.)**</span>.

![screen-set-on-time.png](https://docs.camtraptions.com/uploads/images/gallery/2025-10/scaled-1680-/screen-set-on-time.png)

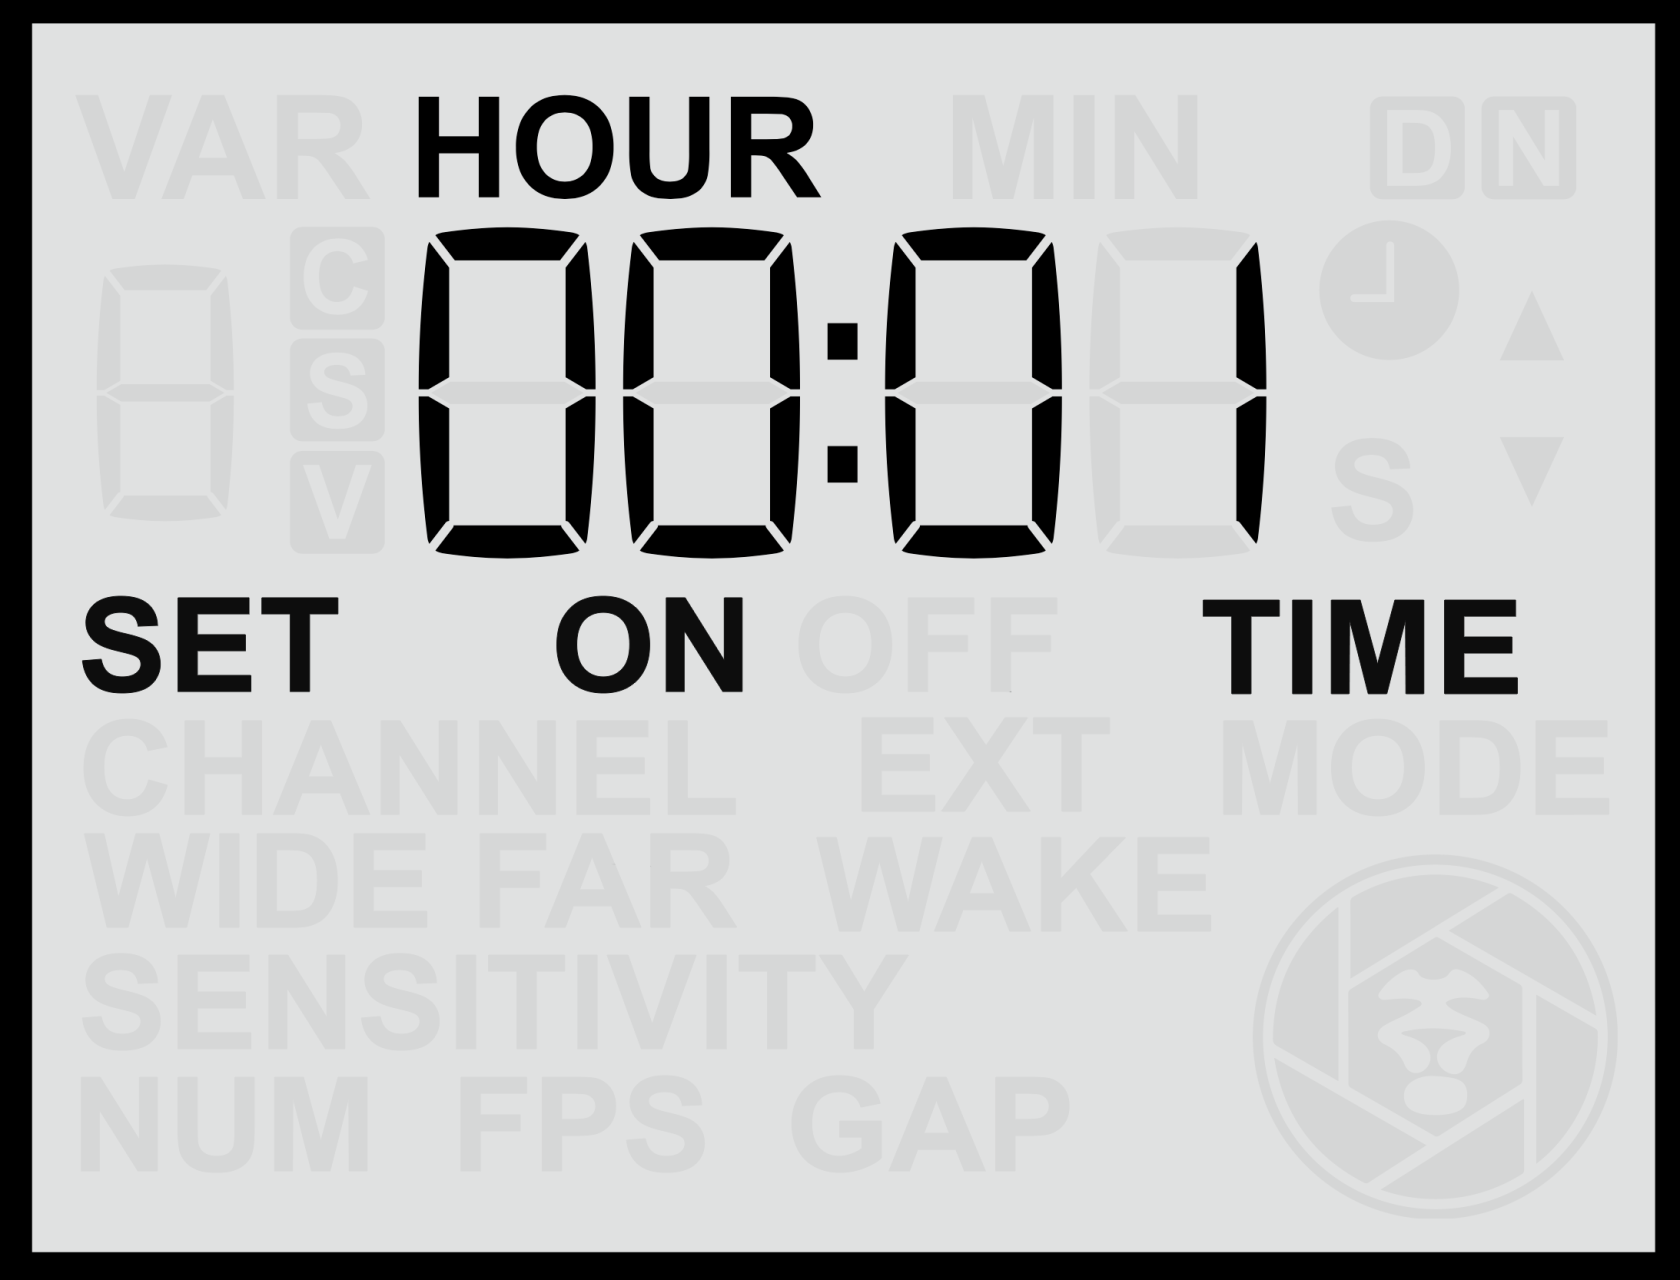
#### **Setting the Window On Time**

1. From the <span class="s1">**Home Screen**</span>, press the <span class="s1">**Right Arrow**</span> until you reach the <span class="s1">**Window On Time**</span> screen.
2. Use the <span class="s1">**Up**</span> or <span class="s1">**Down**</span> buttons to adjust the <span class="s1">**hour**</span> value.
3. Press the <span class="s1">**Set**</span> button to confirm the hour.
4. The <span class="s1">**minute**</span> value will then begin flashing — use the <span class="s1">**Up**</span> or <span class="s1">**Down**</span> buttons to adjust it.
5. Press <span class="s1">**Set**</span> again to save the time.

The time is entered in <span class="s1">**24-hour format**</span> (00:00 to 23:59).

#### **Notes**

- Ensure the <span class="s1">**Time Windows**</span> feature is <span class="s1">**enabled**</span> for this setting to take effect.
- For reliable operation, confirm that the <span class="s1">**sensor clock**</span> is set accurately before adjusting time windows (see [**Set Clock Time**](https://docs.camtraptions.com/books/pir-v4-manual/page/set-clock-time "Set Clock Time") section).

# Set Off Time

The <span class="s1">**Window Off Time**</span> setting defines the time of day when the sensor becomes <span class="s1">**inactive**</span>, marking the end of the period during which motion detection and triggering are enabled.

This setting works together with the <span class="s1">**Window On Time**</span> to establish the daily operating period for the sensor. For example, if you want the sensor to operate <span class="s1">**only at night**</span>, you might set the *Window On Time* to <span class="s1">**18:00 (6:00 p.m.)**</span> and the *Window Off Time* to <span class="s1">**06:00 (6:00 a.m.)**</span>.

![screen-set-off-time.png](https://docs.camtraptions.com/uploads/images/gallery/2025-10/scaled-1680-/screen-set-off-time.png)

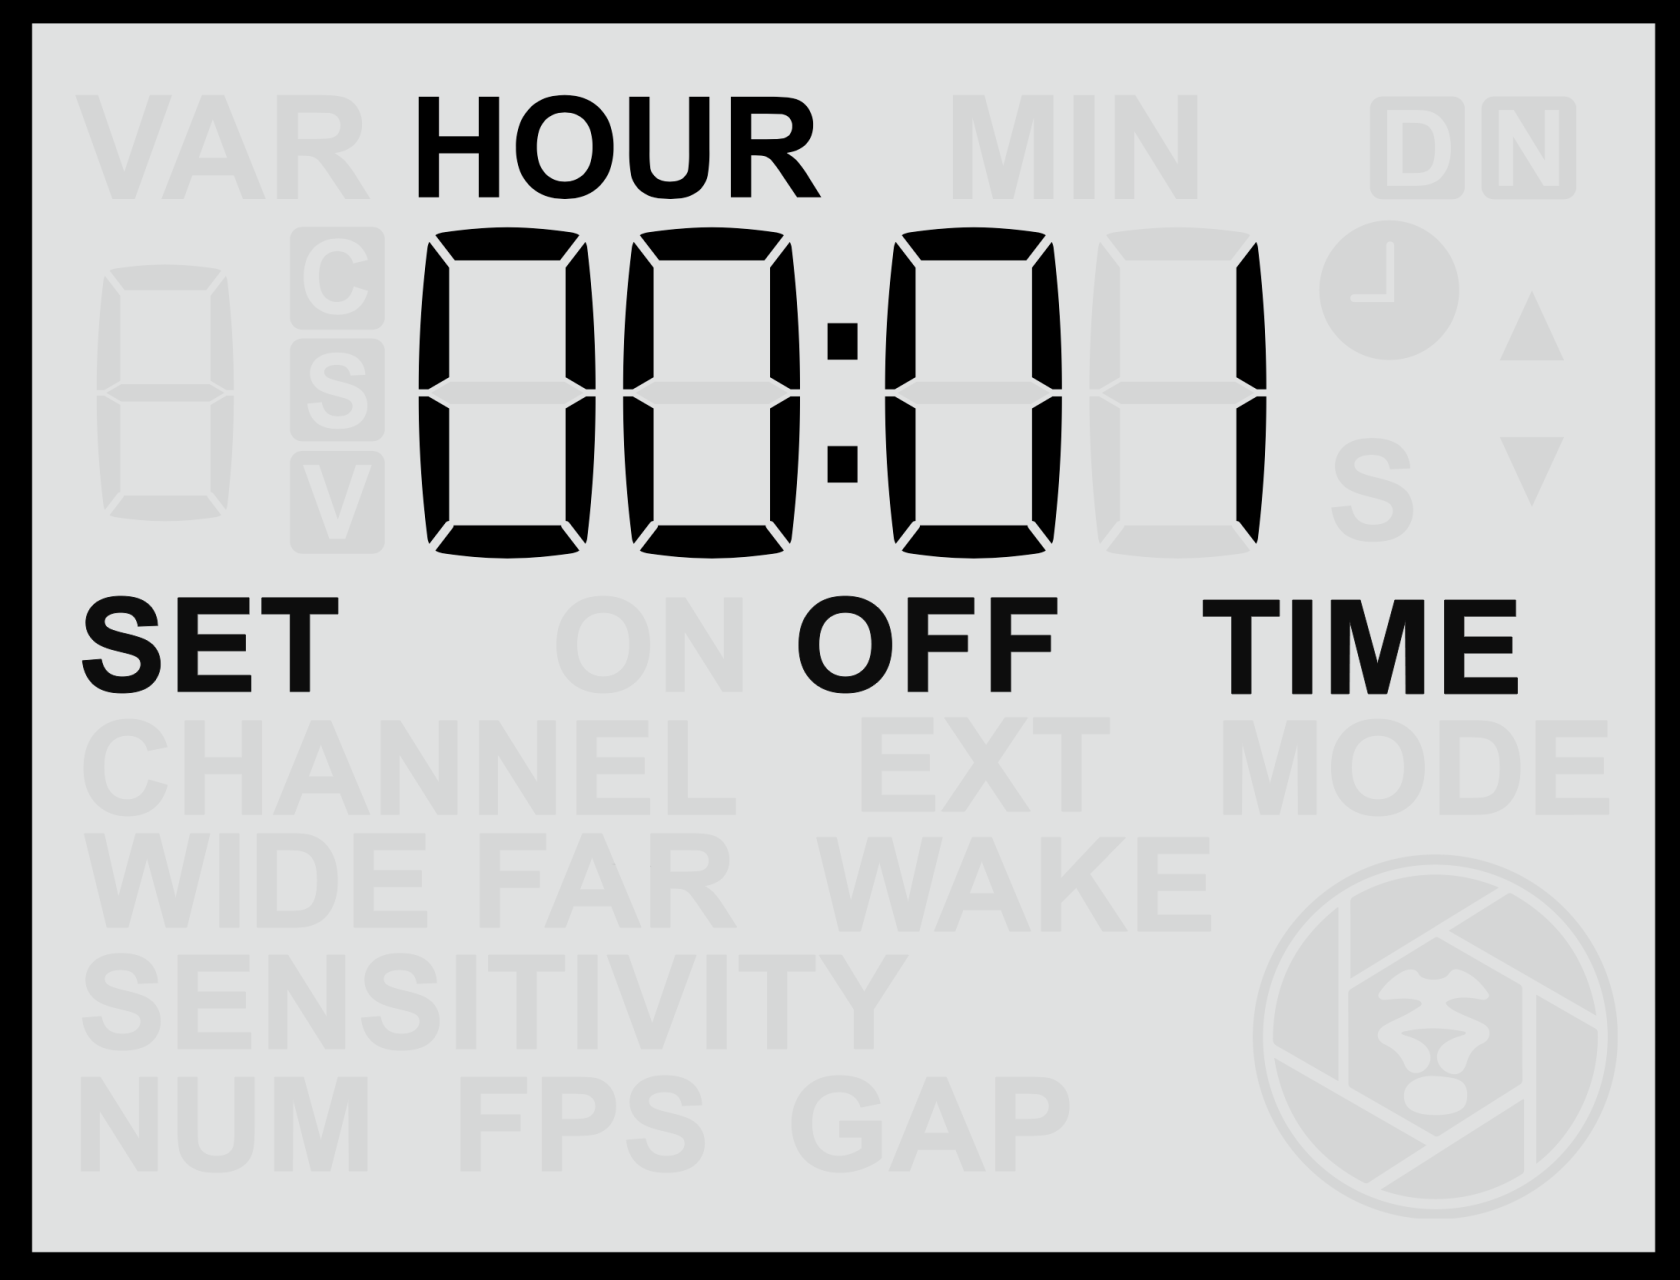
#### **Setting the Window Off Time**

1. From the <span class="s1">**Home Screen**</span>, press the <span class="s1">**Right Arrow**</span> until you reach the <span class="s1">**Window Off Time**</span> screen.
2. Use the <span class="s1">**Up**</span> or <span class="s1">**Down**</span> buttons to adjust the <span class="s1">**hour**</span> value.
3. Press the <span class="s1">**Set**</span> button to confirm the hour.
4. The <span class="s1">**minute**</span> value will then begin flashing — use the <span class="s1">**Up**</span> or <span class="s1">**Down**</span> buttons to adjust it.
5. Press <span class="s1">**Set**</span> again to save the time.

The time is entered in <span class="s1">**24-hour format**</span> (00:00 to 23:59).

#### **Notes**

- Ensure the <span class="s1">**Time Windows**</span> feature is <span class="s1">**enabled**</span> for this setting to take effect.
- The <span class="s1">**sensor will remain inactive**</span> outside the defined time window.
- If the Off Time is set to the same value as the On Time, the sensor will remain active at all times.
- For reliable operation, confirm that the <span class="s1">**sensor clock**</span> is set correctly before defining time windows (see [**Set Clock Time**](https://docs.camtraptions.com/books/pir-v4-manual/page/set-clock-time "Set Clock Time") section).

# External Wake

The <span class="s2">**Periodic External Wake**</span> setting allows the sensor to send a brief <span class="s2">**half-press (wake)**</span> signal to the connected camera or flash equipment at regular intervals. This periodic signal helps prevent certain devices from entering deep sleep modes and ensures they remain responsive for long-term deployments.

![screen-periodic-wake.png](https://docs.camtraptions.com/uploads/images/gallery/2025-10/scaled-1680-/screen-periodic-wake.png)

#### **Purpose of Periodic Wake**

This feature can be useful for a variety of situations, including:

- <span class="s1">**Preventing cameras**</span> from entering deep sleep or becoming unresponsive if left idle for long periods (for example, some models require a command at least once every 24 hours).
- <span class="s1">**Keeping third-party flashes**</span> active by preventing them from entering power-saving modes.

Although there are several potential uses, the <span class="s2">**main purpose**</span> of this setting is to maintain camera responsiveness in systems that may otherwise power down or lose connection over extended periods of inactivity.

#### **Setting the Periodic Wake Interval**

1. From the <span class="s1">**Home Screen**</span>, press the <span class="s1">**Right Arrow**</span> until you reach the <span class="s1">**Periodic Wake**</span> screen.
2. Use the <span class="s1">**Up**</span> or <span class="s1">**Down**</span> buttons to adjust the desired time interval in hours and minutes, from a minimum of 1 minute to a maximum of 24 hours.
3. Press the <span class="s1">**Set**</span> button to confirm and save your setting.

The interval can be configured in <span class="s2">**minutes and hours**</span>, and the sensor will send a brief <span class="s2">**wake signal**</span> to the connected equipment at each interval.

#### **Enable or Disable the Periodic Wake Function**

- <span class="s1">**Hold**</span> either the <span class="s1">**Up**</span> or <span class="s1">**Down**</span> button for more than <span class="s1">**2 seconds**</span> while on the **EXT WAKE** screen.
- When active, the display will show the <span class="s1">**“ON”**</span> indicator.

<p class="callout info">Panasonic cameras, such as the Panasonic GH4 and GH5, can enter a deep sleep state after extended inactivity. To prevent this, set a Periodic Wake interval of around 11 hours. This ensures the sensor sends a brief wake signal periodically, keeping the camera responsive during long deployments.
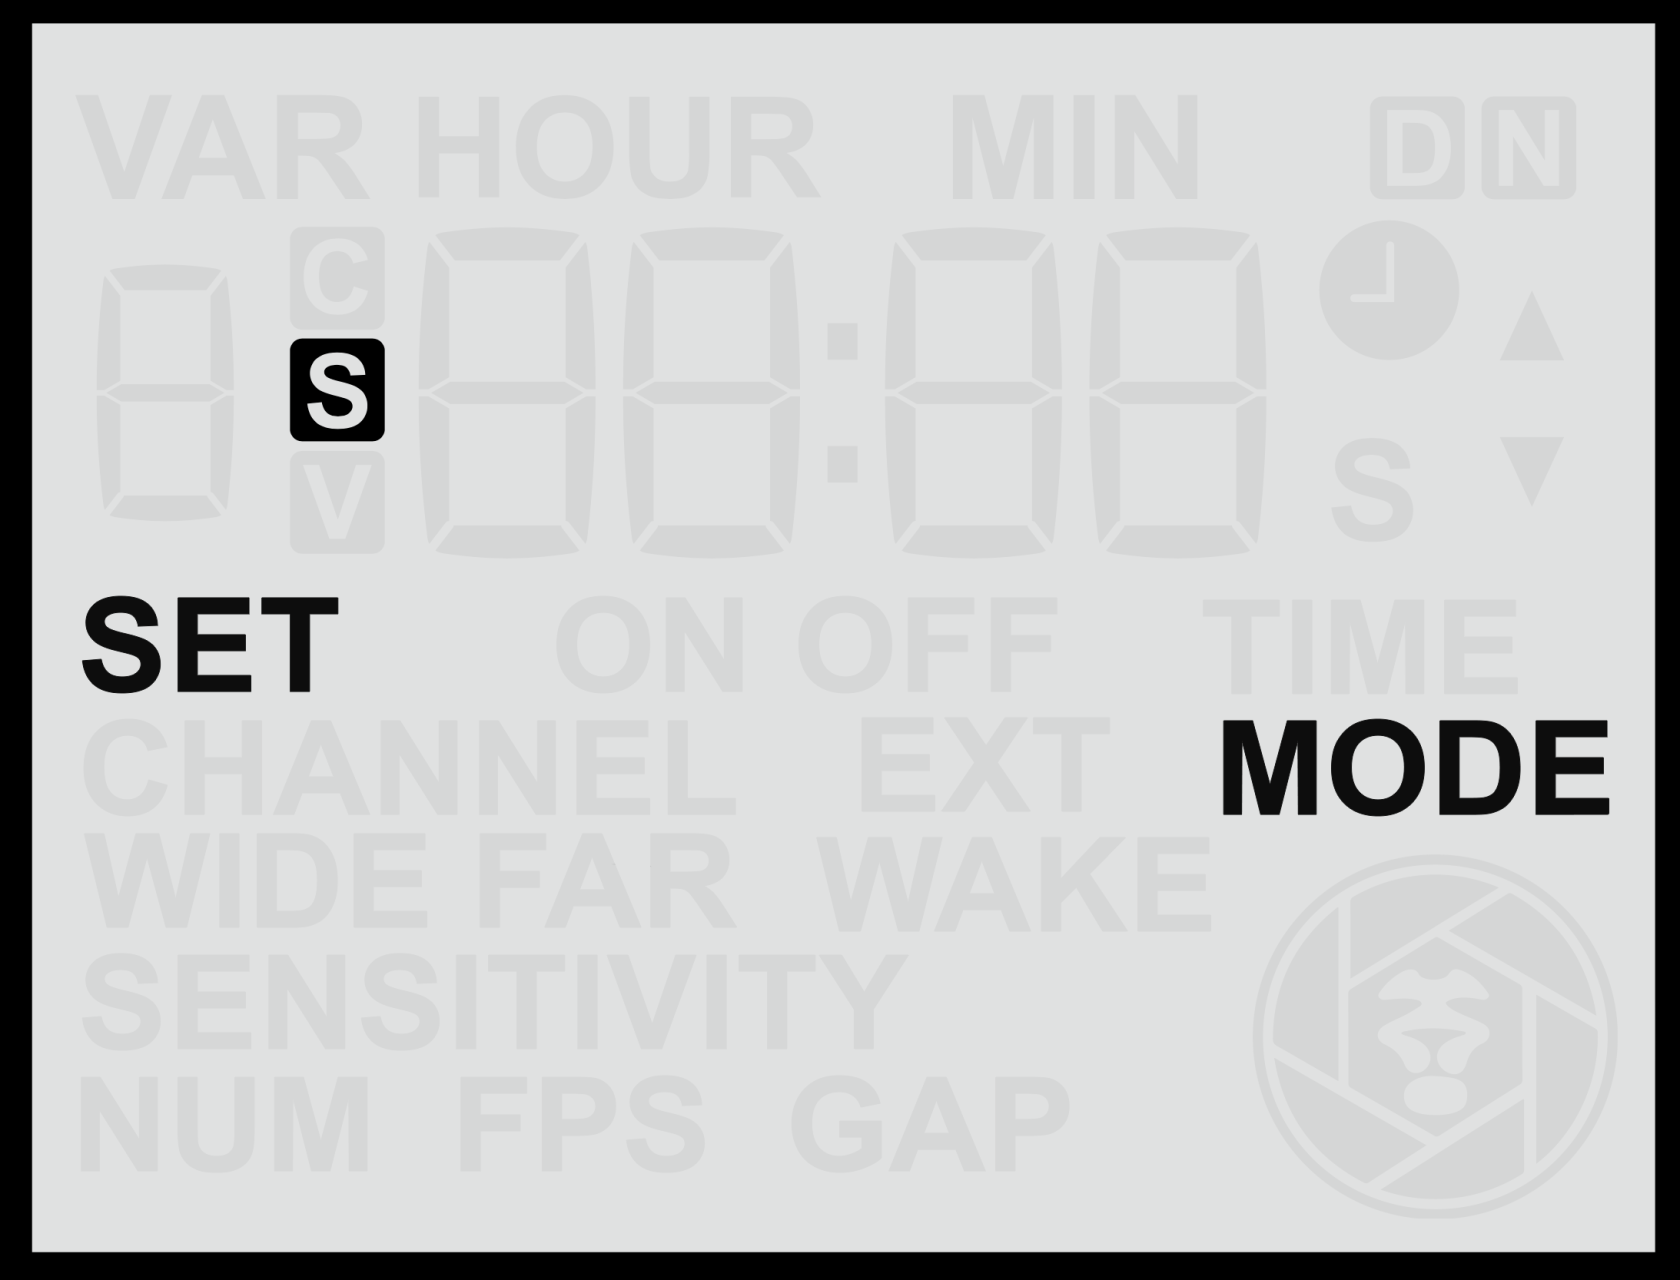
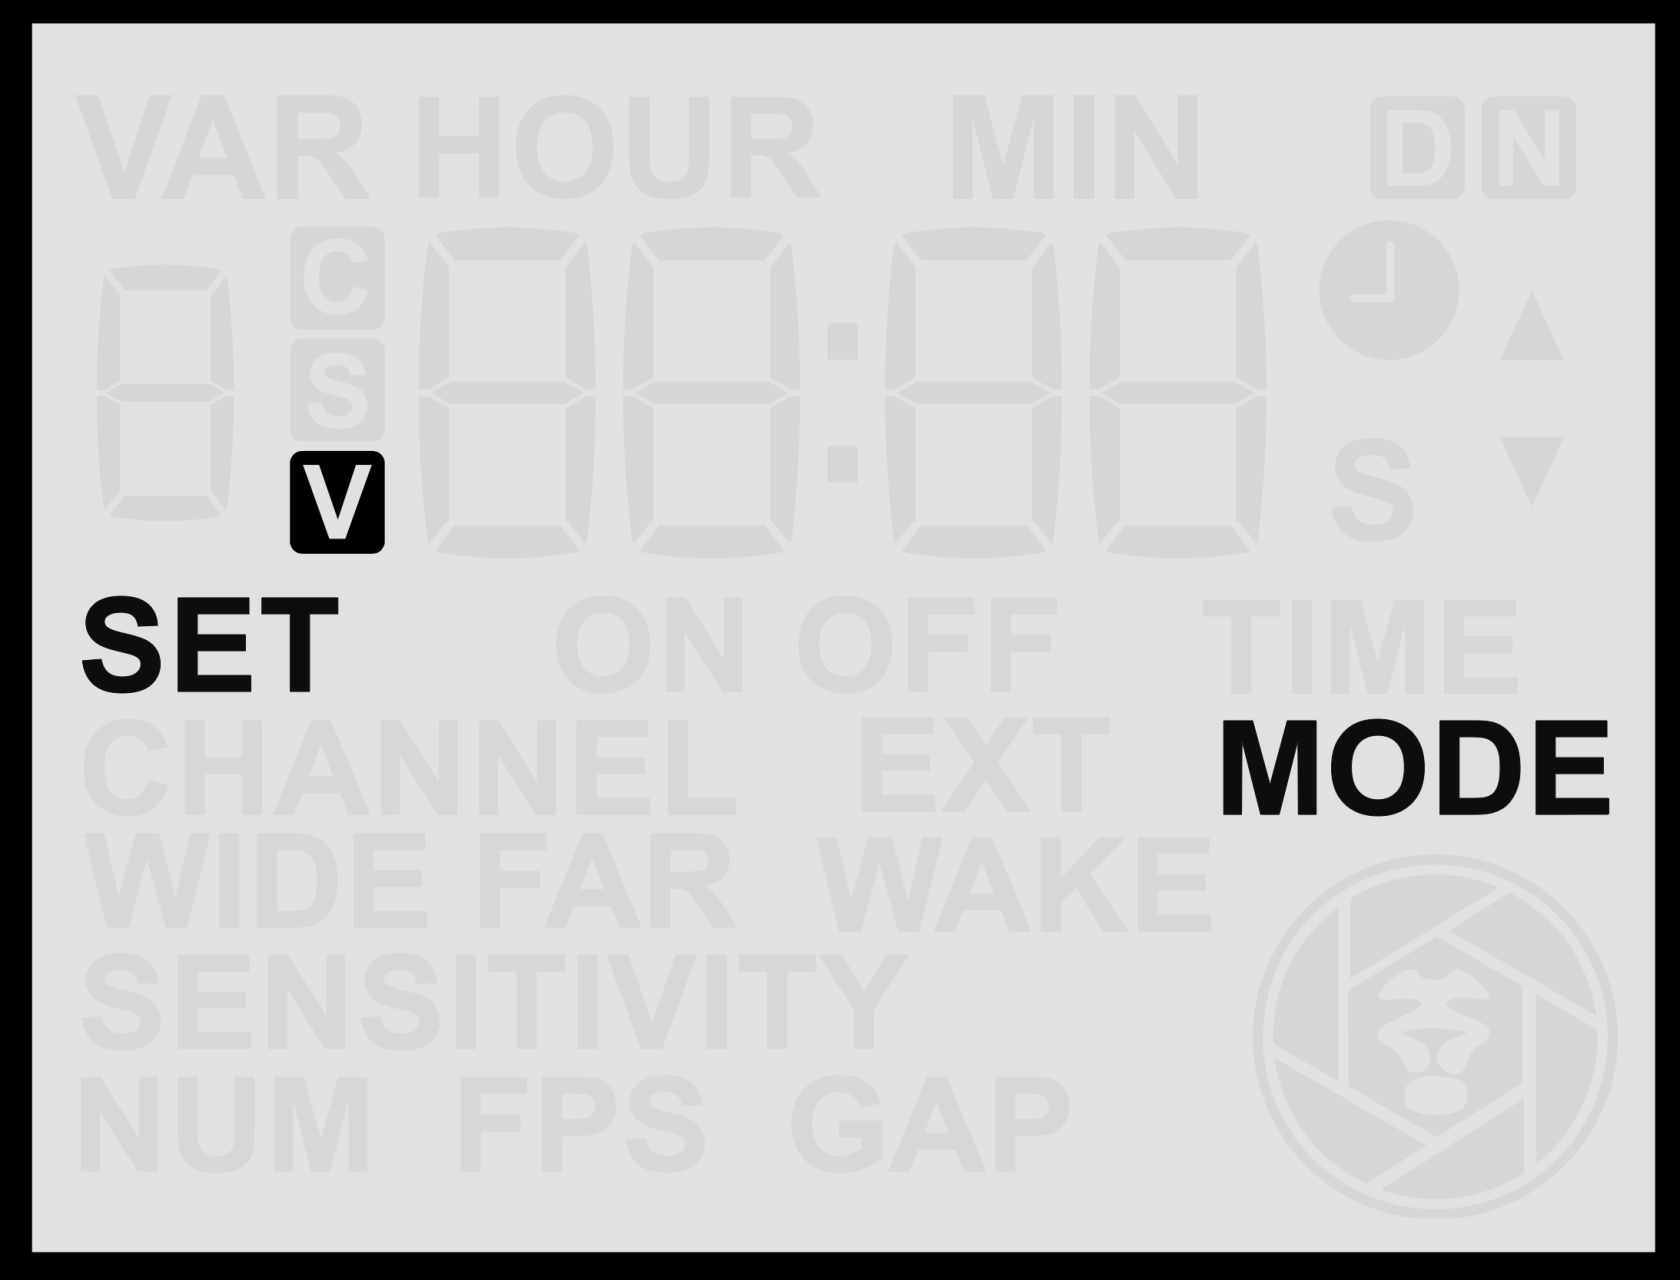
</p>

#### **Notes**

- <span class="s1">**Periodic Wake signals are only sent during active time windows.**</span> If Time Windows are enabled, wake signals will not be transmitted while the sensor is in an off-window period.
- If using <span class="s1">**Camtraptions flashes**</span> or cameras that remain active without assistance (which is the majority of cameras), this setting is not required.
- Using shorter intervals will slightly increase power consumption (not just of the sensor but of the equipment being woken), so choose the <span class="s1">**longest interval**</span> that reliably keeps your equipment awake.

# Advanced Configuration

Advanced Configuration provides in-depth control through Custom Variables (C Vars), allowing you to fine-tune signal durations, flash behaviour, and specialist functions. It also explains how to restore factory defaults and manage complex custom setups safely.

# Custom Variables

The <span class="s1">**Custom Variables**</span> menu provides access to advanced configuration options that allow the behaviour of the sensor to be <span class="s1">**fine-tuned**</span>. These variables modify timing parameters that affect how the camera is triggered, how long signals are held for, and other aspects of sequence timing. For the majority of users, customising these settings is generally unnecessary.

In some cases, enabling or adjusting a Custom Variable may <span class="s1">**override standard Still or Video Mode settings**</span>, resulting in slightly different sequence timing than expected. These options are intended for advanced users who require precise control over the triggering sequence.

### **Accessing Custom Variables**

1. From the <span class="s1">**Home Screen**</span>, press and hold the **Left and <span class="s1">Right Buttons</span>** simultaneously for more than **2 seconds** until the <span class="s1">**Custom Variables**</span> (C VAR) screen appears.
2. Use the <span class="s1">**Left**</span> and <span class="s1">**Right**</span> buttons to select the desired variable number.
3. Use the <span class="s1">**Up**</span> and <span class="s1">**Down**</span> buttons to select the desired variable value.
4. Press <span class="s1">**Set**</span> to save the new value.
5. Some custom settings can also be enabled or disabled by holding the **Up** or **Down** button for more than **2 seconds** to toggle them **On** and **Off**.

![screen-cvar1.png](https://docs.camtraptions.com/uploads/images/gallery/2025-10/scaled-1680-/screen-cvar1.png)

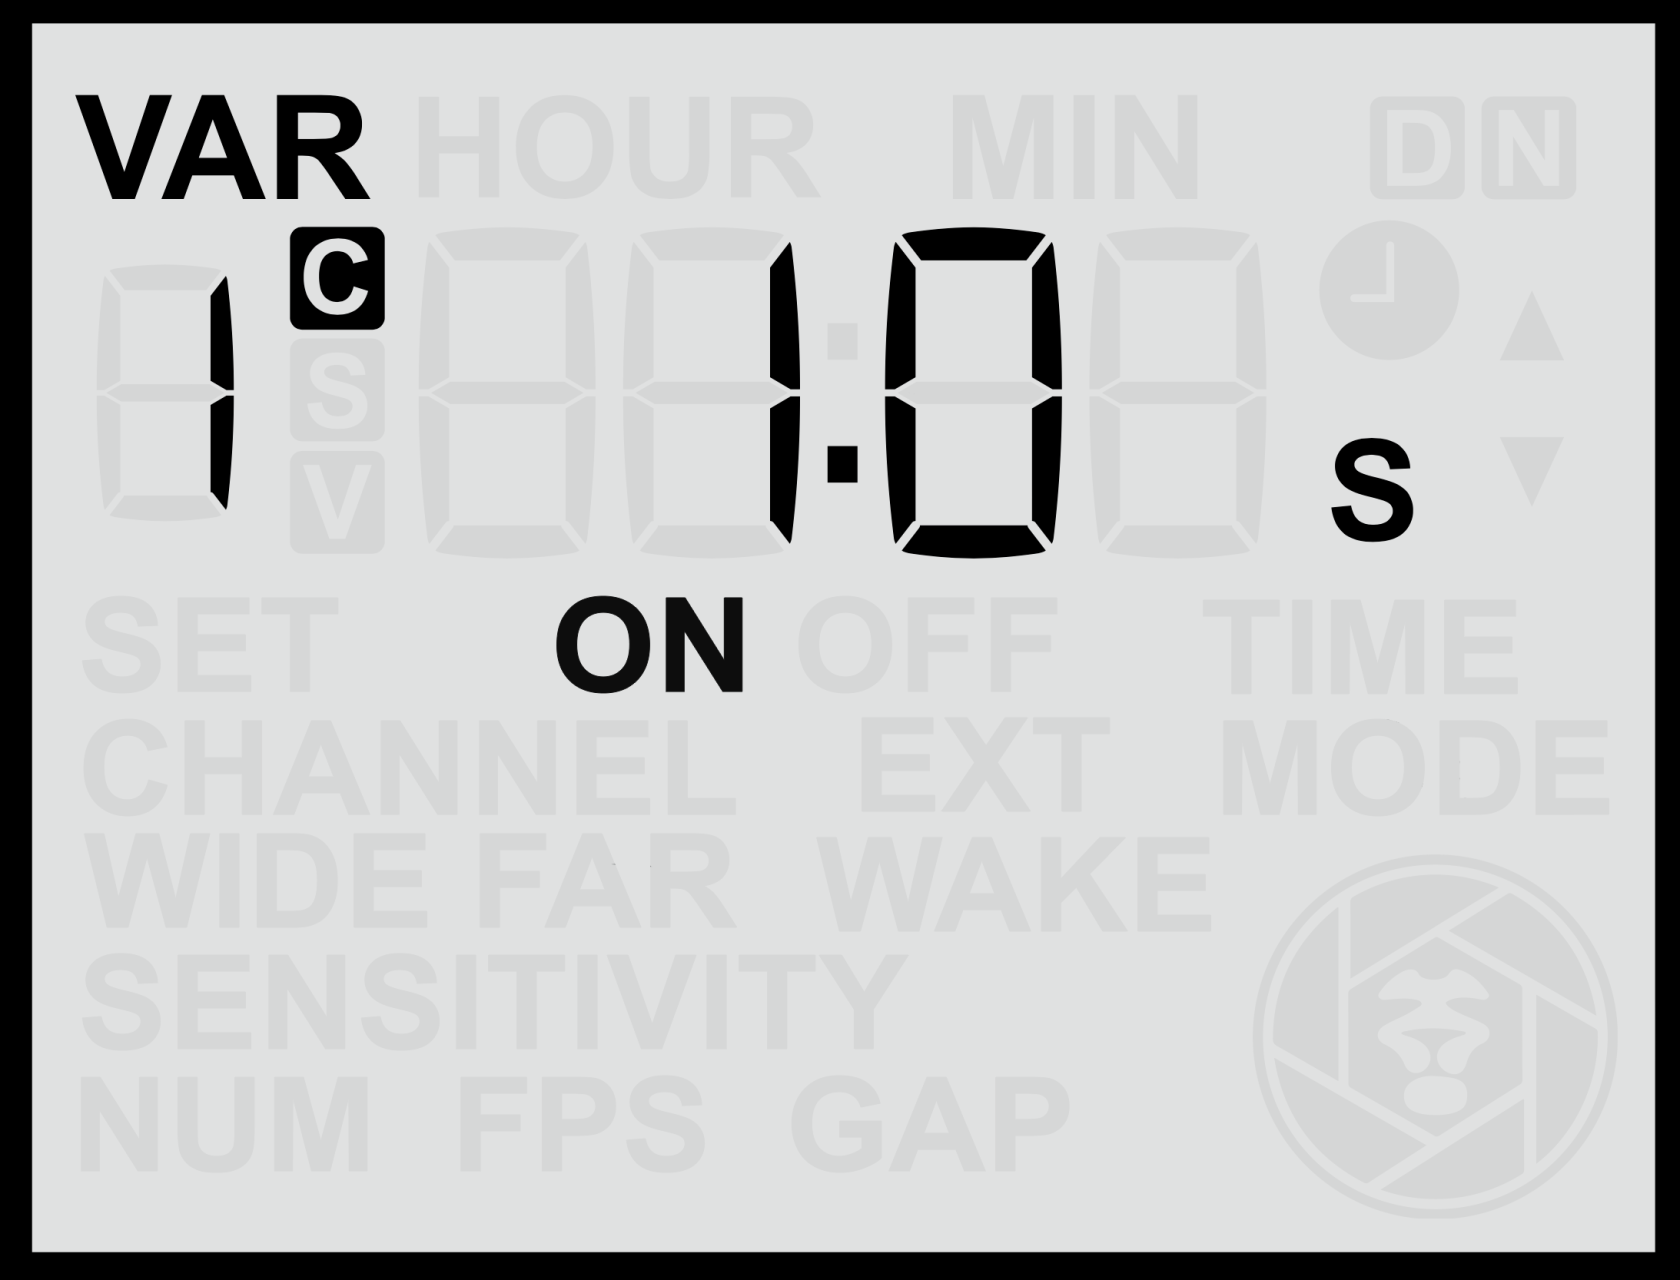
### **Leaving the Custom Variable Menu**

From the custom variable menu, you can return to the Home Screen by either:

- Not pressing a button for 20 seconds.
- Pressing the **Left and Right Buttons** simultaneously for more than **2 seconds.**

### **Available Custom Variables**

<table id="bkmrk-c-var-description-de" style="width: 100%; height: 684.305px;"><thead><tr style="height: 46.5938px;"><th style="width: 7.38975%; height: 46.5938px;">**C Var**</th><th style="width: 70.6794%; height: 46.5938px;">**Description**</th><th style="width: 8.70083%; height: 46.5938px;">**Default Value**</th><th style="width: 13.23%; height: 46.5938px;">**Adjustable Range**</th></tr></thead><tbody><tr><td style="width: 7.38975%;">0</td><td style="width: 70.6794%;"><span class="s1">**[Sampling Frequency / Adaptive Sensitivity](https://docs.camtraptions.com/books/pir-v4-manual/page/custom-variable-0 "Custom Var 0")** – Fine-tune the sensor sensitivity and response speed.</span></td><td style="width: 8.70083%;">8</td><td style="width: 13.23%;">1-16</td></tr><tr style="height: 52.1953px;"><td style="width: 7.38975%; height: 52.1953px;">**1**</td><td style="width: 70.6794%; height: 52.1953px;">[<span class="s1">**Half-Press Length (Before Full Press)**</span>](https://docs.camtraptions.com/books/pir-v4-manual/page/custom-variable-1 "Custom Var 1") – Determines how long the half-press (wake) signal is held before the full-press trigger in both still and video modes.</td><td style="width: 8.70083%; height: 52.1953px;">0.1 s</td><td style="width: 13.23%; height: 52.1953px;">0.1–5.0 s (in 0.1 s steps)</td></tr><tr style="height: 46.5938px;"><td style="width: 7.38975%; height: 46.5938px;">**2**</td><td style="width: 70.6794%; height: 46.5938px;"><span class="s1">**Half-Press Length (After Full Press)**</span> – Determines how long the half-press signal is held after the full-press trigger in both still and video modes.</td><td style="width: 8.70083%; height: 46.5938px;">0.1 s</td><td style="width: 13.23%; height: 46.5938px;">0.1–5.0 s (in 0.1 s steps)</td></tr><tr style="height: 46.5938px;"><td style="width: 7.38975%; height: 46.5938px;">**3**</td><td style="width: 70.6794%; height: 46.5938px;"><span class="s1">**Full-Press Duration (Still Mode)**</span> – If enabled, this overrides the full-press timing determined by the FPS setting.</td><td style="width: 8.70083%; height: 46.5938px;">—</td><td style="width: 13.23%; height: 46.5938px;">0.1–2.9 s (in 0.1 s steps)</td></tr><tr style="height: 46.5938px;"><td style="width: 7.38975%; height: 46.5938px;">**4**</td><td style="width: 70.6794%; height: 46.5938px;"><span class="s1">**Gap Between Full-Press Signals (Still Mode)**</span> – When *Number* (NUM) &gt; 1, this defines the interval between shots. If enabled, it overrides the FPS-determined interval.</td><td style="width: 8.70083%; height: 46.5938px;">—</td><td style="width: 13.23%; height: 46.5938px;">0.1–15.0 s (in 0.1 s steps)</td></tr><tr style="height: 46.5938px;"><td style="width: 7.38975%; height: 46.5938px;">**5**</td><td style="width: 70.6794%; height: 46.5938px;"><span class="s1">**Full-Press Duration (Video Mode)**</span> – Defines how long the full-press signal is held when starting or maintaining a video recording.</td><td style="width: 8.70083%; height: 46.5938px;">1.0 s</td><td style="width: 13.23%; height: 46.5938px;">0.1–2.9 s (in 0.1 s steps)</td></tr><tr style="height: 68.9922px;"><td style="width: 7.38975%; height: 68.9922px;">**6**</td><td style="width: 70.6794%; height: 68.9922px;"><span class="s1">**Maximum Video Length Extension Limit**</span> – Sets an absolute maximum video extension length in minutes. This limits the total recording duration when *Extend Time* is enabled. The maximum recording time will be this variable plus the standard [recording time](https://docs.camtraptions.com/books/pir-v4-manual/page/video-mode-settings "Video Mode Settings").</td><td style="width: 8.70083%; height: 68.9922px;">—</td><td style="width: 13.23%; height: 68.9922px;">1–60 min</td></tr><tr style="height: 152.977px;"><td style="width: 7.38975%; height: 152.977px;">**7**

</td><td style="width: 70.6794%; height: 152.977px;">[<span class="s1">**Flash Wake / Flash Fire Signals**</span>](https://docs.camtraptions.com/books/pir-v4-manual/page/custom-variables-7-and-8 "Custom Var 7 and 8") – Controls whether flash trigger signals are sent during still sequences:   
• <span class="s1">0</span> – No flash wake or fire signals sent.   
• <span class="s1">**1**</span> – A 0.2 s <span class="s1">**Flash Wake**</span> signal is sent immediately before the **first** camera trigger signal in any still sequence.   
• <span class="s1">**2**</span> – A 0.2 s <span class="s1">**Flash Wake**</span> signal is sent immediately before the **first** camera trigger signal, and a 0.2 s <span class="s1">**Flash Fire**</span> signal is sent after **every** camera trigger signal in the sequence.

</td><td style="width: 8.70083%; height: 152.977px;">0

</td><td style="width: 13.23%; height: 152.977px;">0–2

</td></tr><tr style="height: 63.3906px;"><td style="width: 7.38975%; height: 63.3906px;">**8**

</td><td style="width: 70.6794%; height: 63.3906px;">[<span class="s1">**Flash Signal Channel**</span>](https://docs.camtraptions.com/books/pir-v4-manual/page/custom-variables-7-and-8 "Custom Var 7 and 8") – Sets the <span class="s1">**wireless channel**</span> (1–15) used for the Flash Wake and Flash Fire signals defined by C Var 7. This should be set to a different channel than the [main camera trigger channel](https://docs.camtraptions.com/books/pir-v4-manual/page/wireless-channel "Wireless Channel").

</td><td style="width: 8.70083%; height: 63.3906px;">—

</td><td style="width: 13.23%; height: 63.3906px;">1–15

</td></tr><tr style="height: 113.781px;"><td style="width: 7.38975%; height: 113.781px;">**9**

</td><td style="width: 70.6794%; height: 113.781px;">**Wireless Power Boost** – When set to "1", this setting increases the strength of the wireless signal to improve reliability in setups where there may be <span class="s1">signal interference</span>, <span class="s1">long distances</span>, or <span class="s1">obstructions</span> between the sensor and the receiver. This is an <span class="s1">**experimental option**</span> intended primarily for troubleshooting wireless connectivity issues. In most circumstances, the default power level provides the best balance between <span class="s1">range</span>, <span class="s1">battery efficiency</span>, and <span class="s1">signal stability</span>.

</td><td style="width: 8.70083%; height: 113.781px;">0

</td><td style="width: 13.23%; height: 113.781px;">0–1

</td></tr></tbody></table>

To restore factory defaults, see the [<span class="s1">**Reset to Defaults**</span>](https://docs.camtraptions.com/books/pir-v4-manual/page/reset-to-defaults "Reset to Defaults") section.

<p class="callout warning">Adjusting Custom Variables can affect the timing of the camera’s wake, trigger, and release signals.</p>

# Custom Variable 0

The <span class="s1">**C Var 0**</span> menu screen allows you to adjust how **responsive** the sensor is to motion across both lenses. It controls how **frequently** the sensor is taking measurements to look for **movements** (changes in infrared radiations) across its field of view. Taking more frequent measurements means that the sensor will be able to pick up **smaller or more fleeting movements** that might otherwise be missed if it is sampling less frequently.

This is different to the **main [far](https://docs.camtraptions.com/books/pir-v4-manual/page/far-sensor "Far Sensor") &amp; [wide](https://docs.camtraptions.com/books/pir-v4-manual/page/wide-sensor "Wide Sensor") sensitivity setting** which relate to the **amplitude** of the infrared signal required to trigger the sensor, i.e. how **warm, large or close** the subject must be.

![screen-cvar0off.png](https://docs.camtraptions.com/uploads/images/gallery/2025-11/screen-cvar0off.png)

#### **Adjusting Sampling Frequency**

1. From the **C Var 0** screen, use the <span class="s1">**Up**</span> or <span class="s1">**Down**</span> buttons to change the value.
2. Press the <span class="s1">**Set**</span> button to <span class="s1">**save**</span> your selection.

Sampling Frequency can be set between <span class="s1">**1** and **16** (the default is 8)</span>, where:

- <span class="s1">**16**</span> = Maximum sampling frequency (the sensor will detect faster, smaller and more momentary movements).
- <span class="s1">**1**</span> = Minimum sampling frequency (requires slower, larger and more pronounced movement to trigger).

At higher sampling frequencies, the sensor will consume slightly more power and may be more susceptible to false triggering from wind, vegetation or dappled light, but it will be more effective at detecting small, rapidly moving subjects. Therefore, you should look to optimise the sampling frequency based on the intended subject, the environmental conditions and your battery life requirements.

#### **Adaptive Sensitivity Mode**

The sensor also features an <span class="s1">**Adaptive Sensitivity**</span> algorithm designed to help reduce false triggers in challenging environments.

To enable or disable Adaptive Sensitivity:

- <span class="s1">**Hold**</span> either the <span class="s1">**Up**</span> or <span class="s1">**Down**</span> button for more than **2**<span class="s1"> **seconds**</span> while on the **C Var 0** screen.
- When active, the display will show the <span class="s1">**“ON”**</span> indicator for Adaptive Sensitivity.

![screen-cvar0.png](https://docs.camtraptions.com/uploads/images/gallery/2025-11/screen-cvar0.png)

In this mode, the sensor dynamically adjusts its primary sensitivity thresholds, i.e. the thresholds that relate to the main [far](https://docs.camtraptions.com/books/pir-v4-manual/page/far-sensor "Far Sensor") &amp; [wide](https://docs.camtraptions.com/books/pir-v4-manual/page/wide-sensor "Wide Sensor") sensitivity settings (**not** the sampling frequency) in response to background activity levels:

- If there is <span class="s1">**persistent low-level motion or heat variation**</span> (for example, caused by wind-blown vegetation or rising warm air during the middle of the day), the trigger threshold is automatically increased.
- When background movement decreases, the sensor gradually lowers the threshold again.

This adaptive behaviour helps the sensor remain effective while <span class="s1">**reducing false detections**</span> under fluctuating environmental conditions.

In most circumstances, <span class="s1">**Normal Sensitivity Mode**</span> provides sufficient control. However, if false triggers occur intermittently — such as at certain times of day or under windy or hot conditions — <span class="s1">**Adaptive Sensitivity Mode**</span> could improve reliability.

# Custom Variable 1

### **Using Half-Press Duration for Autofocus (C Var 1)**

<span class="s2">**C Var 1**</span> controls the <span class="s2">**length of the half-press (HP)**</span> signal that is sent to the camera before the full-press (FP) trigger. By extending this half-press duration, the sensor gives the camera time to perform <span class="s2">**autofocus**</span> functions before the image is taken.

With newer <span class="s2">**mirrorless cameras**</span> offering highly advanced autofocus systems — including <span class="s2">**animal-eye detection**</span> — this feature allows autofocus to be used in camera-trap setups for the first time.

When the half-press signal is active, the camera can detect and focus on the subject before the shutter is triggered, enabling the possibility of shooting with a <span class="s2">**shallow depth of field**</span> and precise eye focus, creating images that differ greatly from traditional manual-focus camera-trap photos.

#### **Practical Considerations**

- <span class="s1">**Focus reliability:**</span> Autofocus-based setups are inherently less reliable than manual focus. Some images may be misfocused if the camera fails to detect the correct point of interest or locks onto background elements.
- <span class="s1">**Lighting:**</span> Autofocus requires <span class="s1">**continuous light**</span> to function. For nighttime use, <span class="s1">**video lights**</span> may be necessary, as flashes alone will not provide light until after focus is attempted.
- <span class="s1">**Timing:**</span> The optimal half-press duration depends on the camera model and lens. Mirrorless cameras typically require between <span class="s1">**0.2 s and 1 s**</span> for accurate subject detection and focus acquisition.

This setting introduces a new creative approach to camera trapping — enabling <span class="s2">**autofocus precision**</span> and <span class="s2">**shallow-depth-of-field imagery**</span> previously impractical with PIR triggers. While manual focus remains the most dependable method for critical work, <span class="s2">**C Var 1**</span> offers an exciting opportunity to experiment with modern autofocus systems for more dynamic and cinematic results.

# Custom Variables 7 and 8

### **Wireless Flash Wake and Flash Fire (C Var 7 &amp; C Var 8)**

<span class="s2">**C Var 7 and 8**</span> provide advanced control for managing external flashes, particularly in situations where the <span class="s2">**camera cannot wake or trigger flashes automatically**</span>. This feature is especially useful with <span class="s2">**Sony cameras**</span>, which do not send a wake signal to flashes before triggering them.

While flashes such as the <span class="s2">**Camtraptions F1**</span> and <span class="s2">**Z2**</span> do not require a wake signal, the <span class="s2">**Camtraptions Z Pro**</span> achieves much longer standby times by entering a low-power sleep mode. As a result, it must be <span class="s2">**woken**</span> before it can be triggered.

In such cases, the <span class="s2">**sensor**</span> can take over flash control independently:

- <span class="s1">**C Var 7 = 1:**</span> The sensor sends a <span class="s1">**0.2 s Flash Wake signal**</span> immediately before the **first** camera trigger signal in any stills sequence. This wakes compatible flashes (such as the Z Pro) so that they are ready when the <span class="s1">**camera**</span> sends its normal shoot signal.
- <span class="s1">**C Var 7 = 2:**</span> The sensor sends both a <span class="s1">**Flash Wake signal**</span> before the **first** camera trigger signal <span class="s1">**and**</span> a <span class="s1">**Flash Fire signal**</span> after **every** camera trigger signal. In this configuration, the <span class="s1">**camera does not need to send any flash trigger signal**</span>—the sensor handles all flash timing directly.

The <span class="s2">**wireless channel**</span> used for these **flash signals** is defined by <span class="s2">**C Var 8**</span>, which can be set between <span class="s2">**1 and 15**</span>. This should be set to a **different channel** than the [main camera trigger channel](https://docs.camtraptions.com/books/pir-v4-manual/page/wireless-channel "Wireless Channel").

<span class="s1">The **C Var 7 = 2**</span> configuration is particularly effective for <span class="s2">**night-time photography**</span>, where <span class="s2">**long shutter speeds**</span> allow the flash to fire during the exposure window.

As long as the <span class="s2">**shutter speed is longer than the Full-Press duration**</span>, the flash will fire within the open exposure, even when the camera itself is not controlling the flash. The Full-press duration can be customised using C Var 3 so that the flash fires as quickly as possible after the camera shutter opens.

This setup provides a <span class="s2">**reliable and flexible method**</span> to trigger flashes entirely via the sensor, simplifying configurations where cameras have limited flash-control capabilities or when using <span class="s2">**off-camera flash systems**</span> in low-light environments.

# Reset to Defaults

From the <span class="s2">**Custom Variables (C Var)**</span> menu, if you continue scrolling past the last C Var entry, you will reach a screen labelled <span class="s2">**“reset”**</span>. This screen allows you to <span class="s2">**restore all sensor settings to their factory defaults**</span>.

This is useful if many settings or Custom Variables have been adjusted and you want to quickly return the sensor to its original standard behaviour.

![screen-reset.png](https://docs.camtraptions.com/uploads/images/gallery/2025-10/scaled-1680-/screen-reset.png)

#### **Performing a Reset**

1. <span class="s1">Navigate to the </span>**Custom Variables (C Var)**<span class="s1"> menu.</span>
2. Continue scrolling using the <span class="s1">**Right Arrow**</span> until you reach the <span class="s1">**“reset”**</span> screen. 
    - <span class="s1">The word </span>**“reset”**<span class="s1"> will appear </span>**without blinking**<span class="s1">.</span>
3. Press the <span class="s1">**Up**</span> or <span class="s1">**Down**</span> button once — the word <span class="s1">**“reset”**</span> will begin <span class="s1">**blinking**</span>, indicating that the reset function is armed.
4. Press the <span class="s1">**Set**</span> button to confirm. 
    - The text <span class="s1">**“reset”**</span> will disappear.
    - The <span class="s1">**clock symbol**</span> will blink for approximately <span class="s1">**3 seconds**</span>, indicating the reset is in progress.
    - When complete, the sensor will automatically return to the <span class="s1">**Home Screen**</span>.

#### **Cancelling a Reset**

If, while <span class="s2">**“reset”**</span> is blinking, you press <span class="s2">**Left**</span> or <span class="s2">**Right**</span> instead of <span class="s2">**Set**</span>, the screen will move back to the previous or next C Var setting, and <span class="s2">**no reset will be performed**</span>.

#### **Notes**

- Resetting the sensor restores <span class="s1">**all user-configurable options**</span> (including Global, Still, Video, and Custom Variable settings) to their <span class="s1">**factory defaults**</span>.
- The <span class="s1">**firmware version**</span> remains unchanged.
- After performing a reset, it’s recommended to review your key configuration settings (e.g., wireless channel, mode, and time) before redeploying the sensor.

# Maintenance and Care

This section covers best practices for maintaining the sensor’s performance and reliability. Topics include weatherproofing, cleaning, and firmware updates — ensuring your equipment remains dependable in harsh field environments.

# Weatherproofing

The Camtraptions PIR Sensor v4 is built for reliable operation in demanding outdoor conditions. However, regular checks and care are essential to maintain its weather resistance and ensure dependable long-term performance.

#### **1. Check and Clean Seals**

The main seal around the <span class="s2">**battery door**</span> is critical to maintaining a watertight enclosure.

- Ensure the seal and its contact surface are <span class="s1">**clean and free from vegetation, debris or grit**</span> before closing the door.
- Inspect the seal periodically for <span class="s1">**wear, cracking, or deformation**</span>.
- If a seal is damaged, it should be replaced. <span class="s1">**Replacement seals**</span> can be obtained by contacting <span class="s1">**Camtraptions Support**</span>.

#### **2. Protect Unused Openings**

All external ports and access points should be securely sealed when not in use.

- Ensure the <span class="s1">**weatherproof rubber caps**</span> covering the <span class="s1">**power and camera signal sockets**</span> are firmly fitted to prevent moisture or dirt ingress.
- Check that the <span class="s1">**SD card bung**</span> (located beneath the right-hand flap) is fully inserted after use to protect the memory card slot.
- Replacement caps and bungs are available from <span class="s1">**Camtraptions**</span> if any are lost or damaged.

#### **3. Use Silica Gel**

In all environments, but particularly in <span class="s2">**wet or humid conditions**</span>, it is recommended to place a <span class="s2">**small sachet of silica gel**</span> inside the <span class="s2">**battery compartment**</span>. There is space beside the battery for this purpose.

- The silica gel will <span class="s1">**absorb residual moisture**</span> introduced when the door is opened (for example, during battery changes) and helps prevent internal condensation.
- Any small silica sachet that fits can be used, though <span class="s1">**Camtraptions 1 g individually sealed sachets**</span> are ideal for this application.
- Replace the sachet every **4-8 weeks in humid climates** or every 3-6 months in temperate conditions. Replace the sachet more often if the battery door is being frequently opened.

This simple precaution can significantly enhance the <span class="s2">**longevity and reliability**</span> of the sensor in challenging climates.

#### **4. Avoid Submersion or Flood Risk**

The sensor is <span class="s2">**weather-resistant but not waterproof**</span>. It is not designed to be submerged and should not be deployed in locations where it could be flooded — for example, in areas prone to <span class="s2">**rising water, heavy runoff, or riverbank overflow**</span>. Always mount the sensor in a position where it remains above likely water levels.

#### **5. Freeze-thaw Precautions**

In cold, wet environments, water could accumulate in the seam between the battery door and the main enclosure body. If temperatures drop below freezing, this water can **turn to ice and expand**, placing pressure on the door latch and potentially compromising the seal.

To minimise this risk, you can apply a **wide strip of waterproof tape** around the door joint—running from one lower corner of the enclosure, across the top of the latch, and down to the opposite lower corner. This simple precaution helps prevent water from pooling in the seam, reducing the likelihood of freeze-related damage during cold, wet deployments.

![tape.png](https://docs.camtraptions.com/uploads/images/gallery/2025-11/scaled-1680-/tape.png)

# Firmware Update

The Camtraptions PIR Sensor v4 supports <span class="s1">**firmware updates**</span> via microSD card. This allows new features, improvements, and bug fixes to be installed easily by the user without returning the sensor for servicing.

This manual applies to firmware version {{@0tag:Firmware Version}}. Check the sensor's current firmware version by navigating to the **Home Screen** and holding down the **right arrow** button for 2 seconds. If necessary, you can update the firmware by following the instructions below.

#### **Downloading Firmware**

The latest firmware releases can be downloaded from the <span class="s1">**Camtraptions website**</span>:

**[camtraptions.com/resources/pir-v4/](https://www.camtraptions.com/resources/pir-v4/)**

Each firmware version will include a short description of changes.

#### **Preparing the microSD Card**

To perform a firmware update, you will need a <span class="s1">**microSD memory card**</span> *(not supplied)*.

- <span class="s1">The card must be </span>**formatted in FAT32**<span class="s1"> and </span>**no more than 32 GB in total capacity.**
- Copy the two downloaded firmware files directly into the <span class="s1">**root directory**</span> of the card — do not place them inside a folder or rename it.

![sdcontents.png](https://docs.camtraptions.com/uploads/images/gallery/2025-11/scaled-1680-/Glzsdcontents.png)

#### **Inserting the microSD card**

You may find it helpful to use a pair of thin-nose pliers to insert the SD card into the sensor. The card slot is located beneath the right-hand flap on the side of the sensor. Remove the bung and insert the SD card so that the edge of the card is flush with the edge of the board.

![microsdbung.png](https://docs.camtraptions.com/uploads/images/gallery/2025-10/scaled-1680-/microsdbung.png)

![microsdcarddiagram.png](https://docs.camtraptions.com/uploads/images/gallery/2025-11/scaled-1680-/microsdcarddiagram.png)

It is possible to accidentally drop the microSD card into the sensor. If this happens then just turn it over and shake it until the card falls out again.

#### **Installing the Firmware**

1. Ensure a <span class="s1">**fully charged battery**</span> is installed in the sensor.
2. Insert the prepared <span class="s1">**microSD card**</span> into the <span class="s1">**card slot**</span> beneath the right-hand flap.
3. <span class="s1">**Hold the Down button**</span> while switching the sensor <span class="s1">**on**</span> to begin the update process.
4. The screen will not display anything but the **red** indicator light on the front of the sensor will turn on and shine **constantly** to indicate that the update is underway.
5. Wait approximately <span class="s1">**30 seconds**</span> while the firmware updates.
6. When complete, the <span class="s1">**front LED**</span> will blink briefly to confirm the update has finished successfully. The sensor's LCD screen will automatically turn on.
7. You can now remove the microSD card carefully using thin-nose pliers and re-insert the rubber card slot bung, making sure it is fully seated.

<p class="callout warning">Do <span class="s1">**not**</span> remove the battery or power during the update process, as this could interrupt installation and corrupt the firmware.</p>

<p class="callout info">If the microSD card is not inserted correctly (or not inserted at all) and the update procedure is commenced using the sensor's keypad, then the red LED will **flash** rapidly to indicate an **error**. To resolve this, remove the battery from the sensor to turn it off, then make sure the microSD is **correctly inserted** before re-attempting the firmware update procedure.</p>

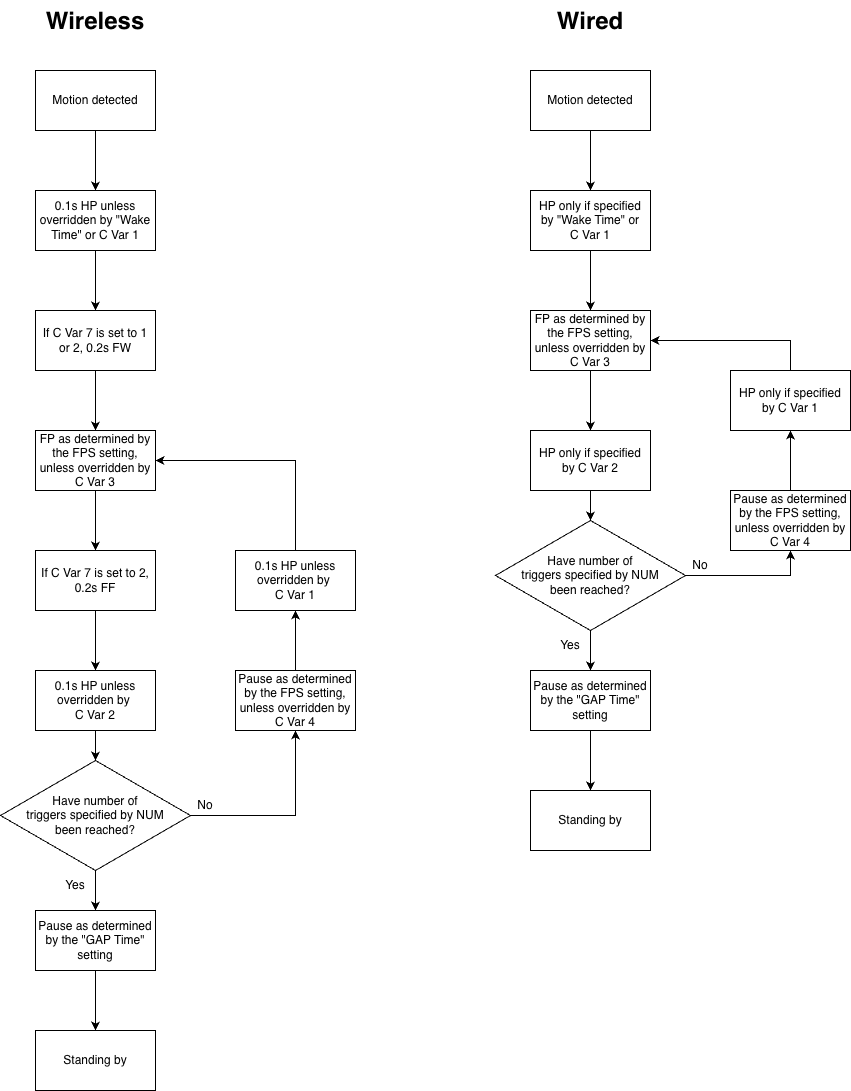
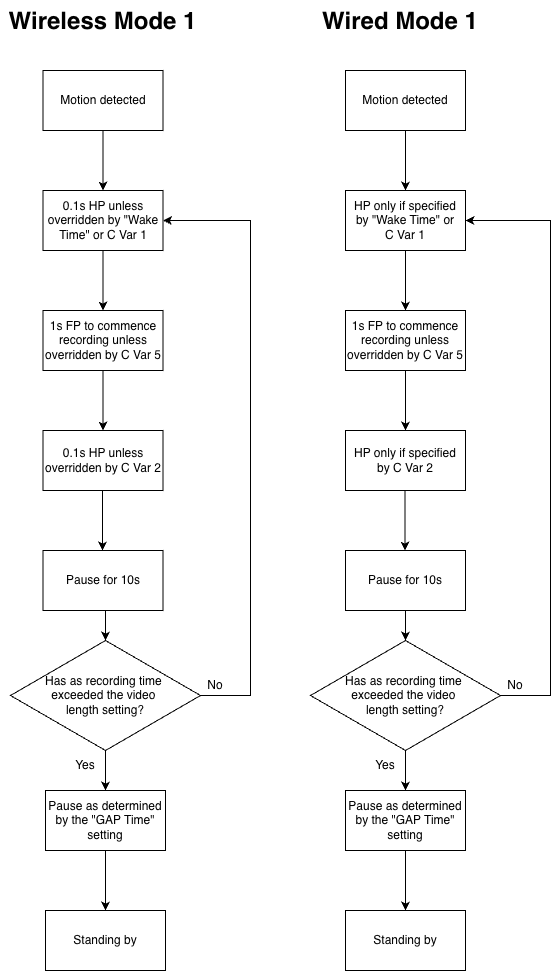
#### **Verifying the Update**

To confirm the update was successful:

1. From the <span class="s1">**Home Screen**</span>, <span class="s1">**hold the Right button**</span> to display the new firmware version.
2. Check that the displayed version matches the firmware file you installed.

If the version number does not match or the sensor does not boot normally, repeat the update process using a freshly formatted microSD card.

# Reference

The Reference section compiles technical data, timing charts, and specifications. It serves as a quick lookup guide for signal sequences, variable definitions, and voltage tables — useful for troubleshooting and advanced configuration work.

# Stills Sequence Timings

These flowcharts outline the sequence of operations when the sensor is set to <span class="s1">**Still Mode**</span>, for both Wireless and Wired outputs, including all optional timing adjustments via menu settings and <span class="s1">**Custom Variables (C Vars)**</span>.

<details id="bkmrk-wireless-and-wired"><summary>Stills Mode</summary>

<div drawio-diagram="35"><img src="https://docs.camtraptions.com/uploads/images/drawio/2025-10/drawing-1-1761573289.png" alt=""/></div>

</details>### **Signal Key**

<table id="bkmrk-abbreviation-meaning" style="width: 100%;"><thead><tr><th style="width: 16.329%;">**Abbreviation**

</th><th style="width: 18.2221%;">**Meaning**

</th><th style="width: 65.4489%;">**Description**

</th></tr></thead><tbody><tr><td style="width: 16.329%;">**HP**

</td><td style="width: 18.2221%;">**Half-Press**

</td><td style="width: 65.4489%;">A half-press signal sent to the camera to wake it, initiate autofocus, or prepare flashes before a capture.

</td></tr><tr><td style="width: 16.329%;">**FP**

</td><td style="width: 18.2221%;">**Full-Press**

</td><td style="width: 65.4489%;">A full-press signal that triggers the camera’s shutter release or starts/stops video recording.

</td></tr><tr><td style="width: 16.329%;">**FW**

</td><td style="width: 18.2221%;">**Flash Wake**

</td><td style="width: 65.4489%;">A signal sent to compatible wireless flash units to wake them from sleep before firing.

</td></tr><tr><td style="width: 16.329%;">**FF**

</td><td style="width: 18.2221%;">**Flash Fire**

</td><td style="width: 65.4489%;">A signal sent to trigger compatible flashes at the moment of exposure.

</td></tr></tbody></table>

### **Notes – Still Mode**

- **Flash Control (C Var 7 / 8):** Enables the sensor to wake or fire flashes independently of the camera (useful for systems like Sony that lack flash-wake signals).
- **Time Windows:** Sequence only operates within defined On Time periods; outside these times, motion is ignored.

# Video Sequence Timings

These flowcharts outline the sequence of operations when the sensor is set to <span class="s1">**Video Mode**</span>, for both Wireless and Wired outputs, including all optional timing adjustments via menu settings and <span class="s1">**Custom Variables (C Vars)**</span>.

<details id="bkmrk-mode-1"><summary>Mode 1</summary>

<div drawio-diagram="36"><img src="https://docs.camtraptions.com/uploads/images/drawio/2025-10/drawing-1-1761573425.png" alt=""/></div>

</details><details id="bkmrk-mode-2"><summary>Mode 2</summary>

<div drawio-diagram="113"><img src="https://docs.camtraptions.com/uploads/images/drawio/2025-11/drawing-1-1764246578.png" alt=""/></div>

</details><details id="bkmrk-mode-h"><summary>Mode H</summary>

<div drawio-diagram="38"><img src="https://docs.camtraptions.com/uploads/images/drawio/2025-10/drawing-1-1761573572.png" alt=""/></div>

</details>### **Signal Key**

<table id="bkmrk-abbreviation-meaning" style="width: 100%;"><thead><tr><th style="width: 16.329%;">**Abbreviation**

</th><th style="width: 18.2221%;">**Meaning**

</th><th style="width: 65.4489%;">**Description**

</th></tr></thead><tbody><tr><td style="width: 16.329%;">**HP**

</td><td style="width: 18.2221%;">**Half-Press**

</td><td style="width: 65.4489%;">A half-press signal sent to the camera to wake it or initiate autofocus.

</td></tr><tr><td style="width: 16.329%;">**FP**

</td><td style="width: 18.2221%;">**Full-Press**

</td><td style="width: 65.4489%;">A full-press signal that triggers the camera’s shutter release or starts/stops video recording.

</td></tr></tbody></table>

### **Notes – Video Mode**

- **EXT Mode:** Extends recording if motion continues; use C Var 6 to impose a maximum video length limit.
- **Time Windows:** Sequence only operates within defined On Time periods; outside these times, motion is ignored.

# Battery Voltage Tables

#### **1. NP-F-Type Lithium-Ion Battery**

*(Nominal voltage: 7.4 V)*

<table id="bkmrk-voltage-%28v%29-approx.-"><thead><tr><th>**Voltage (V)**</th><th>**Approx. Remaining Capacity**</th></tr></thead><tbody><tr><td>8.4 V</td><td>100 % (Fully charged)</td></tr><tr><td>8.2 V</td><td>90 %</td></tr><tr><td>8.0 V</td><td>80 %</td></tr><tr><td>7.8 V</td><td>70 %</td></tr><tr><td>7.6 V</td><td>60 %</td></tr><tr><td>7.4 V</td><td>50 %</td></tr><tr><td>7.2 V</td><td>40 %</td></tr><tr><td>7.0 V</td><td>30 %</td></tr><tr><td>6.8 V</td><td>20 %</td></tr><tr><td>6.6 V</td><td>10 %</td></tr><tr><td>≤ 6.4 V</td><td>Battery nearly depleted — recharge recommended</td></tr></tbody></table>

#### **2. Six AA Alkaline Batteries**

*(Nominal combined voltage: 9.0 V)*

<table id="bkmrk-voltage-%28v%29-approx.--1"><thead><tr><th>**Voltage (V)**</th><th>**Approx. Remaining Capacity**</th></tr></thead><tbody><tr><td>9.3 V</td><td>100 % (Fresh batteries)</td></tr><tr><td>9.0 V</td><td>90 %</td></tr><tr><td>8.7 V</td><td>80 %</td></tr><tr><td>8.4 V</td><td>70 %</td></tr><tr><td>8.1 V</td><td>60 %</td></tr><tr><td>7.8 V</td><td>50 %</td></tr><tr><td>7.5 V</td><td>40 %</td></tr><tr><td>7.2 V</td><td>30 %</td></tr><tr><td>6.9 V</td><td>20 %</td></tr><tr><td>6.6 V</td><td>10 %</td></tr><tr><td>≤ 6.3 V</td><td>Batteries depleted — replace soon</td></tr></tbody></table>

#### **3. Six AA Ni-MH Rechargeable Batteries**

*(Nominal combined voltage: 7.2 V)*

<table id="bkmrk-voltage-%28v%29-approx.--2"><thead><tr><th>**Voltage (V)**</th><th>**Approx. Remaining Capacity**</th></tr></thead><tbody><tr><td>8.4 V</td><td>100 % (Fully charged)</td></tr><tr><td>8.2 V</td><td>90 %</td></tr><tr><td>8.0 V</td><td>80 %</td></tr><tr><td>7.8 V</td><td>70 %</td></tr><tr><td>7.6 V</td><td>60 %</td></tr><tr><td>7.4 V</td><td>50 %</td></tr><tr><td>7.2 V</td><td>40 %</td></tr><tr><td>7.0 V</td><td>30 %</td></tr><tr><td>6.8 V</td><td>20 %</td></tr><tr><td>6.6 V</td><td>10 %</td></tr><tr><td>≤ 6.4 V</td><td>Recharge required</td></tr></tbody></table>

# Specifications

- Detection Type: Dual PIR (Far and Wide sensors)
- Field of View: Far ≈ 10° horizontal &amp; vertical | Wide ≈ 60° horizontal, 4.5° upward, 13.5° downward
- Power: NP-F lithium-ion battery (up to 60mm in height), 6 × AA (with adapter), or 4–12V DC input
- Trigger Output: Wired 2.5 mm jack / Wireless transmitter
- Firmware Updates: microSD card
- Dimensions: 14.8 × 11.7 × 6.7 cm (approx.)
- Weight (excluding battery): 405g
- Mounting: Dual ¼”-20 tripod threads (compatible with Jungle Mounts)
- Weather Resistance: Sealed construction with silica cavity (IP66)

The information in this manual corresponds to firmware version {{@0tag:Firmware Version}} of the Camtraptions PIR Sensor v4.